Course
Drains: Everything You Need to Know
Course Highlights
- In this course you will learn about drains, and why it is important for nurses to know best practices when handling them.
- You’ll also learn the basics of types of drains and drain management.
- You’ll leave this course with a broader understanding of troubleshooting drain problems, and risks associated with drain usage.
About
Contact Hours Awarded: 2.5

Course By:
Meghan Jenkins
MSN, APRN

Begin Now
Read Course | Complete Survey | Claim Credit
➀ Read and Learn
The following course content
Drains are often placed in patients to allow for drainage of a site. The most common indications for drains are to evacuate abscesses, infections, and/or excess fluids . Nurses caring for patients with drains are often intimidated and overwhelmed. In this CE course you will learn all about drain management so you can provide excellent care to your patients.
Introduction
Picture this: you walk into your hospital unit, fresh off a good night’s sleep. You find your patient assignment and head over to get report. Then the outgoing nurse says something that makes your heart skip a beat. “This patient has an abscess drain. You need to flush it every X hours, record the output every X hours, call the doctor if __ happens…” Before long, your head is spinning, and then you realize you’ve been spelling ‘abscess’ incorrectly for who knows how long! You think to yourself “I really need to learn more about these drains!”
Drains can be intimidating, especially with little to no prior experience in drain management. They often come with a specific set of instructions that can be somewhat confusing. What’s worse, a patient may suffer a serious delay in recovery if something goes wrong. Nobody wants to be the one to make that call to the doctor about a malfunctioning drain. Fortunately, like anything else, managing drains becomes much easier with experience and a little education.
Types of Drains
A patient may require drain placement for various reasons. Often, they are placed at the end of a surgery or percutaneously to help eliminate any fluid that may accumulate within the wound. A common type of surgical drain is the Jackson-Pratt ® . Certain organs may require a drain to assist with the removal of their contents, such as foley catheters or nasogastric tubes. Drains may also be placed to help remove fluid or air from body cavities. A chest tube is a good example of this type of drain. Finally, if a patient develops an abscess, a drain is often required to help remove the infected fluid more quickly.
Drains serve a very important purpose (other than driving the patient and their nurses crazy). The accumulation of fluid in the wrong place can have a detrimental effect on the patient’s health and healing (1). Excess fluid in the surgical site can cause significant pain as well as injury to surrounding tissues and organs (1). It can also increase the chance of infection (1).
Medical drains can be divided into multiple categories.
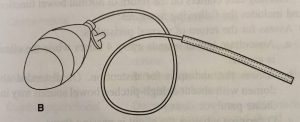
Drains are often described as being active or passive. Passive drains allow use gravity to help remove excess fluid, without needing additional pressure (2). An example of a passive drain would be placing a foley catheter to gravity or using a penrose drain. A penrose drain is a relatively flat, ribbon-like tube that creates a passage from a wound to the open air, which allows any excess fluid to simply flow outward (2). The area surrounding the opening is often lightly covered with gauze to collect fluid as it drains and must be changed when saturated (2).
The following image is an example of a penrose drain (3).

Active drains use actual pressure, typically negative pressure, to help remove excess fluid from the body.
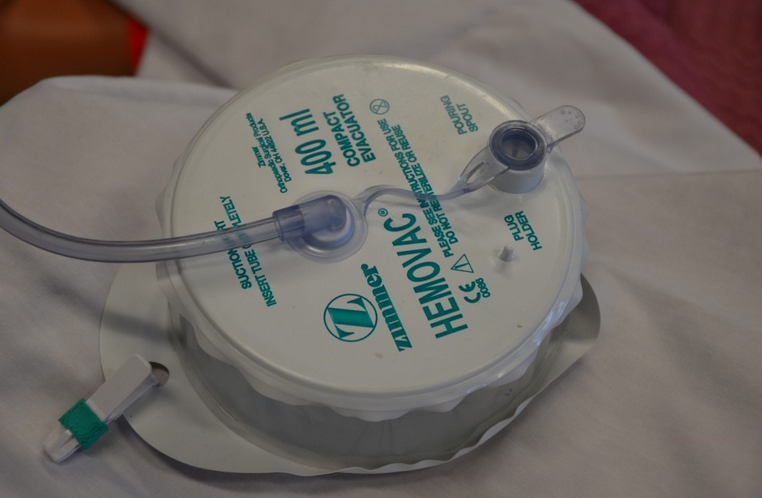
An example of an active drainage system would be a Jackson-Pratt (JP) ® drain or hemovac ®. With both types of drains, the pressure is created by compressing the collection container, which creates a low pressure vacuum that pulls the fluid out of the body (2). The following images are examples of hemovac (12) and JP ® drains (3).

Self Quiz
Ask yourself...
- Why is it important to know the different types of drains?
Open vs. Closed Drains
Drains can also be described as open or closed. An open system simply means that it is open to air. An example of an open system would be a penrose drain, as described above. A closed drain, on the other hand, is not open to the environment. Rather, the draining fluid is contained within the system, and the collection bulb or bag is simply emptied from time to time, as needed. A JP ® drain is an example of a closed drain.
Surgical vs. Percutaneous Drains
While not a technical classification, it is important to understand how the drain is placed. Surgical drains are usually positioned in the operating room or, more rarely, at the bedside by the physician. The JP ® is an example of a surgical drain.
Drains may also be placed percutaneously:
Percutaneous: (adjective) effected or performed through the skin (4)
Percutaneous drains are placed without surgical intervention. Rather, Interventional Radiologists use imaging, such as CT, ultrasound, or fluoroscopy to guide a needle into the area requiring drainage (5). This technique is generally less invasive (6). Before surgical or percutaneous insertion of a drain, the patients coagulation status and hemostasis risk must be evaluated (13).
Self Quiz
Ask yourself...
- What are the advantages of open versus closed drainage systems?
Infections 101: A Brief History of Drains
Before the advent of antibiotics, the development of an abscess or postoperative infection was often a death sentence (7). Thanks to advances in modern medicine, patients now stand a chance. In certain situations, infections can be treated with a course of antibiotics. However, if there is any concern for the development of sepsis, further intervention will be required (6).
Until the 1970s, the most effective (and only) way to treat infection and abscess was surgical intervention (7). Surgeons would attempt to remove the infected material while striving for “directness, simplicity, and above all, avoidance of unnecessary contamination of uninvolved areas” (7). Unfortunately for these patients, this meant that a second surgery was required to heal them from complications of their first surgery. Even with the addition of antibiotics, these situations were associated with significant morbidity and mortality (6).
Luckily, rapid advances in technology allowed for the development of a less invasive solution. The advent of fluoroscopy, ultrasound, and especially CTs provided physicians with a tool to see inside the body without having to cut someone open. The first studies involving the use of medical imaging for percutaneous drain placement were published in the late 1970s (7). Over the next several years, multiple studies reported success rates ranging from 60-80% using these new techniques (8).
Doctors are now able to drain up to 3 separate abscess/infection sites percutaneously (8). Recent studies report technical success of up to 90% with percutaneous drain placement, and it can offer immediate improvement in sepsis, with return to hemodynamic stability within 1-2 days (9). CT is considered the imaging modality of choice because of its ability to fully visualize the infection and surrounding structures as well as provide a pathway from the skin to the destination (9).
Self Quiz
Ask yourself...
- How has the increased use of drains altered care practices and approaches to managing abscesses?
Patient Considerations for Percutaneous Drain Placement
Not every infection or fluid collection requires percutaneous drain placement or even surgery. Thus, it is important for physicians to work together to determine the appropriate treatment for each patient individually. When a patient is found to have an abscess, multiple doctors may get involved, usually either a surgeon or interventional radiologist (sometimes both) and a clinical pharmacist if an infection is suspected or confirmed.
It is essential that providers use best practices when selecting a drain, as ineffective or incomplete drainage of the infection can lead to significant morbidity and mortality (8). For example, percutaneous drainage is sometimes avoided in patients with chest infections, such as empyema, abscess, and pleural effusion because of the risk of pneumothorax (9). Additionally, pyogenic and fungal abscesses in the lung parenchyma often resolve with more conservative management, namely through supportive care and antibiotics (9). Pancreatic abscesses remain at high risk of treatment failure with percutaneous drain placement, thus surgery is usually still the intervention of choice (9).
Conversely, there are many types of abscesses that respond well to percutaneous drainage. Liver abscesses have a very low risk of complications with this type of drain placement, around 1-4% (9). It is also very effective in managing infections related to visceral perforation, which may result from Crohn’s disease, prior operations, diverticulitis, and appendicitis (9). Deep pelvic abscesses respond well to percutaneous drainage, although these can be more challenging and require careful planning because of the presence of nearby organs (9).
Percutaneous drainage is often considered for patients who are too ill for surgery, in the hopes that it may improve sepsis and promote increased strength/rest (8). It is also recommended for patients who have a good response to antibiotics and low risk of mortality.
Self Quiz
Ask yourself...
1. Deciding who may benefit from a drain and who needs conservative therapy is difficult and nuanced.
2. Should medical interventions be initiated while awaiting drain placement?
Image-Guided Drainage: How Does it Work?
When first contemplating percutaneous drainage, doctors must first decide which modality to use: fluoroscopy, ultrasound, or CT. As mentioned previously, CT is most often used to guide drain placement because of its superior visualization.
The interventional radiologist will typically review any available imaging beforehand to plan the most appropriate route for drain placement. Care must be made to avoid major vessels and other important structures (6). To minimize the risk of complications, physicians are advised to use the safest, most direct route and attempt placement in the most dependent part of the fluid collection to encourage effective drainage (6).
Once the patient is properly positioned on the table, the physician will use the CT, ultrasound, or X-ray to guide the placement of a special needle, taking frequent pictures to monitor its progression from the skin through soft tissue and into the infection (6). Once the needle is in place, a wire is passed through the needle into the fluid collection and then the needle is removed, leaving only the wire in place.
Next, a drainage catheter is threaded across the wire to its final resting place. The tip of the catheter rests within the fluid collection. The drainage catheter contains holes to help fluid pass out of the body. Once the tube is in place, the wire is removed and a drainage bag is attached. Throughout the procedure, images are taken to ensure correct placement. Patients are often given moderate sedation to make them more comfortable, but not in every case.
Drain Management
Care for the patient with a drain can seem intimidating, but it doesn’t have to be. Often, the physician will write orders to guide nursing staff while caring for these patients. Drain management may also differ depending on what type of drain the patient has. If there are no orders it is reasonable to contact the physician who placed the drain for clarification.
Surgical Drains
Two of the more common types of surgical drains are the hemovac ® or JP ® drain. As mentioned previously, both of these drains are active, closed systems, meaning they use negative pressure to help remove excess fluid from a surgical wound, all of which is stored within the collection device.
When managing JP ® or hemovac ® drains, it is important to note the color of the drainage fluid. The fluid is typically bloody or purulent at first, but should gradually lighten to a light pink, clear, or yellow color (10). Indications for removal may vary, but in general, these drains remain in place until the daily output decreases to less than 30 ml (10).
Follow any written instructions provided by the ordering physician. Nursing will also be responsible for emptying the drain, observing the site and documenting findings. The drain should be emptied no later than when it becomes half full, as it will lose suction and become ineffective (2). Observe the insertion site for drainage and signs of infection. Be sure to keep the skin clean. Sometimes these drains are sutured in place. The drains should be further secured with medical adhesive or pinned to the patient’s gown with a safety pin to secure the drains before mobilizing and to avoid accidental removal.
Percutaneous Drains
Percutaneous drains usually look a little bit different. The interventional radiologist uses a special type of drainage tube that is also sometimes called a ‘pigtail’. These tubes do not always have to be sutured in place, for they may contain a string that, when pulled, curls the distal end of the tube, making it a bit harder to pull out. They are then usually adhered to the skin with a dressing.
Again, it is important to note the color of the drain output. Keep in mind that percutaneous drains are often used for abscess or infection, meaning fluid will be purulent and/or bloody. Check for any specific written instructions for drain management. Monitor the drain site regularly for signs of infection or drainage. Empty the drainage bag as directed or as needed and document findings. These drains may also use a collection bag that applies suction through negative pressure.
Percutaneous abscess drains are more likely to require flushing because the purulent drainage can be thick and pose a risk for occluding the drain. They may be equipped with a three-way stopcock to allow for easy flushing.
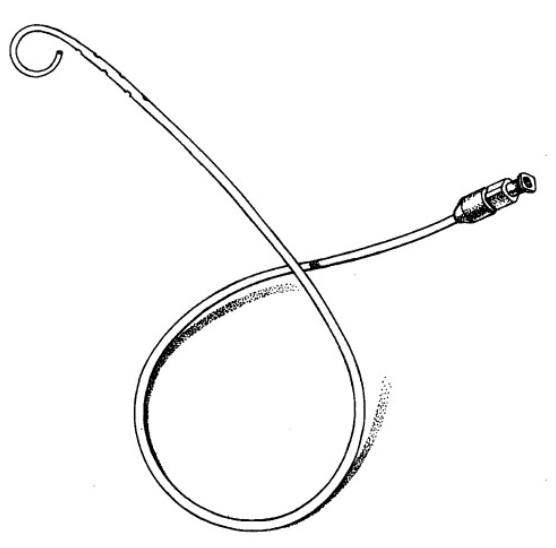
(French pigtail catheter [Cook Inc., Bloomington, IN; C-PCS-830-LOCK]).
Self Quiz
Ask yourself...
- Image guidance has revolutionized drain placement. Don’t you think?
- What are the advantages of surgical drains and what is their role currently?
How to Flush a Drain Using a Three-way Stopcock
The first step is to review all orders and become familiar with policies regarding flushing a drain. In most cases, flushing requires an order from the provider as they are the ones that determine whether flushing is needed or not based on assessment findings and recent imaging results. And some facilities do not allow nurses to flush at all! They require the provider to do it.
Once you have double-checked everything, you can proceed.First gather some supplies: gloves, an alcohol pad, “dead end” cap or clave, clean pad/towel, and saline flush syringes. Prepare by applying gloves and laying out a clean towel or pad underneath to create a workspace and catch any drainage. Flushing a drain is usually painless, but advise patients that they may feel a little discomfort.
Take a look at the figure below (11). This is an example of a three-way stopcock. It has three different ports and an “off switch” that swivels. Whichever direction the off switch is pointing to closes that port so fluid cannot flow. In the example provided, the switch is closed to the patient, meaning that fluid cannot pass into the bag.
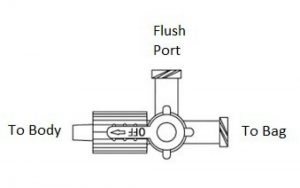
Step 1. Find the Flush Port
To flush the drain, find the flush port located on the stopcock. It should be pretty easy to spot, as it is usually the only port that is free (since one end of the stopcock is connected to the actual drain tube, the other to the drain bag). The flush port should be capped with either a “dead end” cap or a clave. If there is a dead end cap, it will have to be removed, since saline cannot be flushed through. If a clave is present, the saline syringe can be screwed in directly.
Step 2. Prepare the Flush Port
Next, turn the off switch so it is pointing toward the flush port, if it isn’t already. This will close the flush port or “turn it off” so that drainage cannot leak out. If a dead end cap is present, remove it. Wipe the flush port with an alcohol pad and attach a new, sterile clave, if available. Claves make future flushing much easier because the flush syringe can be attached directly. If a clave is already present, wipe it thoroughly with an alcohol pad.
Step 3. Prepare the Saline
Attach a saline syringe to the flush port. 5-8 ml is usually plenty. If the ordering physician wrote specific instructions on how much saline to infuse, follow the directions closely. The off switch will have to be turned before flushing is possible. At this point, the switch is facing the flush port, which prevents fluid from exiting or entering. The attached saline simply will not flush, no matter how hard the plunger is pushed.
Step 4. Flush the Drain
Saline can be flushed either into the drain or into the bag, depending on which way the off switch is turned. To flush the drain itself, a nurse would have to direct the saline toward the patient. This means the off switch needs to be turned toward the bag. The bag is now “off” and won’t get any flow, allowing saline to travel through the flush port and up the drain into the patient. Once the saline is flushed, turn the off switch back to the flush port. This will reopen flow into the bag. The saline that was just infused should now travel freely through the drainage tube and into the bag. Observing this allows the nurse to know that the tube is draining correctly.
Sometimes the contents of the abscess can be thick or contain particles that can clog the tube leading to the bag. Thus, the drain bag may also need to be flushed. Simply follow the same steps listed above, only, instead of turning the off switch to the bag, it should be turned to the patient. This will prevent flow from entering the drainage tube, leaving a pathway from the flush port into the drain bag. The nurse should be able to see the saline traveling into the bag. Once the bag is flushed, return the off switch to face the flush port. This allows for an open pathway from the drain into the bag.
Step 5. Assess the Drain
After flushing, it is important to note any patient discomfort, as well as document how much saline was flushed.
Before leaving the bedside always ensure that the off switch on the stopcock is turned toward the flush port. This will allow drainage to flow seamlessly from the patient into the bag.
Note that not all drains are meant to be flushed, especially those that do not contain a flush port and/or three-way stopcock. Never flush a drain without a provider’s order. Do not attempt to flush a drain if you suspect it has been pulled away from its original position.
Properties of a Well-Functioning Drain
Since humans lack x-ray vision, the inner workings of a drain can seem a little mysterious. What is going on in there? How can a nurse know if it is doing what it is supposed to do? Repeat imaging (CT, ultrasound, etc.) is the best way to visualize how infections and abscesses change over time. However, it is costly and unnecessary to expose patients to extra radiation as a matter of curiosity.
To get some idea of how a drain is functioning, we have to look at the drain itself. Even though drains may look different, they function in similar ways, thus these considerations can be applied to both surgical and percutaneous drains.
Output
The hallmark of a well-functioning drain is output. The purpose of a drain is to get fluid out of the body. Therefore, if the collection bag/bulb is capturing drainage fluid, this is a good indication that it is working correctly. Remember that the fluid is often bloody at first, but should lighten over time. The drainage from an abscess may also be bloody at first before appearing purulent.
Skin Site Clean/Dry
The skin at the site of a drain should be kept clean and dry (2). Minimal amounts of fluid may leak around the tube, causing crusting on the skin or a small amount of visible drainage. This can be gently wiped away with clean gauze soaked with normal saline or warm, soapy water (10). Apply a fresh clean gauze at the site to protect the skin from breakdown (10). If a large amount of drainage is leaking from the skin and around the tube, this is not normal and should be addressed.
Stopcock in the Proper Position
Ensuring that the three-way stopcock (if present) is in the proper position is essential for proper function. The off switch should be pointing to the flush port at all times, unless the nurse is preparing to flush the drain. Turning the off switch to the flush port prevents fluid from draining outside the system and creates an open pathway from the drain into the drain bag.
Active Suction
All active drains should be monitored closely to ensure that the bulb or accordion is adequately compressed (2). Constant negative pressure must be maintained in order for the drain to work. To compress a JP, use the “side-in method” where the nurse compresses the JP bulb at its largest diameter (in the middle) with fingers and thumb to compress the bulb (14). The drain should be emptied when it is approximately 25 percent full to maintain the pressure within the bulb (14).
These drains may require frequent assessment and emptying, especially at first. Examples of active drains include JP®, hemovac®, and most percutaneous drains.
Is this Normal? Troubleshooting Tips
Unfortunately, drains can develop complications. It is essential to know what to look for so that potential problems can be identified early. As mentioned previously, a delay in reporting or discovering a drain malfunction may cause delays in patient healing. Luckily, the problems are fairly easy to spot if you know what to look for.
Bleeding
Some bleeding is normal. The act of placing a drain may cause bleeding from nearby small vessels (9). This is usually self-limiting, which is why the nurse may note bleeding in the first hours after placement. The drainage fluid should gradually lighten in color. Prolonged bleeding or the development of new bleeding warrants a prompt call to the physician.
Leaking
A leaky drain can be messy business. If the source of the leak is not immediately known, the nurse should evaluate the drain. Assess the tubing for cracks or holes. Ensure all connections are tight. Sometimes the drainage bag/bulb may be punctured. If so, it is often easily replaced.
Leaking may also occur because the drain is occluded or kinked (2). Assess the tubing carefully for signs of obstruction. Flushing the drain can help dislodge occlusions. Again, never flush a drain without ana ctive order. If flushing with saline fails to clear the occlusion, tissue plasminogen activator (TPA) may be ordered by the provider. This is administered via the drainage tube.
A drain may also leak at the skin. Minimal amounts of leakage can be expected because the drain creates a track for small amounts of fluid to escape. Moderate to severe leakage can cause skin breakdown and is not normal. It suggests that the drain is malfunctioning in some way, often due to an occlusion or displacement of the drain. Fluid travels the path of least resistance. If it can’t pass easily through the tube, it will find another way out. Notify the physician, who may order follow up imaging, like a CT scan. If a percutaneous drain is leaking, the patient may have to be sent down to interventional radiology for assessment and possible replacement.
No Output
Drain output may cease for two reasons: there is no more fluid or the fluid can’t get out. It is easy to assume the former. Yet, when faced with a drain without drainage, It is important to use critical thinking and common sense. Drainage usually tapers off, meaning it will drain a little less over time. An abrupt cessation of fluid could indicate a problem. Assess the drain for kinks or obstructions. If the drain is occluded, fluid may begin to leak around the tube at the skin. Carefully document drain output as dictated by the physician or facility protocol. Any time there is a concern, the physician should be notified.
Infection
Infection may occur with both surgical and percutaneous drains. It usually forms one of two ways: during initial drain placement or as a result of continued catheter presence (9). Infection may form during initial placement if the needle punctures a non-target area (such as the colon) or from prolonged dilation, which is why the procedure should be completed in a timely manner (9). Infections may also form at the skin if a drain is present for a long time (9).
The nurse should assess the drain site frequently. Signs of skin infection include redness, increased pain, swelling, fever, and purulent drainage (10). Additionally, sepsis is always a concern for the patient with an abscess (9). A patient with sepsis will sicken very quickly, with rapid increase in fever, chills, and rigors (9). Vital sign monitoring is essential. If the nurse suspects a new infection of any kind or deterioration, notify the physician immediately.
Displacement
Living with a drain takes some getting used to. It can be easy for patients to forget it’s there. Sometimes the tubing can become tangled up in the bed sheets or left behind when a patient stands up. Although drains come equipped with reinforcements, such as a suture or dressing to help keep the tubing in place, it is possible to pull the drain at least partially or sometimes completely out of the body.
If a drain is pulled out entirely, the nurse should cover the site with some gauze to catch any drainage. When drains are placed, they form a pathway from the abscess or infection to the skin. The tube’s job is to provide a conduit for the fluid to escape. If the tube is removed abruptly, that pathway still exists temporarily, so fluid will continue to leak out of the body in the absence of the tube. Do not attempt to put the tube back in, as it is no longer sterile. Notify the physician.
If the drain is only partially removed, reinforce the dressing as best as possible to maintain its current position and call the physician. Again, do not attempt to push the tubing back inside the patient. The physician may order imaging to assess the drain’s location (2). Removal and/or replacement may be necessary.
Self Quiz
Ask yourself...
- Managing drains can be intimidating at first. Would you agree?
- How would you troubleshoot the common issues listed here?
Summary
Drain are usally indicated to help facilitate healing after surgery or infection, assist with draining contents from affected organs, or to remove fluids that have accumulated in body cavities.
They are classified based on their function: open or closed, passive or active. Familiarity with the different types of drains gives the nurse a basic understanding of how they work- which is important because they can look very different, depending on the manufacturer.
In the old days, surgery and antibiotics were the only way to treat intra-abdominal infections. Significant advances in technology have allowed interventional radiologists to specialize in using medical imaging (CT, ultrasound, X-ray, and MRI) to place drains without making an incision. However, patient selection is still very important, and physicians must know which patients are good candidates for percutaneous drain placement and which are better off heading to the OR.
It is important for nursing staff to understand how a drain is supposed to behave when it is functioning normally so that potential problems are easier to spot. When in doubt, consult the physician. Always be aware of any written orders or policies that dictate drain management, as practices may vary from place to place.
As with anything else, the best way to become more comfortable with drains is to be around them!
References + Disclaimer
- Makama, J. G., & Ameh, E. A. (2008). Surgical drains: What the residents need to know. Nigerian Journal of Medicine: Journal of the National Association of Resident Doctors of Nigeria, 17(3), 244-50. doi: 10.4314/njm.v17i3.37389
- Knowlton, M. C. (2015). Nurse’s guide to surgical drain removal. Nursing 2015, 45(9), 59-61. doi: 10.1097/01.NURSE.0000470418.02063.ca
- Lemone, P., & Burke, K. (2008). Medical-surgical nursing(4th ed.). Upper Saddle, New Jersey: Pearson.
- Percutaneous. (2019). In Merriam-Webster Dictionary Online. Retrieved from https://www.merriam-webster.com/dictionary/percutaneous#medicalDictionary
- Wallace, M. J., Chin, K. W., Fletcher, T. B., Bakal, C. W., Cardella, J. F., Grassi, C. J., … Kundu, S. (2010). Quality improvement guidelines for percutaneous drainage/aspiration of abscess and fluid collections. Journal of Vascular and Interventional Radiology, 21(4), 431-435. doi: https://doi.org/10.1016/j.jvir.2009.12.398
- Hearns, W. C. (2012). Abscess drainage. Seminars in Interventional Radiology, 29(4), 325-336. doi 10.1055/s-0032-1330068
- Rivera-Sanfeliz, G. (2008). Percutaneous abdominal abscess drainage: A historical perspective. American Journal of Roentgenology, 191(3), 642-643. doi: 10.2214/AJR.07.3903
- Cinat, M. E., & Wilson, S. E. (2002). Determinants for successful percutaneous image-guided drainage of intra-abdominal abscess. Arch Surg., 137(7), 845-849. doi:10.1001/archsurg.137.7.845
- Lorenz, J. & Thomas, J. L. (2006). Complications of percutaneous fluid collection. Seminars in Interventional Radiology, 23(2), 194-204. doi: 10.1055/s-2006-941450
- National Institutes of Health. (n.d.) Patient education: How to care for the Jackson-Pratt drain. Retrieved from https://www.cc.nih.gov/ccc/patient_education/pepubs/jp.pdf
- St. Jude Children’s Research Hospital. (2019). Caring for a pigtail drain. Retrieved from https://www.stjude.org/treatment/patient-resources/caregiver-resources/patient-family-education-sheets/home-care-guidelines/caring-for-a-pigtail-drain.html
- (Image) Doyle, G. R., & McCutcheon, J. A. (2015). Clinical Procedures for Safer Patient Care. Victoria, BC: BCcampus. Retrieved from https://opentextbc.ca/introductiontosociology2ndedition/.
- Patel IJ, Davidson JC, Nikolic B, Salazar GM, Schwartzberg MS, Walker TG, Saad WA; Standards of Practice Committee, with Cardiovascular and Interventional Radiological Society of Europe (CIRSE) Endorsement. Consensus guidelines for periprocedural management of coagulation status and hemostasis risk in percutaneous image-guided interventions. J Vasc Interv Radiol. 2012 Jun;23(6):727-36. do: 10.1016/j.jvir.2012.02.012. Epub 2012 Apr 17. PMID: 22513394.
- Mamuyac, E. M., Pappa, A. K., Thorp, B. D., Ebert, C. S., Jr, Senior, B. A., Zanation, A. M., Lin, F. C., & Kimple, A. J. (2019). How Much Blood Could a JP Suck If a JP Could Suck Blood? The Laryngoscope, 129(8), 1806–1809. https://doi.org/10.1002/lary.27710
Disclaimer:
Use of Course Content. The courses provided by NCC are based on industry knowledge and input from professional nurses, experts, practitioners, and other individuals and institutions. The information presented in this course is intended solely for the use of healthcare professionals taking this course, for credit, from NCC. The information is designed to assist healthcare professionals, including nurses, in addressing issues associated with healthcare. The information provided in this course is general in nature and is not designed to address any specific situation. This publication in no way absolves facilities of their responsibility for the appropriate orientation of healthcare professionals. Hospitals or other organizations using this publication as a part of their own orientation processes should review the contents of this publication to ensure accuracy and compliance before using this publication. Knowledge, procedures or insight gained from the Student in the course of taking classes provided by NCC may be used at the Student’s discretion during their course of work or otherwise in a professional capacity. The Student understands and agrees that NCC shall not be held liable for any acts, errors, advice or omissions provided by the Student based on knowledge or advice acquired by NCC. The Student is solely responsible for his/her own actions, even if information and/or education was acquired from a NCC course pertaining to that action or actions. By clicking “complete” you are agreeing to these terms of use.
➁ Complete Survey
Give us your thoughts and feedback
➂ Click Complete
To receive your certificate