Course

2022 North Carolina Renewal Bundle

Course Highlights


  • In this course you will learn about a number of topics that concern modern day nursing.
  • You’ll also learn the basics of essential best practices and procedures.
  • You’ll leave this course with a broader understanding of what it takes to be a nurse.

About

Contact Hours Awarded: 30

Course By:
Multiple Authors

Begin Now

Read Course  |  Complete Survey  |  Claim Credit

Read and Learn

The following course content

In this course, we will cover the variety of nursing topics listed in the course outline below. This course fulfills the North Carolina Board of Nursing’s requirements needed for license renewal. Upon completion of this single module, you will receive a certificate for 30 contact hours.

 Course Outline

  1. The State of the Nursing Profession
  2. Nursing Documentation 101
  3. Flu Treatment, Symptoms, and Red Flags
  4. Measles
  5. Childhood Asthma Treatment and Prevention
  6. Nursing Interventions for Sepsis: Fluid Management
  7. One Hour Sepsis Bundle
  8. Chest Tubes Nursing Care
  9. Drains: Everything You Need to Know
  10. Transaortic Valve Replacement (TAVR) Nursing Care
  11. Liver Transplant Nursing Care
  12. Effective Communication in Nursing
  13. Alzheimer’s Nursing Care
  14. References

The State of the Nursing Profession


Introduction: Issues Faced By Modern Day Nurses

Nurses have been treating patients for as long as illness has been afflicting humans. The history of nursing is a long and at times, difficult story that most of us can sympathize deeply with. What other profession has both relieved the burden of disease while also carrying a portion of the burden themselves? Every nurse knows that bond forged between a patient and nurse is sacred and highly unique. The nurse allows the patient to cast his or her pain, suffering, and worries upon them. They do so willingly and return to them comfort, peace, and care.

Nurses also hold a unique position within healthcare. What other profession does so much and has such an impact on patient care? Bedside nurses deliver the vast majority of treatments, perform the majority of assessment and in today’s profession they are becoming increasingly responsible for treatment decisions. Bedside nurses are no longer handmaidens and water fetchers. Today’s bedside nurse is a highly competent, trained professional with an expansive knowledge base. It is not uncommon to see experienced nurses training residents, fellows, and at times, attending physicians. The line between nursing and medicine is becoming blurred as nurses continue to advance and grow into their profession. On a given day you may see Nurse Practitioners and Nurse Anesthetists performing highly complex procedures such as endotracheal intubation, central line placement, chest tube placement, and even diagnostic cardiac catheterization in some facilities!

However, this growth has not come without its own growing pains. In this lesson we will discuss some challenges and issues that are unique to modern day nurses and potential solutions.

Nursing Burnout

From ambulatory facilities to ICUs, everyone is working longer hours. As budgets become thin, nursing workloads become more and more stretched. The acuity of patients is higher than ever thanks to advanced medical care. It seems our profession has not kept pace with the demands of today’s patients, or rather it has not acclimated to provide an environment which fosters high level care from nurses. Indeed, many studies (1) have linked increasing levels of nursing burnout to decreased patient safety. Another study (2) found that higher levels of burnout correlated with worse patient satisfaction.

Most nurses would not be surprised by this. It is safe to say that most nurses have experienced some degree of burnout. One study (3) found that up to 35% of nurses experience signs of burnout in their roles. So what are the risk factors and protective factors for nursing burnout?

Risk Factors

  • Inpatient (hospital) work setting
  • Increasing or unreasonable workloads, which impair or impede nurses’ abilities to perform their jobs correctly
  • Increasing patient : nurse ratios
  • Negative physician-nurse relationships
  • Unsupported management

Protective Factors

  • Supportive management and environments
  • Positive physician-nurse relationships
  • Being involved in decisions affecting nursing and patient care
  • Being able to discuss new ideas openly

*Based on data from studies (1-4)

This list is by no means all-inclusive and as you can see many of the factors listed are unfortunately not uncommon. We have demonstrated that burnout is bad for patients, and it is obviously detrimental to nurses. Furthermore, we can assert that it is a threat to the entire profession. One in six nurses (5) frequently considers leaving the profession. This is no surprise to those practicing in areas at high risk for burnout. It seems that nurses leave the profession or advance their degree in order to avoid the stress of bedside nursing.

So how do we combat this issue? The first step is acknowledgement. Though the term has created quite a buzz in the healthcare world, there is little action being taken to prevent burnout. It is difficult to blame anyone given the amount of pressure healthcare systems are under as they adapt to ever-changing regulations and legislation with increasingly meager budgets. However, the author believes that without proper resource allocation the burnout epidemic will continue to grow, which will affect patients and nurses alike.

The answer is not simple. Interventions must be multi-faceted and be aimed at several levels.

Nurses’ Coping Mechanisms

We teach pilots how to deal with stressful situations as a basic aspect of their training. We have seen the effects of unchecked stress in our war veterans as the nation reels in a PTSD epidemic that is seemingly impossible to control. The nursing profession would be wise to intervene earlier. This can start with teaching nurses appropriate coping mechanisms and preparing them for the stresses they will inevitably face. A BREATHE technique (6) was developed and tested with positive results. Nurses who utilized this program and the techniques reported lower stress levels than controls. The key aspects of this course were:

  1. Assessing stress;
  2. Identifying stressors;
  3. Managing stress;
  4. Avoiding negative coping;
  5. Recognizing when professional mental healthcare is necessary.

Though these techniques cannot change the work environment or other factors, they can potentially render nurses more resistant to the effects.

Work Environments

As we have discussed, the work environment is a major factor in nursing burnout development. In order to minimize the effects of burnout, it is required that healthcare institutions identify the contributing factors and make burnout reduction a priority. This includes:

  • improving nurse:patient ratios;
  • improving nurse-physician communication/interactions;
  • creating open communication about burnout; and
  • other advocacies.

Leadership

Nursing leaders have been traditionally chosen based on experience and performance at other roles, such as bedside nursing. However, this does not directly correlate with management/leadership aptitude. It has been demonstrated that effective leadership and management (2) can reduce the burden of nursing burnout. Choosing and training effective leaders is a must for the profession of nursing.

Burnout Summary 

Burnout is without a doubt one of the great challenges of our generation of nurses. It remains under-studied and under-addressed. By educating and empowering nurses we hope to raise awareness of the issue, which is pivotal to the future of our profession and for quality patient care.

Other useful resources:


Social Media

As our world evolves, social media has become a highly personal yet public aspect of all lives, including nurses and patients. Traditional nurse-patient relationship boundaries can be blurred by social media. Most nurses have read or heard stories about nursing professionals losing their jobs or licenses due to issues stemming from social media. So what are best practices for nurses when it comes to social media?

  • Avoid posting any negative materials concerning patients, healthcare facilities or the profession in general on social media.
  • Avoid posting any material that may violate HIPAA, ethical standards, or any institutional policies.
  • Approach social media relationships between yourself and patients with a great deal of caution. Always consult with your state board of nursing, leadership, and institutional guidelines on this matter. An initiation of contact (friend request or message) by a patient does not make the action permissible.
  • Avoid taking any pictures at work that reveal patient information or that may breach any institutional policies.
  • Never discuss protected information with a patient over social media, even if you intend on disclosing this information via another route (in-person visit, phone call, etc.)


Acts of Violence Against Nurses and Healthcare Personnel

Reports of violence leading to serious harm and even death have increased in the healthcare world. Factors leading to patient agitation / violence include:

  1. Staff behavior;
  2. Patient behavior;
  3. Care settings;
  4. Waiting times.

The most common reasons reported for an eruption of violence were:

  1. Dissatisfaction with the perceived quality of care;
  2. An unacceptable comment by a staff member;
  3. Lack of staff professionalism (6).

We know that when violence erupts, both patients and staff members report having felt fear, frustration, loss of control, and pressure (7). The outcome of a violent event is not beneficial to either party. Patients may be subject to civil justice and potentially a reduced quality of care. Nurses who are attacked may suffer severe mental and physical damage; both short- and long-term (7).

It is evident that avoiding healthcare violence is in the best interest of all parties. However, the factors that lead to these situations are multi-faceted and cannot be reduced by a single measure. Let’s explore the factors surrounding violent episodes a bit more closely. Below are the results from a survey of patients who were violent with hospital staff detailing their specific complaint/trigger:

  1.  Staff behaviors: dismissive, arrogant, superiority, blunt tone of voice, mismanaged patient expectations, and poor guidance provided by healthcare staff.
  2. Patient factors: violent tendencies, feelings of sickness, anxiety, having underlying psychiatric disease, and feeling fearful.
  3. Disturbing hospital settings: uncomfortable accommodations (physically), lack of adequate staffing,  lack of transparency.

*Based on data from (7).

So how do nurses and healthcare staff go about reducing violence? The organizational factors (uncomfortable accommodations, lack of staff, etc.) will continue to agitate and provoke patients. Healthcare workers must take a position of de-escalation when tensions rise. This includes managing expectations, maintaining a  respectful and professional nature despite patient behaviors, and maintaining transparency with patients.

Behaviors to be avoided include: harsh mannerisms and tone, condescending comments (7), and healthcare workers should be focusing on de-escalation of conflict and avoid confrontation when patients become upset. Early and judicious use of security staff is also imperative in preventing serious physical harm.

Despite the best intentions of nursing staff, violent events will continue to occur. The role of the patient has changed significantly in recent years and some hypothesize this is partially to blame for the epidemic. The role of the patient has gone from “passive” and “a receiver of care” to an “empowered, knowledgeable participant in care”. However, patients often do not have the requisite knowledge to assume this role, which may lead to feelings of frustration, fear, and misunderstanding. Working collegialitywith patients and attempting to educate them at each juncture of care may help reduce these feelings.

Quiz Questions

Self Quiz

Ask yourself...

  1. How has the nursing profession changed in the last two years?
  2. What are some modern-day concerns that have directly impacted your career as a nursing professional?

Nursing Documentation 101

Introduction

“I just love charting,” said no nurse, ever. If you ask most people why they want a career in healthcare, their response is that they want to help people. They did not want to spend hours in front of a computer clicking boxes. This time-consuming task of documenting in the medical record, or charting, is dull, repetitive, and sometimes disconcerting. It takes time away from being able to provide care for the patient. Yet documentation in the medical record is truly a vital part of patient care.

Nursing documentation fills a significant portion of the medical record. Nurses need make sure what they are adding is accurate and complies with the guidelines set by their facility and the state board. This principle is the same, even though there are differences to be aware of now that the electronic medical record has become the standard.

The Who, What, When, Where, Why, and How

Who

There are approximately 2.9 million working RNs in the United states, with about 1.6 million working in hospitals (1). Nurses on a med-surg unit typically spend about one-third of their total working hours documenting (2). Considering a nurse on a med-surg floor spends about 2.5 hours per shift charting, that roughly translates into 7 billion hours spent charting each year. And that is only for the nurses!

Every discipline of the healthcare team contributes to the patient’s medical record. These different clinicians may not have the opportunity to report off to one another, and they must refer to the medical record to gather the information they need in order to care for the patient. Even kitchen staff responsible for preparing meals for patients must be able to see the dietary order for the patient.

The following are a few examples of the clinicians who contribute to or review the patient’s medical record:

  • Medical Team: physicians, nurse practitioners, physician assistants, surgeons, specialists, residents
  • Nurses and LPNs
  • Medical Assistants, CNAs, patient care assistants or technicians
  • Specialty technicians: radiology, anesthesia
  • Therapists: physical, speech, occupational, respiratory
  • Pharmacists
  • Dieticians
  • Case managers or social workers
  • Coding and billing specialists
  • Researchers

What

The primary purpose of the medical record is to communicate data about the patient and care provided between different members of the healthcare team. The bulk of the medical record is a collection of assessment data obtained from the patient. Details concerning assessments and results from lab tests or radiology comprise a large portion of the data. Assessment data is usually collected on a flow sheet system. Progress notes are written by the medical team or therapists and help to guide the intended plan of care for the patient. This is considered narrative charting. The medical record also includes orders for prescribed medications and treatments from the medical team. The following are typical components found in a patient’s medical record.

  • Patient demographics: name, age, gender, contact information, language, and insurance information
  • Past medical history: surgeries, chronic conditions, family history, allergies, and home prescriptions
  • History and Physical (H&P): this can contain information about admitting diagnosis or chief complaint and narrative of the story leading to admission
  • Flowsheet of assessment data: vital signs, head-to-toe assessment, intake and output record
  • Laboratory test results
  • Diagnostic test results: from radiology or procedures
  • Clinical notes: progress notes from the medical team, procedure notes, notes from consulting clinicians, education provided, and discharge planning
  • Treatment orders
  • Medication Administration Record (MAR)

When

The medical record should document every interaction the patient had with any member of the healthcare team. An encounter is created upon admission and everything occurring during a particular admission becomes part of the medical record. Phone calls made to patients and/or families may also become a part of the medical record.

Where

Medical records are stored in various ways, depending on their format and the facility. Paper records from small outpatient offices may be kept onsite. Records are now largely kept electronically. This is referred to as the electronic medical record (EMR) or electronic health record (EHR) and consists of Protected Health Information (PHI). They will be stored on a secure server, typically only accessible by authorized personnel.

Why

The medical record is essential to nursing documentation for several reasons. The primary reason for the medical record is that it allows members of the healthcare team the ability to review and analyze data in order to deliver appropriate care. It allows clinicians to keep track of all the care that has already been completed for the patient. It also provides the patient with a record of the treatment they received for as part of their lifetime medical history. The medical record is used for coding and creating a bill for the services the patient received. Medical records may also be used for reviewing processes and research purposes. Ultimately, it is also a legal document and may be used in a court of law as applicable.

How

Medical records are in the final stages of evolution from a paper chart to an electronic medical record system (EMR). By 2017, 96% of acute care hospitals and over 80% of physician offices possessed certified health IT (3). This migration of medical records from paper to electronic format was made possible with advances in technology over the last 30 years. The EMR allows members of the healthcare team to access the medical record instantaneously and improves continuity of care. Utilization of the EMR ultimately reduces costs in healthcare (4) and increases efficiency.

While EMR does have some drawbacks, the benefits that it provides are substantial enough that the government has encouraged its adaptation. The Health Information Technology for Economic and Clinical Health (HITECH) Act was enacted in 2009. This program provided tens of billions of dollars in financial incentives for healthcare facilities to adopt an EMR system (5,6).

Privacy and Security

Since 1996, HIPAA, The Healthcare Information Portability and Accountability Act, has been the governing legislation that provides for the privacy protection of medical records. Compliance with HIPAA mandates that anyone who interacts with patients receives training that will ensure they will maintain privacy for the patient. Part of the HIPAA legislation also allows the patient to request their medical records.

The patient also has the right to request to amend their medical record. Patient permission must be given prior to a third party’s access to their medical record (7). HIPAA legislation was introduced at the advent of EMR technology. A provision of HIPAA provided a framework to ensure privacy of electronic health records (8). However, breaches in security by hackers or cyberterrorists remains a potential threat.

Benefits of the EMR
  • Immediate data accessibility and communication of patient status
    1. Clinicians can view records remotely, analyze the findings, and place orders immediately for faster patient treatment.
    2. Multiple clinicians can view the chart at one time.
    3. Records can be viewed easily from previous admissions and/or outpatients visits easily.
    4. Records can be instantly shared between facilities (in instances of shared systems).
  • Reduction in errors
    1. Errors due to misinterpretation of handwriting in nursing documentation are eliminated.
    2. Allows for increased safety checks. The EMR can be set to flag missing components of information, tasks that were not yet completed or are overdue, recognize duplicates, and present warnings if documentation has not yet been validated or “signed.”
    3. Scanning medications is possible with EMR systems to reduce the risk of medication administration errors.
  • Assists with appropriate billing by capturing charges of services provided to the patient.
  • The EMR can provide reminders for necessity of certain preventative health screenings or vaccines.
  • Automatic “signature” of data is completed simply by the user logging in with a unique ID and password. All entries are date and time stamped. If a correction is made, the original data can be accessed.
  • Accessing patient EMR is tracked and can be audited to protect patient privacy from unnecessary viewing.
Downsides to the EMR

It is expensive to convert records system to an electronic system:

  1. The initial cost of the EMR software is very expensive
  2. More work hours must be paid for staff training and coverage of patients during initial implementation of the program
  3. Maintaining appropriate encryption and cybersecurity technology against viruses and hacking are also a costly component

Computer systems can be temporarily inaccessible, for example when updates and reboots are required. Paper charting is still necessary in the interim.

Template charting has limitations (9). Templates for nursing documentation may not exist for a specific problem and does not accurately reflect the patient’s condition. Atypical patients may have multiple problems or extensive interventions that must be documented in detail.

Templates may also encourage cloned or copied documentation. It creates unnecessary redundancy and at times inaccurate information in the EHR. Some EHR systems are designed to facilitate cloning with such popular features as:

  • “Make me the author” to assume the content of another person’s entry
  • “Demo recall” of “Duplicate Results” to copy forward vital signs or assessment data
  • “Smart phrases” pulls in specific identical data elements

Automated insertion of previous or outdated information through EHR tools, when not modified to be patient-specific and pertinent to the visit, may raise significant quality of care and compliance concerns.

Quiz Questions

Self Quiz

Ask yourself...

  1. Think about your current charting system. Visualize the ways in which the process can be improved.
  2. How does your medical records system facilitate accurate charting?
  3. Do you believe that your system is efficient?
  4. What are some issues with your system that make it difficult to chart nursing care accurately, and with timeliness?

The Legal Requirements

If it wasn’t documented, it wasn’t done. Every healthcare practitioner has had this mantra ingrained in them from the very beginning of their career. Nurses are trained to document defensively, that is, if they are taught at all.

In a 2014 study, only 20% of new graduate nurses had received electronic medical record training as a part of their nursing school curriculum (6). It is not uncommon for clinicians to have the tendency to view the medical record as a defense tool against potential legal problems, rather than its more significant role as a communication tool for patient care.

Regardless, accurate and complete documentation is essential. Your career, and more importantly, patient care, depends on it.

Quiz Questions

Self Quiz

Ask yourself...

  1. Did you receive proper training on documentation in your nursing program?
  2. How can programs be improved to better prepare nurses?

When Documentation Becomes Your Defense

In the dreaded event of a legal problem, medical records will be scrutinized to every detail. It is usually the primary source of evidence for the case. A malpractice lawsuit requires four elements to be proven (10):

  • That a medical professional assumed a duty to provide care for the patient.
  • The clinician failed to provide appropriate care within their scope of practice for the patient.
  • The failure in appropriate care caused an injury to the patient.
  • The injury resulted in damage to the patient.

Potential legal problems that may arise include the following (11):

  • Administrative liability – Professional licensure discipline and/or discharge (firing) from position.
  • Civil Liability – Malpractice lawsuit, failure to provide necessary care.
  • Criminal liability – Misdemeanor or felony charges for cases of gross negligence.

The Cost

Fortunately, medical malpractice claims have begun to drop since 2001. In 2004, the medical practitioners involved who were known as the defendants won the case 83% of the time. The legal fees can still amount to $18,000 if the case is dropped, to as much as $93,000 even when the case is won (12,13).

In 2018, there were 8,718 malpractice cases that resulted in payments to injured patients (14). Of those events, 310 reports of malpractice suits that resulted in payments related to nursing care.

However, 180 of those, about 60% of those had payments to the injured patient that were over $50,000 (14). However, there were nearly 15,000 adverse action reports filed against nurses, which was more than the number combined filed against physicians, NPs, and PAs combined.

The majority of medical malpractice cases primarily target the physician and the facility. However, anyone who made an entry into the patient’s medical record may be required to participate in legal proceedings.

Most common malpractice claims against nurses include failure to (15):

  • Follow standards of care
  1. Follow safety protocols
  2. Perform procedures according to guidelines
  3. Use equipment properly

Use or operate equipment within the manufacture’s details

  • Failure to correctly document
    1. Communication with the provider
    2. The care you completed
  • Follow assess and monitor
    1. Report a change in status of the physician
    2. Assess a patient with change in status
  • Communicate pertinent data
    1. Provide appropriate discharge education and information
    2. Communicate properly and completely between shifts
Quiz Questions

Self Quiz

Ask yourself...

  1. Think about the last difficult shift you had. Did you properly document the care you provided?
  2. How would you prioritize documentation differently after reading this module?

What is Required for Nursing Documentation?

Necessary medical record nursing documentation can vary significantly depending on the care area. For example, the documentation a circulating nurse in the operating room completes will be very different from what is documented on an emergency room patient. While the basic principles of documentation stay constant, the nurse needs to be familiar with the documentation requirements for that area based on requirements of the state board of nursing, the facility, and the unit.

There are standard requirements for medical record documentation that are applicable in all patient care settings, and in both paper and EMR systems. These standards include the following (16):

  • Accurate: Clinicians must be careful to proofread documentation to make sure it is free from errors. A small typo can have serious repercussions, as it is more likely to be misinterpreted by others.
  • Relevant, concise, organized and complete: It is important to keep the information concise and relevant so that other care providers can quickly find the pertinent information that they need. Assessment data should be entered in a systematic way. Complete documentation ensures all of the unit policies for documentation are addressed.
  • Free of bias: Clinicians should only include information that is pertinent to the care of the patient and remain free from personal bias. Direct quotations within the proper context should be utilized with proper context.
  • Factual: Clinicians should not exaggerate or minimize findings. Charting is to be completed after completing a task, not before. Do not speculate data. Observations need to include exact times and measurements. Avoid approximations. Make sure to chart on the correct patient.
  • Timely: What occurred during the shift should be documented during the shift. Documentation should be done as soon as possible after completing tasks. If something needs to be added in after the shift was completed, it should be denoted as a late entry with a reason as to why. Your facility likely has strict requirements regarding late entries.
  • Legible/decipherable and clearly written: Paper documentation must be clearly legible. Writing must clearly convey meaning.
  • Standardized: Clinicians must use appropriate medical terminology and approved acronyms and abbreviations.
  • Labeled and Auditable: Paper documentation must be signed with credentials and must include date and time of the entry. When charting in the EMR, all entries and corrections are recorded and time stamped. Password sharing or having another clinician assist in documenting under incorrect username is fraudulent.
Quiz Questions

Self Quiz

Ask yourself...

  1. Do you currently incorporate all of the above principles in your documentation?
  2. If not, how can you change your practice to improve your documentation?

Examples of Effective and Ineffective Charting

The following will show some examples of these principles in action. These are based on the scenario of a patient being admitted to the Emergency Department for chest pain.

Example of effective documentation Example of ineffective documentation
Accuracy Patient stated she took 800mg of Tylenol at 4 p.m., an hour after she began to feel chest pain. Patient reports she took pain med for chest pain.
Relevant Patient stated she has never experienced chest pain prior to this event, and does not have a history of cardiac problems. Patient was a competitive athlete 20 years ago and used to be in great shape. Patient thinks she is still pretty healthy.
Concise Vital signs taken, telemetry monitor applied, lab samples collected and PIV started per the chest pain protocol. Patient was triaged and immediately brought to exam room. In accordance with the chest pain protocol, vital signs were taken first. Then the patient had a telemetry monitor applied. Next, the patient had blood samples drawn through the inserted PIV catheter.
Organized

Patient reports no allergies

Prescriptions include hormone replacement therapy

Past medical history includes hysterectomy and foot surgery from a few years ago

Patient family history includes cardiovascular disease on her father’s side of the family

Patient denies smoking, illicit drug use, but does drink 3 times a week

Patient reports feeling fine until 1 hour after lunch when chest pain began.

Patient was feeling fine until one hour after lunch, when she started to feel chest pain. Patient has no history of cardiac problems. However, there is family history of cardiovascular disease on the father’s side. Patient had a hysterectomy and foot surgery a few years ago. Patient denies smoking and illicit drug use. Patient does take hormone replacement therapy prescription. Patient does not have any allergies. Patient reports drinking alcohol 3x/week.
Complete Patient complaining of 8/10 chest pain, described as “stabbing.” Patient has been experiencing this pain for three hours. She has taken Tylenol, but nothing alleviates the pain. Patient is complaining of chest pain.
Free of Bias Education provided per chest pain protocol. Patient was instructed to call 911 immediately if experiencing chest pain in the future. Patient verbalized understanding. Patient was given needed education about chest pain since she clearly didn’t understand that chest pain cannot wait 3 hours and she needs to call 911 right away because she can die of a heart attack.
Factual Patient reports last meal was around 1300 which consisted of spicy foods. Her chest pain onset was 30 minutes after. She waited an additional three hours before seeking emergency care. Patient presented to ER after lunch.
Legible/Decipherable Patient was instructed to call for assistance with ambulation and how to utilize call light. Patient cannot safely walk by her self. Call light assistance. Bathroom walk with me.
Standardized Morphine Sulphate 2mg IV push, once PRN for 8/10 pain per chest pain protocol. MSO4 2.0 mg, IV push, x1.
Timely Documentation is completed in real-time, all documentation completed before transferring patient to telemetry. Nurse documents three days later due to high volume of patients.


Common Documentation Errors

  • Falsification of a record. This can happen when charting an action isn’t completed in a timely manner, or from charting information before that action was completed.
  • Fraudulent charting is the act of knowingly making a false record. Criminal charges of forgery can result if the misrepresentation is done for personal gain. An example of this would be a nurse documenting at administration of a controlled substance but instead was diverting the medication.
  • Inappropriate use of cloning features. Information “copied and pasted” from a different patient’s record or that is completed by another provider. Data copied from previous shift assessments that isn’t updated to reflect current status is also a false record (9).
  • Fail to document communication. Notification of the medical team of a change in patient status or critical lab values should always be included. Clarification or confirmation of orders should also be documented (17). Include notification of other providers who assisted with patient are. This includes failure to document transfer of care to another nurse.
  • Failing to document a reason why something isn’t done. If a patient doesn’t receive a prescribed medication, the reason why the medication isn’t given needs to be described. If you communicate with the provider, this should also be included.
Quiz Questions

Self Quiz

Ask yourself...

  1. Have you ever entirely or partially failed to document a critical portion of care?
  2.  If you could alter your documentation, how would you better document in this situation?

Conclusion

Including all of the necessary information into each patient’s medical record can be a daunting task. The nurse must make sure that they have included all of the relevant and accurate information that is required by their facility guidelines. It must usually be done in a loud environment and is frequently interrupted by actually having to provide care to the patients.

It is not only a tedious chore, but it also tends to cause a lot of apprehension. There is usually a worry of “did I chart enough?” or “did I chart everything I needed to?” This is due to the defensive practices and attitudes healthcare workers have adapted to protect against malpractice lawsuits. In this way, charting is similar to paying taxes. No one likes it, but it still has to be done.

Perhaps a way to develop a healthy perspective toward charting is to change the focus to its original purpose: to communicate care about the patient. The purpose of charting is to relay to the other healthcare team members what is going on with the patient. With this objective in mind, the nurse will inevitably cover all the necessary details and it may also be a bit more satisfying to know that even though they are in front of the computer, they are performing and completing important information for the patient.


Quiz Questions

Self Quiz

Ask yourself...

  1. What is the main question you can ask yourself to ensure you are following necessary nursing protocols?
  2. What to you is the most important element of this course, that will help you in your current profession?
  3. How do you plan to use the information regarding charting in your workplace?

Flu Treatment, Symptoms,

and Red Flags


Introduction

Every year, ER waiting rooms, outpatient clinics, and inpatient hospital beds fill up with patients seeking treatment for the miserable symptoms brought on by the influenza virus. This illness does not discriminate and afflicts all ages, from young babies, to the elderly, and everyone in between. Symptoms can range in severity from several days of fever, chills, and cough in bed at home, to weeks of hospitalization, respiratory distress requiring mechanical ventilation, and even complications resulting in death.

Starting in October and often lasting well into spring, flu season tasks healthcare workers everywhere with promoting prevention, quickly and efficiently identifying those infected, and appropriately managing symptoms and any secondary complications that may arise. In the last two years, the overloading of the healthcare system with COVID-19 infections has meant hospitals and clinics are even more pressed to provide appropriate staffing, treatment, and medical resources to people affected by influenza.  

An illness affecting the population on such a large scale requires healthcare professionals to stay up to date on disease trends, diagnosis and treatment protocols, and “red flags” of more serious cases in order to minimize the impact of flu season and keep complications and mortality as low as possible.

This course will review disease trends in recent years, common and more insidious symptoms to help identify flu infections, available testing methods and their accuracy, pharmacologic treatments and the importance of their timing, supportive treatments and symptom management, and the “red flags” of dangerous secondary infections and complications.

Upon completion of the course, the reader should be comfortable participating in prevention, identification, and management of the seasonal influenza virus.

Current Practice, Barriers and Need for Continued Education

Influenza is a serious global issue that has been affecting mankind since the beginning of recorded history. Despite medical advances in recent years, influenza remains a major public health concern, with up to 20% of the United States population being affected annually (13).

Between 140,000 and 710,000 people are hospitalized nationally each year, with around 52,000 deaths. Those most at risk are young children, those over age 65, and those with other chronic or underlying conditions such as asthma, diabetes, immunosuppression, etc.

Despite high rates of infection and risk of complications, the estimated annual vaccination rate amongst the general population remains at about half, 50.2% for adults (3) and 58.6% for children for the 2020-2021 flu season (4). There is an increased rate of vaccination amongst healthcare workers (78.6%), but as these are the people most likely to come in contact with and spread the virus, even that number could be improved upon (6).

Further complicating the situation, influenza virus has several strains and possesses the ability to change its DNA (referred to as “drift and shift”) as it replicates, making it difficult to produce a highly accurate vaccine (2). Because of this, vaccines cannot be created very far in advance if the most current strain is to be targeted. Vaccine shortages can result if new vaccines are not created at a fast enough rate throughout flu season (6).

There are antiviral medications available for prevention and treatment of flu, however this requires proper identification of those infected or most at risk for infection, and the administration of these medications is typically time-sensitive (5). Health care professionals should be familiar with common symptoms of flu and be comfortable assessing patients, testing for and diagnosing flu.

All of these considerations for flu illustrate the intense need for educated, proactive health care workers to promote vaccines, quickly identify those most at risk or with active infections, and treat effectively in order to keep the impact of flu minimized.

The National Institute of Health has ongoing projects to keep available resources robust (14), but this research is only as strong as the health care professionals who implement it and are on the front lines of patient care. Staying up to date on current practice is paramount for national and global management of this resilient pathogen.

Quiz Questions

Self Quiz

Ask yourself...

  1. Do you think that the current rate of vaccinations among healthcare providers (78.6%) could be improved?
  2. With up to 20% of the US population being affected annually, do you think enough resources are utilized in the prevention, recognition, and treatment of influenza?
  3. What could be done from a national, state, and local level to promote increased prevention, recognition, and treatment of influenza?

What is Influenza?

Viruses are small pathogens containing genetic material that infect host cells and replicate within that host. They can exist for short periods of time outside of a host as an infectious virion and are spread between hosts through a variety of ways. Influenza is a specific group of RNA viruses that replicate within the epithelial cells of the respiratory tract (15).

There are three main types of flu viruses (A, B, and C). Viruses B and C typically only exist in humans, but A has been found in other mammals such as pigs and horses (15). There are also subtypes of each virus, depending on specific structure of the virus; these are labeled as H1-16 and N1-9 for hemagglutinin and neuraminidase, however, further discussion of these is beyond the scope of this course (15).

As the virus replicates within host cells, there can be subtle changes to the RNA over time, eventually adding up to more noticeable changes and resulting in these different subtypes. These slow changes are referred to as antigenic “drift” and are part of why creating a highly accurate flu vaccine is so difficult (2).

Typically viruses that have drifted some are still susceptible to the current vaccine or there is some acquired immunity within the population. However, there is sometimes a more dramatic structural change referred to as antigenic “shift” that results in a completely new viral subtype and a population with virtually no immunity to this new agent (15). This can result in serious infection of pandemic proportions, such as the 2009 H1N1 outbreak (15).

Influenza viruses are typically spread through droplet transmission, when an infected person spreads microscopic drops of bodily fluids, typically through sneezing or coughing, which then come in contact with another susceptible person (8). These droplets usually only travel across air distances of 6 feet or less, however they can be transferred further via indirect contact such as handshaking or by vectors (surfaces or objects where virions survive temporarily while waiting on contact with the next host) (8).

Once a host touches a contaminated vector and then touches their own mucous membranes (nose, mouth, eyes, etc), they can become infected. Other bodily fluids such as loose stools, vomit, and sputum can contain viral RNA and contribute to disease spread (8).

Quiz Questions

Self Quiz

Ask yourself...

  1. The typical point of replication for influenza is the upper respiratory tract, more specifically the nares.  How does this correlate with influenza symptoms?
  2. As you can see, influenza is spread via many modes. How will you use this information to better protect yourself and patients from influenza infection?

Prevention: Flu Vaccines

Once pathogenicity is understood, providers are better able to prevent spread of infection. The primary and most effective way to help prevent the spread of flu is through a high rate of vaccination in the general population. Current recommendations are for all individuals 6 months of age and older to receive a vaccine unless otherwise contraindicated (8).

It is especially important that those most at risk (children under age 2, adults older than 65, and those with comorbid conditions) and those working with high risk individuals (healthcare and childcare workers) receive vaccines.

For the optimum protection, the goal for vaccine timing should be by the end of October, keeping in mind that full antibody production takes about two weeks after the vaccine is received. Though early vaccination is ideal, a flu vaccine can be administered at any point during flu season and patients requesting immunization later in the season should still be vaccinated (8).

The first time children between 6 months and 8 years of age receive a flu vaccine, they will need 2 doses, 4 weeks apart (8). After receiving 2 doses, children only need 1 dose for all subsequent flu seasons (8).

There are some individuals who should not receive a flu vaccine, but this group is typically very small. Among those who are absolutely contraindicated are infants under 6 months of age and anyone with a previous life-threatening reaction to a flu vaccine(6).

It was previously thought that anyone with an egg allergy should not receive the vaccine, since the viral components are grown in an egg medium, however most recent recommendations suggest that this does not cause a reaction for most people and should be reviewed on an individual basis with one’s own primary care provider (6).

Anyone with a history of Guillain-Barré Syndrome should also consult their provider and may be advised to omit the vaccine. Patients with a current cough or cold accompanied by fever may be advised to postpone the vaccine until their symptoms have resolved (6).

Each year, the CDC studies two factors of the current flu vaccine: efficacy and effectiveness. Randomized controlled trials are used to study efficacy, or the intended result, of the vaccine in optimal conditions with healthy participants (6). Less formal observational studies are used to study effectiveness, or how well the vaccine is working in the “real world.”

As previously discussed, antigenic drift and shift mean that the annual vaccine is imperfect and does not always prevent illness as well as intended. For a general idea of the typical effectiveness, we can look at data from recent years: the vaccine was shown to be 38%, 29%, and 39% effective in 2017-2018, 2018-2019, and 2019-2020 flu seasons, respectively (12).

Regardless of the lower levels of effectiveness compared to other vaccines, such as MMR, vaccination against flu can still prevent substantial numbers of illness and death when considering the population of the United States.

There are a few side effects to be aware of and to include in patient education with administration of flu vaccines. The most commonly reported side effect is local soreness around the injection site. This occurs in about 65% of patients vaccinated, does not typically interfere with activity, and resolves within a week (6).

More systemic symptoms such as fever, headache, and malaise are sometimes reported, but interestingly these symptoms are reported at similar rates in patients who received a placebo vaccine (6). Rarely, an allergic reaction can occur, ranging from urticaria to anaphylaxis.

Children under age 2 are at a slightly increased risk of febrile seizures, particularly if a flu vaccine is given in combination with Prevnar and DTaP vaccines, therefore timing of routine vaccines in conjunction with a seasonal flu vaccine should be discussed with parents of young children (6).

Though the actual correlation is unclear, there is also a suggested link between flu vaccines and the extremely rare condition of Guillain-Barre Syndrome (GBS). This often life-threatening paralytic condition occurs in about 1-2 people per 100,000 each year, regardless of flu vaccine status.

Ongoing research indicates it is unlikely flu vaccines directly cause GBS and that other triggers such as recent viral illness are more likely to be the culprit, but the CDC estimates there may be a 2 per 1 million chance of experiencing this complication after receiving a flu vaccine (6).

Quiz Questions

Self Quiz

Ask yourself...

  1. How would you react if a patient refused the influenza vaccine due to potential side effects?
  2. What education would you provide on this topic? How would you ensure the patient understood the risks?

Standard Precautions

In addition to vaccines as the front line of disease prevention, there are multiple ways to help slow or prevent the spread of disease once flu season starts.

Hand hygiene and cough etiquette are amongst the most effective measures to prevent spread of illness (1). These steps are easy and can be followed by anyone, whether they are ill or not.

Avoid touching your mouth and nose. When coughing or sneezing, use a tissue to cover your nose and mouth and then dispose of the tissue and wash your hands. Handwashing should be done with soap and water or alcohol based hand sanitizer (9). In addition to standard precautions during flu treatment, anyone with respiratory symptoms and/or fever is encouraged to wear a surgical mask, a recommendation that was in place prior to more widespread masking with COVID-19 pandemic.

Hospitals and clinics can help stop the spread of infection by separating well patients from those with respiratory symptoms (1). People who are ill should not attend work or school and should limit their contact with well people as much as possible while symptoms are present (9).

Infected individuals are considered contagious 1-2 days before showing symptoms and up to a week after illness begins; they should be fever free for 24 hours before returning to work/school (9).

Recognition and Treatment of Flu: Symptoms

Despite prevention efforts, hundreds of thousands of people nationwide will contract the influenza virus each season.

When prevention efforts fail, the next important step is early identification. It is important for all healthcare workers to be familiar with the symptoms of flu and be able to quickly and accurately identify those with a probable diagnosis of flu.

Typical influenza infections start suddenly, with a combination of fever, headache, sore throat, fatigue, nasal congestion or runny nose, body aches, and chills.

Fever and acute symptoms can last more than 7 days, with fatigue and weakness lingering for weeks. While fever is typical of influenza infection, not all who are infected present with a fever (15).

Testing for Influenza

It should be noted that patients with suspected flu can be treated purely based on clinical presentation and regional flu trends at that time; rapid flu tests do not have the highest sensitivity and therefore should not be the determining factor in regard to the necessity of treatment. However, there are several methods of testing for flu that can help confirm a suspected diagnosis of flu.

There are two main types of testing for flu: ​molecular assays ​and antigen detection tests​. Molecular assays work by identifying viral nucleic acids or RNA in a respiratory specimen (7). They are highly sensitive and specific, meaning they can detect the virus at even very low levels and the risk of false positive is very low.

There are rapid molecular assays that can result in as little as 15 minutes, identifying flu A or B, and there are also Reverse Transcription-Polymerase Chain Reaction (RT-PCR) and nucleic acid amplification tests available which take closer to 45 minutes to an hour for results and can identify specific subtypes of flu for a more in-depth diagnosis (7). Antigen detection tests are typically used in outpatient settings due to their cost-effectiveness and rapid results (10-15 minutes). These rapid tests are up to anywhere from 50-70% sensitive and have specificity >90% (7).

While more accessible to the clinic setting, antigen detection tests are less accurate and a negative result does not exclude a diagnosis of flu. In cases where flu is highly suspected and a rapid test result is negative, the result can be confirmed with a molecular assay or treatment can be started based on clinical presentation and a presumed false negative test result (7). Other illnesses such as COVID-19 may need to be ruled out or a simultaneous infection confirmed as well.

In fact, where high risk populations are concerned, such as asthma, heart disease, immune disorders, and other comorbid conditions, prompt treatment when flu is suspected may be recommended regardless of testing results (7).

Viral cultures are also available for the most in-depth results. While not practical for the clinical setting due to long result windows (3-10 days), viral cultures offer extremely detailed and useful information about the genetic details of current flu strains, which is helpful when developing the next year’s vaccine (7).

Quiz Questions

Self Quiz

Ask yourself...

  1. Influenza testing is nuanced and rapid testing cannot be relied upon for diagnosis.
  2. Does this mirror what you see or do in clinical practice?
  3. How could improved education of healthcare providers lead to more accurate diagnosing and treatment of influenza?

Treatment

Once flu has been identified clinically and laboratory confirmation is obtained (if desired), treatment of flu should be started as quickly as possible in order to maximize benefits of treatment and minimize potential complications of untreated illness.

Three antiviral medications known as neuraminidase inhibitors are available by prescription in the US (oseltamivir, zanimivir, and peramivir). These medications work by blocking neuraminidase, an enzyme that allows newly replicated influenza viruses to be released from host cells (5). Another antiviral, baloxavir, works by stopping replication of the virus within the host cells (5).

Treatment should ideally be started within 48 hours of symptom onset; however, there may still be benefits for severely ill patients or those who are very young, elderly, suffering from comorbid conditions, or already hospitalized, and treatment initiation after 48 hours may be considered (5). Treatment should also never be delayed while awaiting laboratory results (5).

Treatment may be initiated based on clinical symptoms alone, if symptoms are highly suggestive of influenza during an endemic period. The decision to treat is based on many factors, including risk of complications and time since symptom onset.

The most common side effects of these medications include nausea, vomiting, headache, dizziness, and sometimes a skin reaction. Typically, these medications are well tolerated and prompt initiation of treatment should be encouraged (5).

In addition to antivirals, supportive care is a mainstay of treatment. Rest, hydration, cool mist humidifiers, antipyretics, and throat lozenges have all been shown to provide comfort and help with symptoms. Multiple studies have shown honey to be an effective cough suppressant and 1 tbsp. in warm tea or water can work well to provide some relief.

Patients should be monitored for signs of dehydration, including dry mucous membranes and reduced urine output. Ill patients should also isolate themselves as best as possible to prevent further spreading the illness (12).

Quiz Questions

Self Quiz

Ask yourself...

  1. Which patients are at highest risk of influenzas complications, including death?
  2. Is it justified to treat these individuals based on positive clinical symptoms even with a negative rapid test? Is it justified to treat them after 48 hours?

“Red Flags” – Potential Complications and What Not to Miss

The majority of flu cases make a full recovery after 1-2 weeks of illness, however there are some more serious complications that can develop, including life-threatening symptoms and even death (11). Flu can sometimes trigger systemic inflammation, leading to myocarditis, encephalitis, rhabdomyolysis, or multi-organ failure.

These conditions can be difficult to diagnose if suspicion is not high. Flu infections attack the usual defenses of the respiratory tract and predispose the body to secondary bacterial infections like pneumonia.

The body’s initial inflammatory response is beneficial to help the body fight off a flu infection, but increasing inflammation or prolonged inflammation puts too much stress on the body and this extreme response can result in autoimmune disorders or sepsis (13). Those with asthma, heart disease, or other chronic conditions are at an increased risk of complications, as are young children and the elderly (11).

Post-influenza pneumonia is a well-described phenomenon and the most common causative pathogen is Methicillin-Resistant Staphylococcus Aureus (MRSA). This secondary infection should be considered in patients with respiratory symptoms and/or sepsis after a recent resolution of flu followed by returning or new/acute symptoms. It is important to consider MRSA as a causative agent when prescribing antibiotics to patients with post-influenza pneumonia (15).

“Red Flags” or warning signs that the body is working too hard to deal with the flu virus, or is not compensating well, include: fast respiratory rate or difficulty breathing, cyanosis, tachycardia, hypotension, chest pain, dizziness, confusion, decreased urine output (>8 hours), severe muscle pain, or seizures. In children, fever >104 (or any fever in children <12 weeks of age) and retracting are concerning signs.

Any other signs/symptoms that are concerning or seem to be worsening warrant further workup and possible hospitalization to prevent further decline (11).

Quiz Questions

Self Quiz

Ask yourself...

  1. Have you ever seen a patient who displayed “red flags”?
  2. How would this change the patient’s management and what type of treatment / monitoring would they need?

Case Study 1

This case study involves a real patient’s experience with seasonal flu. Names, genders, ages, and some details have been changed to protect patient information.

Jennifer is a 35 year old female who presents to an urgent care clinic in mid February with 2 days of rhinorrhea, cough, sore throat, body aches, and tactile fever. She has not received a flu vaccine this season. Recent medical history significant for COVID-19 infection six weeks ago. Following triage, her vitals are recorded as: ​HR: 110, RR: 22, Temporal temp: 101.3, SPO2: 97%, BP: 110/76. ​

She is visibly uncomfortable but sitting up on the exam table and able to cooperate and carry on a conversation. She is breathing a little shallowly and has a frequent, coarse sounding cough, but is overall not in any respiratory distress. She is congested and has clear rhinorrhea, eyes are watery, she has some posterior pharynx erythema, no cervical lymphadenopathy, and some faint rhonchi to her lungs that she is able to clear when coughing.

Rapid strep, flu, and COVID-19 swabs are collected and the results are negative. She is given a prescription for 5 days of 75mg BID TamifluⓇ (oseltamivir) which she fills and begins taking that afternoon. A viral culture is collected from her via nasopharyngeal swab for confirmation of suspected influenza.

Within 3-4 more days, Jennifer is fever free and beginning to feel better despite some persistent fatigue. She works from home until her fever has resolved and cough is improving. She makes a full recovery without sequelae. Three days later her viral culture indicates she has type B influenza, despite her negative rapid influenza test. This is a typical case of influenza and the TamifluⓇ may have hastened her recovery and possibly prevented severe illness. It also illustrates that rapid influenza testing has a low sensitivity and per CDC guidelines, treatment may be based on clinical signs and symptoms.

Case Study 2

This case study involves a real patient’s experience with seasonal flu. Names, genders, ages, and some details have been changed to protect patient information.

Braxton is a 9 year old male who presents to his PCP’s office with sudden onset of high fever (tmax 103), headache, and cough that started that morning. It is December and he has not received a flu vaccine. His vitals are stable.

Exam reveals clear rhinorrhea, erythematous and enlarged tonsils, and frequent barky cough. Rapid strep and COVID-19 tests are negative, but a rapid flu test is positive for Influenza A. He is given a prescription for tamiflu (oseltamivir), however his parents have some reservations about the medication due to an article they read on social media and decide not to give him the medicine.

They manage his symptoms with analgesics, Gatorade, and rest. About 11 days later, he follows up in the office with complaints of persistent fatigue and new complaints of dizziness and abdominal pain. Parents report a syncopal episode at home that morning, prompting today’s visit.

His cough is still present, but better than it was, and he has been afebrile for about 5 days now. He looks very pale, and complains of some dizziness as he gets up onto the exam table; his behavior is sluggish. He has some abdominal bloating and tenderness with mild spleen enlargement. Furthermore, he has lost 4 pounds since his previous visit. Vitals are somewhat concerning: ​HR: 145, RR: 27, Temporal temp: 98.8, SPO2: 98%, BP: 90/54. ​

This patient seems poorly hydrated, and his overall appearance is concerning, so you order some stat labs. Multiple abnormal lab values return, the most critical of which is a hemoglobin of 3.4. He is admitted to the local children’s hospital PICU and treated for hemolytic anemia secondary to viral infection as well as multisystem organ failure.

After multiple blood transfusions and aggressive steroid therapy, he is discharged after over two weeks of hospitalization, with no permanent organ damage.

This case illustrates one of the rae (but potential) complications of the viral influenza infection. It is possible that early antiviral treatment may have avoided this complication and/or minimized it.

Summary

While influenza is an annual problem and can often seem routine or overshadowed by COVID-19, it is still of utmost importance that healthcare professionals stay vigilant in their knowledge of flu treatment and treat each case on an individual basis.

As the front lines for promotion of flu prevention, early identification and treatment of flu, and maintaining alertness for potential complications, health care workers can have the biggest impact on the severity of the current flu season.

Staying up to date on current practice can help reduce overall numbers of infection, rate of complications, and mortality.

Quiz Questions

Self Quiz

Ask yourself...

  1. What are some key things to remember about the recognition of influenza?
  2. How do you plan to use what you have learned in this course in your workplace and beyond?

Measles


The History of Measles

Medicine has come a very long way in curing diseases that once wiped out entire populations. Before the vaccine, measles was a serious health concern. Each year, millions of people became infected with measles, and in the United States alone, an average of 495 people died of related complications.

Even beyond the mortality rate, 48,000 people experienced hospitalizations, and 1,000 of those developed a significant and lifelong disability every year. One of the most dreaded complications of measles involves the spread to the central nervous system, causing subsequent inflammation and risk for brain injury from acute encephalitis (4).

Measles is an acute, viral respiratory illness that is one of the most contagious of all infectious diseases. In fact, 9 out of 10 (90%) susceptible persons with close contact will develop measles. The virus is transmitted by direct contact with infectious droplets or by airborne spread. The measles virus lives for up to two hours on surfaces. The disease is active and contagious in the airspace for two whole hours.

Enter the Measles Vaccine

During a Measles outbreak in 1954, physicians collected blood samples from affected students in Boston. They isolated the measles virus from a 13-year-old student’s blood and created a measles vaccine. In 1963, the live Measles vaccine debuted in the United States. Five years later, the modern-day vaccine was introduced.

Measles is usually combined with mumps and rubella as part of the MMR vaccine. It is a very effective vaccine that protects over 97% of recipients (5). By 2000, the Centers for Disease Control and Prevention (CDC) declared measles eliminated. Historically, the development of the measles vaccine changed the scope of public health.

For the first time, prevention proactively saved lives. But now, with the advent of the anti-vaccination campaign, we are at risk for a revival of the disease that healthcare nearly eliminated.

Quiz Questions

Self Quiz

Ask yourself...

  1. How did the invention of the measles vaccine affect the global burden of Measles?
  2. The CDC declared Measles “eliminated” in 2000, do you think this was a premature assumption that opened the door for resurgence?

Signs and Symptoms of Measles

Measles includes the onset of an elevated fever that may be as high as 105 degrees Fahrenheit (4). Other symptoms include:

  • Malaise
  • Cough
  • Noninfectious nonallergic rhinitis (also known as coryza)
  • Conjunctivitis
  • Koplik’s spots
  • Maculopapular rash

Koplik’s spots are unique to measles and highly suggestive of the disease. They occur two to three days before the rash. They are white, clustered lesions on the gums that resemble grains of salt.

The maculopapular rash appears approximately 14 days after exposure and spreads from head to trunk to the extremities. Those with measles are contagious from four days before they show symptoms until four days after the rash appears. In some cases, immunocompromised patients may not develop a rash. The rash usually disappears within one week (4).

Diagnosis

A diagnosis is made after evaluation of the signs and symptoms, in particular, a widespread skin rash that appears three to five days after exposure and lasts up to one week. The rash consists of red, itchy bumps. Measles is more likely to occur in unvaccinated children, primarily under five years old.

Once a diagnosis is suspected, measles is verified with laboratory confirmation. The lab tests that are performed are the measles antibodies (IgM) and measles RNA by real-time polymerase chain reaction (RT-PCR). To complete the laboratory tests, the nurse should collect a nasopharyngeal swab and take a serum sample. The serum sample is for public health implications, and diagnostic testing usually occurs in a specialty lab (4).

Complications

If measles is not identified and treated, the associated complications can be quite deadly. Possible complications include (4):

  • Encephalitis
  • Pneumonia
  • Ear infection (Otitis media)
  • Miscarriage or preterm labor in pregnant women
  • Thrombocytopenia
  • Blindness
  • Severe diarrhea and dehydration
Quiz Questions

Self Quiz

Ask yourself...

  1. One of the most dreaded complications of measles is encephalitis. What signs and symptoms may alert you that a patient is developing measles encephalitis? 

Personal Protective Equipment (PPE)

Because Measles is incredibly contagious, it is critical to adhere to all recommendations for isolation and the appropriate personal protective equipment (PPE). Patients with Measles should be placed on airborne precautions. Airborne precautions are used to prevent the spread of germs through the air (8). Other illnesses with airborne precautions include tuberculosis and chickenpox.

It is vital to place the patient on isolation precautions as soon as you suspect measles to minimize potential exposure to other staff and patients. Place patients in a negative pressure room and wear a fitted N-95 respirator to enter a room. A surgical mask is not appropriate, so a respirator must be worn.

Treatment

The treatment of measles is broken into different categories, depending on exposure and symptoms: (4)

-Post-exposure prophylaxis for asymptomatic patients who have been exposed to measles. If they are not properly vaccinated or unsure of their immunization status, they should be treated with an MMR vaccine within 72 hours or immunoglobulin within six days of exposure.

  • Patients should receive the immunoglobulin if they are not vaccinated against measles and are unable to be vaccinated with the MMR vaccine in the cases of pregnancy, severe immunosuppression, or age less than one-year-old. They should not receive the MMR vaccine for six to eight months following the immunoglobulin administration.
  • Patients should avoid public areas for 72 hours due to the contagious nature of the disease (e.g., hospitals, schools, and daycare).
  • Immunoglobulin and the vaccine should never be given together as this process invalidates the vaccine. 

-Treatment after the confirmation of measles is individualized and may range from a vaccination, immunoglobulins, vitamin A, Ribavirin, or supportive care (9).

  • Acetaminophen PRN for fever and myalgia (muscle aches or pains)
  • Humidifier for cough and sore throat
  • Rest and hydration
  • Isolation for four days after the rash appears
  • Educate patients that symptoms will last two to three weeks
  • Vitamin A or Ribavirin may be given 
Quiz Questions

Self Quiz

Ask yourself...

  1. What treatment options are there for measles?
  2. Do you think the lack of perceived threat from Measles has affected research?
  3. How will this affect morbidity and mortality in cases of Measles outbreaks?

Measles Spread

Although the COVID-19 pandemic has showcased many polarized views on either the support or opposition of vaccinations, the “anti-vax” or “anti-vaccination” movements were around much before then with measles. 

These groups publicly shared views of wanting to eliminate vaccinations and believed that its benefits do not outweigh the overall risk of receiving them. However, evidence does not prove that the risks of vaccinations are significant, especially when compared to the risks of the diseases. 

Encouraging Vaccination Through Education

The best strategy to reduce the spread of measles is to encourage all patients and family members to receive all recommended vaccinations. One of the most important nursing interventions is education, and this is the perfect opportunity to educate your patients.

In 2014, families visiting Disneyland left with measles. The state of California later reported 159 cases of measles throughout the next several months. When looking at school data in that same year, only 70 percent of counties had the ideal herd immunity status of 95% vaccinated.

In response to this outbreak, California passed Senate Bill 277 that eliminated all personal beliefs and conditional vaccination exemptions before entering school. The law went into effect in 2016 and only allowed medical exemptions and required that all schools report the vaccination status of enrolled children. Officials in California found that by tightening the vaccine regulations, more children received vaccinations before entering kindergarten (6). In 2016, 97% of school districts met herd immunity guidelines.

When patients are discussing travel plans, it is an excellent opportunity to provide Measles education (6). Many patients are unaware that leaving the country puts them at risk for specific vaccine-preventable diseases, particularly when traveling to endemic countries.

It is also important that patients and families understand the concept of herd immunity. This is the indirect defense from infectious disease that happens when the majority of a population is immune to a specific infection. Herd immunity ensures that even when a person is not vaccinated, they receive protection because the people surrounding them are resistant to the disease and are unlikely to transmit it to them or harbor an outbreak. However, for herd immunity to be effective, 19 out of 20 people (95%) of the population must be vaccinated (7). When many people are immune, the chances of infection to the rest of the population are rare because it is unlikely an unvaccinated person will come in contact with an infected person.

There are medical conditions that make the vaccine unsafe to receive. New babies are at risk for many diseases until they are old enough to receive all vaccinations (5). Many people are at risk for infectious diseases because they are unable to receive the MMR vaccine. Other populations who should not be vaccinated include patients who are:

  • Pregnant,
  • An anaphylactic allergic response to a component in the MMR vaccine,
  • Immunosuppressed or compromised,
  • Recently received blood products,
  • Suffering from active tuberculosis or other severe illness.

Lastly, many people are unaware of the risks of measles because they have never seen it. However, measles could become an endemic in the U.S. again if vaccine coverage decreases significantly and herd immunity is lost (4). It is critical to discuss this possibility with your patients so that they are aware of the significant risk of the anti-vaccination movement. Most patients and caregivers are unaware that Measles can result in life-threatening complications, such as pneumonia and encephalitis.

Parent Education and Shared Decision Making

While many healthcare professionals have strong opinions regarding vaccination, using shared decision-making to further parental understanding of vaccinations is critical. It can be upsetting for parents to see their infant or child receive multiple injections. By opening the discussion of the risks and benefits, the nurse provides parents with essential information regarding vaccination. It is crucial that nurses have an open discussion and to acknowledge the concerns of patients and families.

Despite multiple immunizations in each visit until their second birthday, the CDC states that a healthy child’s immune system will not become overwhelmed by the vaccinations. There is a slight risk for side effects with immunizations such as severe allergy, disease, and death; but, most side effects are mild, like redness and swelling at the injection site (3). However, vaccine-preventable diseases can be fatal, and the benefits of the vaccine far outweigh the risks. The risks of becoming ill with measles are far worse than the risks associated with the vaccination (3). These are important points to make families aware of.

The U.S. Food and Drug Administration (FDA) ensures the safety, effectiveness, and availability of vaccines. Current vaccinations have each been evaluated by scientists and continually monitor for other side effects after FDA licensure. Any complications or adverse effects are tracked by the Vaccine Adverse Event Reporting System (VAERS). If the CDC and FDA find a link between a particular immunization and a specific side effect, they will weigh the benefits against the risks and update the safety information on the Vaccine Information Sheets (VIS) (3).

Quiz Questions

Self Quiz

Ask yourself...

  1. How will you approach education and support decision-making for patients and families?
  2. What information specifically would you provide in these situations?

The Anti-Vaccination Movement and Public Health Implications

In 2018, there was a measles outbreak in Washington that was considered a public health crisis. In the first few months of 2019, more than 100 vaccine-related bills were introduced in 30 states across the country.

Some states have proposed to eliminate vaccine exemptions or tighten the laws surrounding mandatory vaccination to attend school, while other state regulations recommend exemption expansions.

The Food and Drug Administration (FDA) commissioner Scott Gottlieb controversially made a public statement warning state legislators that they must replace lax laws. Mr. Gottlieb notified states that if they do not tighten vaccine exemptions than the federal government would take action (2).

Recent News

The MMR vaccine is very effective against measles. Receiving two doses of MMR is 97% effective, while just one dose is still 93% effective (5). However, Measles is an extremely contagious disease that can spread quickly in an unvaccinated population. In 2013, an unvaccinated teenager returned to New York from the U.K. Over the next three months, measles spread throughout Brooklyn. At the conclusion, 58 people across the city became infected with measles. Not a single person who became ill with measles had documentation of being vaccinated (6).

The “anti-vax” movement goes beyond lay people. In the fall of 2018, a Texas nurse posting on social media about a toddler with measles in the PICU. The nurse shared to an anti-vaccination group that measles was much worse than she expected. “I think it’s easy for us non-vaxxers to make assumptions, but some of us have never and will never see one of these diseases. (1)”

She stated that despite the severity of the disease in the toddler, she wanted to purposely transmit measles from the child to her unvaccinated child at home. While she possessed nursing knowledge, she did not understand epidemiology. She felt that natural immunity would be safer than vaccination. Despite seeing measles for the first time and knowing how ill the child was, she did not change her vaccination stance and acknowledged she never would.

Her beliefs did not affect her employment, but her behavior did. She was fired from the children’s hospital for sharing private health information after families made hospital administrators aware (1). Thus, it is essential to obtain your data from evidence-based resources like the CDC instead of peers.

The moral of this story is that no amount of evidence can convince hardline anti-vaccinations proponents. It is our job to provide information, education, and promote shared decision making. Ultimately it is the parent or patient’s right (in most states) to refuse vaccines.

Summary

Nurses are busy working to assess, evaluate, educate, and empower their patients. Administering vaccines piles another task on a nurse’s overburdened list, but it is our job to ensure each patient receives appropriate education on vaccinations. Assessing vaccination status should be a priority for each and every admission and intake. It is critical to evaluate each patient’s vaccination status to ensure that all vaccines have been administered per the wishes of the parents and/or patients.

For further information about immunizations specific to healthcare providers, please visit: www.cdc.gov/vaccines/hcp

If you need more information about measles, see: www.cdc.gov/measles

To report an adverse reaction to a specific vaccination, visit: vaers.hhs.gov 

Quiz Questions

Self Quiz

Ask yourself...

  1. What did you learn about Measles during this course?
  2. Make a T-Chart detailing what you knew about the Measles vaccine before this lesson, and what you know now that you have read this course.

Childhood Asthma Treatment

and Prevention

Introduction

It has been said that an ounce of prevention is worth a pound of cure. This adage holds more true in asthma than most conditions. Asthma is one of the most prevalent chronic illnesses in children. Millions of hospital admissions, primary care office appointments, and missed school days each year are directly related to asthma. Preventing asthma-triggering events and practicing continuous maintenance therapies can significantly reduce the amount of disruption in a child’s life due to asthma symptoms without childhood asthma treatment. In this course, we will explore the asthma disease process, triggers, and common therapeutic management with particular focus on prevention strategies for asthma exacerbation.

One in 13 people are directly affected by asthma (5). Asthma is a chronic disease of the lungs that causes wheezing, coughing, difficulty breathing, and chest tightness (9). For patients with asthma, a common cold or allergic rhinitis can quickly escalate into a life-threatening event. Triggers in the environment can quickly initiate trouble among delicate, inflammation prone, airways.

Although asthma is one of the most prevalent chronic diseases among adults and children, it is often not well controlled. While many patients know that they have asthma, many do not know how to manage it to prevent exacerbations. This can be especially devastating in children as their daily schedules, sleep, education, and activities can be significantly altered by lack of childhood asthma treatment.

Educating and empowering patients and their families to prevent disease exacerbation is a key component of successful childhood asthma treatment. We will discuss asthma prevalence, common triggers, signs of asthma exacerbations, and prevention strategies in this course.

Quiz Questions

Self Quiz

Ask yourself...

  1. Accessing your prior knowledge of asthma, how prevalent would you say the disease is in children?
  2. Do you think there is adequate evidence that childhood asthma treatment is imperative to patients?

What is Asthma?

Asthma is a chronic disorder of the respiratory system that is characterized by four primary components: recurrent respiratory symptoms, bronchial hyper-responsiveness, airway obstruction, and inflammation (9).

Certain factors such as genetics, environment, socioeconomic status, smoking status, and race/ethnicity can increase the chances of developing asthma. Common triggers of asthma include allergens, pollution, cold air, stress, and exercise, among other irritants. All of these contribute to asthmatic reactions, and necessitate childhood asthma treatment.

Environmental factors trigger dendritic cells, which produce B and T cell lymphocytes, initiate IgE production of mast cells, eosinophil, and neutrophils. The end result of this cascade is bronchial inflammation.

These cells also activate Th2/Th1 cytokines which amplify the response of the smooth muscle walls leading to persistent inflammation and remodeling of the tissues (long-term) (9).

Quiz Questions

Self Quiz

Ask yourself...

  1. What triggers asthmatic reactions in children?
  2. How do you think a child’s bodily response to environmental triggers can improve with childhood asthma treatment?

Airway Remodeling in Asthma

When bronchoconstriction and airway inflammation are persistent, airway edema occurs, worsening asthma symptoms. Airway edema can continue to exacerbate symptoms by promoting increased mucus production, mucous plugging, and hypertrophy and hyperplasia of the smooth muscles.

The combination of bronchoconstriction and airway inflammation gives rise to the chronic symptoms of coughing, wheezing, and difficulty breathing without childhood asthma treatment.

This is known as airway remodeling and this process makes asthma treatment more complicated as many commonly prescribed medications have limited response to altered bronchial tissues (9).

Importance of Early Diagnosis and Childhood Asthma Treatment

While asthma cannot directly be cured, it can be managed. The earlier asthma is diagnosed, the earlier prevention education can be provided, and the earlier pharmacological management initiated, if indicated.

The primary goal in asthma therapy is to prevent and reduce chronic inflammation (which leads to airway remodeling) and acute exacerbations.

Proper management of asthma symptoms helps to reduce chronic damage by way of airway remodeling, while reducing the odds of death related to an asthma attack, and increasing quality of life.

Prevalence and Impact of Pediatric Asthma and Need for Childhood Asthma Treatment

Below are statistics of asthma prevalence in children from the Centers for Disease Control and Prevention’s National Health Interview Survey (NHIS) (3,5,6,9):

• Approximately 5,100,000 children in the United States have been diagnosed with asthma.
• 50-80% of children with asthma develop symptoms before their fifth birthday.
• Approximately 1 in 10 school-age children have asthma.
• Approximately 44% of children have experienced an asthma attack within the past 12 months.
• Approximately 50% of children with asthma have reported having asthma exacerbations and/or having poor control of their asthma within the past year.
• 10.5 million school days are missed every year due to asthma symptoms.
• ⅓ of hospitalizations in children under the age of 15 are related to asthma.
• In 2019, 178 children died from asthma-related complications.

 Stat of children with asthma in the United States

Quiz Questions

Self Quiz

Ask yourself...

  1. What are chronic symptoms of asthma and what causes them?
  2. How can one explain the need for childhood asthma treatment to a parent?
  3. Why is early diagnosis of asthma key in management?
  4. What are some of the difficulties in diagnosing asthma in young children?
  5. What challenges might a healthcare professional encounter when recommending childhood asthma treatment?

Presentation and Risk Factors

Children can be diagnosed with asthma at a very young age. These children usually present with symptoms of persistent allergy, cough, and intermittent wheeze (6). They often present to the primary care office or emergency department with asthma symptoms during periods of increased allergen exposure and/or a viral respiratory illness.

Respiratory viruses attack airway structures, causing inflammation and increased mucus production, which exacerbate asthma symptoms. Children with asthma symptoms prior to the age of 3 have had significant lung growth deficits by age 6 (9). Early diagnosis and treatments are critical in reducing such complications.

Gender is a risk factor for asthma development. In early childhood, boys are more likely to have asthmatic symptoms. Later, after puberty, that risk flips, and girls more commonly have asthmatic symptoms (12). Children of African American and Puerto Rican descent are at higher risk than those of Caucasian or Hispanic backgrounds (8).

Children with obesity are more likely to develop asthma (9). Finally, asthma is more prevalent in households with an income <100% below the poverty line (12).

While all children with persistent respiratory symptoms should be flagged and followed for potential asthma disease work-up, clinicians of childhood asthma treatment should be aware of the risk factors and be vigilant in screening and diagnosing those patients.

Diagnosis and Childhood Asthma Treatment Disparities

In a survey completed by the CDC’s National Center for Health Statistics (NCHS), it was recorded that in 2016 only 71.1% of children with asthma had routine healthcare visits (12).

Access to healthcare, especially in many rural and poverty-stricken areas, is a national concern. Creating outreach programs in schools, primary care offices, and local hospitals may help maximize asthma screening and treatment for at-risk children.

It is critical that healthcare providers recognize these care disparities and work with local and national resources to increase screening and diagnosis.

Asthma Severity

Asthma diagnosis and exacerbations are ranked based on severity of symptoms, control, and responsiveness to therapies. Severity is the “intrinsic intensity of the disease process” (9). It can be measured by incidences of symptoms without long-term therapy.

Control is “the degree to which the manifestations of asthma are minimized and goals of therapy are met” (9). Finally, responsiveness is how easily asthma symptoms (especially exacerbations) can be managed (9).

A combination of family and individual medical history, lung function testing, and history of asthma-related medication use help determine asthma diagnoses and treatment plans.

Patients with severe symptoms and a decreased response to therapy are at an increased risk for severe, life-threatening asthma attacks.

There are four classifications of asthma severity:

• Intermittent
• Persistent Mild
• Persistent Moderate
• Persistent Severe.

In children, components of severity are further separated by age group: 0-4 years, 5-11 years, and >12 years. Each level is described by the quantity of symptoms being experienced.

These symptoms include nighttime awakenings, need for short-acting beta2-antagonists (SABA) for quick relief of symptoms, work/school days missed, ability to engage in normal activities, and quality of life assessments (9).

Lung function testing with spirometry should be performed in a healthcare office to evaluate the child’s lung compliance. This test should be attempted in all children age 5 years old or greater if asthma diagnosis is being considered (9). Spirometry measures the child’s forced expiratory volume in 1 second and in 6 seconds (FEV1 and FEV6) and forced vital capacity (FVC).

Spiromerty should be performed before and after inhaling a SABA medication to help determine if there is airflow obstruction, its severity, and reversibility with use of a SABA (responsiveness) (9). The resulting numbers are compared to expected values for each age group and written as percentages.

Greater than 85% of expected lung compliance is considered normal for children up to age 19. Asthma severity and lung compliance are inversely related- the further the decrease in compliance the more severe the asthma is.

When combined with the child’s history of symptoms and medication use, healthcare providers can determine the classification of asthma severity and appropriate treatment measures using the stepwise approach. The stepwise approach helps to standardize asthma symptoms and initiate related therapies.

Healthcare providers use this information to determine when to move up or down a treatment level to provide the most effective management with the least number of exacerbations from this disease. Provider assessment of a child’s asthma maintenance therapy should be completed every 4-6 weeks with therapy changes and then every 3-6 months with good symptom control (8).

Quiz Questions

Self Quiz

Ask yourself...

  1. What are some modifiable risk factors for the development of asthma in pediatrics?
  2. How can you educate parents and caregivers on the risk factors that are associated with a need for childhood asthma treatment? 
  3. What percentage of children with asthma have routine health visits?
  4. How can we determine the severity of asthma?
  5. What are the four classifications of asthma severity?

Step-Wise Approach for Classifying Asthma Severity

The chart below outlines the evaluation of asthma utilizing a standard step-wise approach. First choose the child’s age and then ask questions pertaining to the impairment/risk. Based on this, you will be given a “step”. The appropriate treatment for each step is outlined in the table below.

Step-Wise Approach for Classifying Asthma Severity (9)

AGE

COMPONENTS OF SEVERITY

INTERMITTENT

MILD PERSISTENT

MODERATE PERSISTENT

SEVERE PERSISTENT

0-4 years

Impairment

Symptoms

≤2 days/week

>2 days/week but not daily

Daily

Throughout the day

Nighttime awakenings

0

1-2x/month

3-4x/month

>1x/week

SABA use

≤2days/week

>2 days/week but not daily

Daily

Several times per day

Interference with normal activity

None

Minor limitation

Some limitation

Extremely limited

Risk

Exacerbation requiring oral systemic corticosteroids

0-1/year

≥2 exacerbations in 6 months requiring oral systemic steroids or ≥4 wheezing episodes/1 year lasting >1 day and risk factors for persistent asthma

Management

Recommended step therapy

Step 1

Step 2

Step 3 plus consider short course of oral systemic corticosteroids

5-11 years

Impairment

Symptoms

≤2 days/week

>2 days/week but not daily

Daily

Throughout the day

Nighttime awakenings

≤2days/month

3-4x/month

>1x/week but not nightly

Often 7x/week

SABA use

≤2days/week

>2 days/week but not daily

Daily

Several times per day

Interference with normal activity

None

Minor limitation

Some limitation

Extremely limited

Lung Function

Normal FEV1 between exacerbations

FEV1 >80% predicted

FEV1/FVC >85%

FEV1 = >80% predicted

FEV1/FVC >80%

FEV1 = >60%-80% predicted

FEV1/FVC 75%-80%

FEV1 = <60% predicted

FEV1/FVC <75%

Risk

Exacerbation requiring oral systemic corticosteroids

0-1/year

≥2 per year. Consider time since last exacerbation, as frequency and severity may change overtime.

Management

Recommended step therapy

Step 1

Step 2

Step 3, medium-dose ICS option and consider short course of oral systemic corticosteroids

Step 3 medium-dose option, or Step 4 and consider short course of oral systemic corticosteroids

≥12 years

Impairment

Symptoms

≤2 days/week

>2 days/week but not daily

Daily

Throughout the day

Nighttime awakenings

≤2days/month

3-4x/month

>1x/week but not nightly

Often 7x/week

SABA use

≤2days/week

>2 days/week but not daily, and not more than 1 time on any day

Daily

Several times per day

Interference with normal activity

None

Minor limitation

Some limitation

Extremely limited

Lung Function

Normal FEV1 between exacerbations

FEV1 >80% predicted

FEV1/FVC normal

FEV1 >80% predicted

FEV1/FVC normal

FEV1 = >60% but <80% predicted

FEV1/FVC reduced by 5%

FEV1 = <60% predicted

FEV1/FVC reduced by >5%

Risk

Exacerbation requiring oral systemic corticosteroids

0-1/year

≥2 per year. Consider time since last exacerbation, as frequency and severity may change overtime.

Management

Recommended step therapy

Step 1

Step 2

Step 3 and consider short course of oral systemic corticosteroids

Step 4 or Step 5 and consider short course of oral systemic corticosteroids

Quiz Questions

Self Quiz

Ask yourself...

  1. Can a patient with well-controlled asthma experience a life-threatening attack?
  2. Which patients are most at risk for severe asthma attacks?
  3. Some patients have asthma which is not severe but are also not responsive to therapy. How would you categorically describe this?

Therapies

Asthma is treated in a step-wise approach based on asthma symptom severity. Using the step-wise approach allows providers to prescribe appropriate medications for each child in order to optimize symptom control.

A review of common asthma medications and their escalation of prescription based on the step-wise approach are listed below.

Step-Wise Approach for Pharmacologic Management of Asthma (9)

AGE

STEP 1

STEP 2

STEP 3

STEP 4

STEP 5

STEP 6

0-4 years SABA PRN

Preferred:

Low-dose ICS

Alternative:

Cromolyn or montelukast

Preferred:

Medium-dose ICS

Preferred:

Medium-dose ICS plus either LABA or montelukast

Preferred:

High-dose ICS plus either LABA or montelukast

Preferred:

High-dose ICS plus either LABA or montelukast plus consider oral systemic corticosteroid

5-11 years SABA PRN

Preferred:

Low-dose ICS

Alternative:

Cromolyn, LTRA, nedocromil, or theophylline

Preferred:

Low-dose ICS plus either LABA, LTRA, or theophylline

Alternative:

Medium-dose ICS

Preferred:

Medium-dose ICS plus LABA

Alternative:

Medium-dose ICS plus either LTRA or theophylline

Preferred:

High-dose ICS plus LABA

Alternative:

High-dose ICS plus either LTRA or theophylline

Preferred:

High-dose ICS plus LABA plus oral systemic corticosteroid

Alternative:

High-dose ICS plus either LTRA or theophylline plus oral systemic corticosteroid

≥12 years SABA PRN

Preferred:

Low-dose ICS

Alternative:

Cromolyn, LTRA, nedocromil, or theophylline

Preferred:

Low-dose ICS plus either LABA or Medium-dose ICS

Alternative:

Low-dose ICS plus either LTRA, theophylline or zileuton

Preferred:

Medium-dose ICS plus LABA

Alternative:

Medium-dose ICS plus either LTRA, theophylline or zileuton

Preferred:

High-dose ICS plus LABA AND consider omalizumab for patients with allergies

Preferred:

High-dose ICS plus LABA plus oral corticosteroid AND consider omalizumab for patients with allergies

Medications

Inhaled Short-Acting Beta2-Agonists (SABA)

SABA medications are the preferred therapy in the event of acute asthma symptoms, asthma exacerbations, and in preventing exercise-induced asthma symptoms (taken before the activity). Albuterol, Levalbuterol, and Pirbuterol relax airway smooth muscles within minutes to allow relief of inflammation and improvement of airflow.

Children with intermittent asthma may not require a daily, preventative medication. They may only be prescribed a SABA medication for acute symptom exacerbation. Frequency of SABA medication use can be an indicator of asthma activity and control.

Using a SABA medication greater than two days a week for symptom relief generally indicates suboptimal control and indication to move up a treatment step. Of note, all children with asthma are prescribed a SABA medication to use as a rescue, quick-relief medication. (9)

Inhaled Corticosteroids (ICS)

Inhaled Corticosteroids work by suppressing cytokine involvement, decreasing the involvement of the airway’s eosinophil cells and preventing an increase in inflammatory mediators. Use of long-term ICS can prevent the need for oral systemic steroid administration by controlling asthma symptoms. Variable dosing of ICS medication is used depending on severity and persistence of asthma symptoms.

Side effects in long-term use include impaired growth in children, decreased bone mineral density, skin thinning and bruising, and cataracts. Children on this medication should be instructed to use a spacer (if applicable) and rinse their mouths after inhalation to prevent oral thrush. Common ICS medications include Fluticasone (Flovent HFA), Budesonide (Pulmicort Flexhaler), Mometasone (Asmanex Twisthaler), Beclomethasone (Qvar RediHaler), and Ciclesonide (Alvesco) (9)

Cromolyn Sodium and Nedocromil

Cromolyn sodium and nedocromil are alternative treatment options to low-dose ICS for mild persistent asthma and exercise-induced asthma. These medications are generally not preferred in children. Studies have shown inconclusive results to the impact of effectiveness of this medication in children. (9)

Leukotriene Modifiers (LTRA)

Leukotriene modifiers may be used as an alternate treatment option for mild persistent asthma and step 2 of asthma management. They are not recommended over LABA medications in ages >12 years. These medications work by preventing the release of mast cells, eosinophil cells, and basophils that cause airway constriction, vascular permeability, and increased mucous.

Medications in this class include Montelukast, Zafirlukast, and Zileuton. Montelukast can be prescribed in children over the age of 1 and Zafirlukast for children over the age of 5. Zileuton is currently not approved for use in children. (9)

Methylxanthines

Theophylline is a methylxanthine that can be used as an alternative or adjunctive therapy to ICS for mild persistent asthma in children older than 5. In previous trials, theophylline was shown to have little effect on airway reactivity and produced significantly less control than the use of low-dose ICS alone (9). Because of this and it’s narrow margin of safety, it’s use has largely fallen out of favor.

Inhaled Long-Acting Beta2-Agonists (LABA)

LABA medications stimulate the beta2-receptors to relax the smooth airway muscles. They are the preferred medication to be used in adjunct with ICS medications. They are not recommended alone and not recommended to treat acute asthma symptom exacerbation. LABA therapy should be considered in children ages 5+ who are not well controlled on ICS management alone. The LABA medications on the market today are Salmeterol and Formoterol. (9)

Oral Systemic Corticosteroids

Oral corticosteroids are usually reserved for severe asthma flares or in the event of difficult-to-control asthma. Side effects such as adrenal suppression, growth suppression, dermal thinning, hypertension, Cushing’s syndrome, cataracts, and muscle weakness may occur and are more likely with chronic usage. If oral corticosteroids are being used more than three times a year for management of asthma exacerbations, reevaluation of long-term asthma control should be evaluated.

Quiz Questions

Self Quiz

Ask yourself...

  1. Make a list of the medications available for treatment of childhood asthma.  How do these compare to medicines prescribed to adults?

Experimental Treatments

Immunomodulators

Immunotherapy for asthma management is a relatively new concept. Research is currently being performed to address and assess the effectiveness of immunotherapy in preventing asthma symptoms.

Some therapy modules being studied include Omalizumab, Methotrexate, Soluble interleukin-4 receptor, anti-IL-5, recombinant IL-12, cyclosporin A, intravenous immunoglobulin (IVIG), and clarithromycin. (9)

Complementary and Alternative Medicine (CAM)

Many CAM therapies have not been proven statistically to reduce asthma incidence, severity, or risk. Practicing alternative medicine strategies is not recommended as a replacement to scientifically proven pharmacologic management, but they may be used as an adjunct if appropriate.

These therapies include acupuncture, chiropractic therapy, homeopathic and herbal medicine, breathing techniques, relaxation techniques, and yoga (9).


Asthma Prevention Strategies

Asthma Action Plan

The Asthma Action Plan (1) is a great tool for families. It can improve recognition of the early signs of asthma exacerbations and facilitate appropriate treatment of asthma symptoms. It was found in the NCHS’s National Health Interview Survey performed in 2016, that only 50.8% of children reported they had received asthma actions plans and only 76% were taught how to recognize early signs of an asthma attack (12). If updated frequently with the child’s healthcare provider and followed in the event of asthma symptoms it may reduce exacerbation severity and duration, primary care office visits, hospital visits, and asthma-related deaths (1).

Asthma action plans are designed to provide families one place to collect all the child’s critical information regarding their asthma including:

  • Name;
  • Date of birth;
  • Current medications for long-term maintenance;
  • Quick-relief medications;
  • Medication dosing/instructions; and
  • Important phone numbers in case of emergency.

This information helps guide caregivers to act quickly when exacerbations occur. It also identifies common asthma symptoms that might be overlooked and plans appropriate treatment steps to complete in the event these symptoms occur.

There are three zones on the Asthma Action Plan:

  1. Green
  2. Yellow
  3. Red

Each zone indicates increasing severity of symptoms and identifies appropriate treatments or interventions. With proper control of their asthma disorder, children and adults alike should spend a majority of their days in the green zone. This zone indicates that there are no asthma symptoms, even in play or activity (1). Prevention of trigger exposure is the key to maintaining this zone.

The next zone, yellow, indicates that the child is not feeling well and is experiencing asthma symptoms such as coughing, wheezing, runny nose/cold symptoms, breathing harder or faster, waking at night coughing, and playing less than usual (1).

The final zone, red, indicates the danger zone in which the child’s symptoms worsen so drastically that in addition to giving the medications listed on the plan, taking the child immediately to the hospital or calling 9-1-1 is the necessary course of action (1).

Some children, even if they spend the majority of their days in the green zone, can quickly escalate to the red zone. Educating families on this plan is critical to helping them make the best decisions for their children in both preventing and managing asthma symptoms.

Quiz Questions

Self Quiz

Ask yourself...

  1. There are a myriad of treatment options for pediatric patients with asthma. What are the first-line treatments?
  2. What are some of the side effects of long term systemic corticosteroid administration? Are these risks the same for inhaled steroids?
  3. Some patients wish to incorporate CAM therapies. How will you approach this? What kind of education would you provide on this subject?
  4. Why is it important to uphold prevention techniques and strategies?

Controlling Allergies and Environmental Triggers

Children with asthma often lead normal lives until a trigger initiates the inflammatory cascade, resulting in an asthma exacerbation. Up to 90% of children with asthma symptoms also have allergies (11). Some of the most common allergens and environmental triggers for asthma, both indoor and outdoor, include dust mites, molds, trees or pollens, cockroaches, pet dander, secondhand smoke, ozone, and particle pollution (7,11).

Exercise and stress can also be triggers for asthma symptoms (10). While limiting exercise is not generally recommended unless prescribed by a healthcare provider, choosing less physically demanding exercises may result in better asthma control. Children with well-controlled asthma are often able to complete activities and exercise as desired (10).

Teaching families how to identify asthma triggers and avoid the child’s exposure when possible can significantly reduce asthmatic complications. Below are a few suggestions that can be offered to families to help improve environments for children with asthma.

Avoiding Common Asthma Triggers (2,7,9)

  • Frequently wash hands to avoid spread of infection (common cold, alternate viruses, bacteria).
  • Close house windows, doors, and car windows to prevent increased exposure to pollens and other outdoor allergens
  • Use zippered mattress and pillow covers to reduce exposure to dust mites.
  • After playing outside, immediately change clothes and/or bathe to reduce prolonged exposure to outdoor allergens.
  • If possible, remove old carpeting and/or frequently vacuum when child is not around.
  • Avoid humidifiers that may harbor mold and bacteria.
  • Monitor for food allergies including but not limited to milk, eggs, peanuts, tree nuts, soy, wheat, fish, shellfish, and food additives.
  • Address pets in the home. If pets are an asthma trigger and rehoming is not an option, bathe pets weekly, keep them outside as much as possible, and avoid having them in child’s bedroom.
  • Avoid secondhand smoke. Ask those who smoke to not smoke around the child, smoke in designated rooms, or cease smoking all together.

These interventions, along with providing thorough asthma prevention and treatment education to families have been proven to significantly reduce complications from asthma (12).

Peak Flow Meters

Peak flow meters are small, hand-held devices used to measure exhaled airflow (2). In the event of an asthma exacerbation, airways become inflamed, trapping air in the lungs and increasing the difficulty of proper exhalation. The use of the peak flow meter can help identify narrowing of the airway prior to the actual presence of asthma symptoms (2).

In the National Health Interview Survey (NHIS) performed in 2016, reports determined that only 50.6% of children were taught how to use a peak flow meter (12). Using the peak flow meter presents an opportunity to treat early signs of asthma exacerbations, with the hope of ultimately reducing the incidence of moderate to severe symptoms.

Peak flow meter education may seem intimidating to families at first. However, it is quite simple. Just like the Asthma Action Plan, peak flow meters have three zones that indicate severity of airway inflammation. The green zone is considered the safe zone, yellow is the caution zone, and red is the emergency zone (2). Each zone indicates a percentage of the child’s personal best exhaled air flow.

The green zone indicates 80-100% of the child’s personal best flow; the yellow zone measures 50 to less than 80%; and the red zone measured less than 50% of the child’s personal best flow. (9) Using the results of the peak flow meter test with the asthma action plan can help families decide the appropriate course of action in asthma management.

To use the peak flow meter, the child should move the marker on the meter to zero, sit or stand-up straight, take a deep breath, put the meter into the mouth closing the lips around the mouthpiece, and blow as hard and fast as possible (9). The number noted on the meter should then be marked in a log and the steps repeated 5-6 more times (9).

The best three numbers should then be recorded in a final log to determine how well the child’s asthma is controlled. Families should be instructed to record a log over the course of a couple of weeks to determine the child’s best peak flow rate as well as determine the colored zones for future asthma management.

After the zones are created with the data collected, the child should then use the peak flow meter daily, to determine if the child is experiencing airway inflammation. The child and family should use the results to compare to the treatment plan as written on the child’s asthma action plan (2,9).

Proper Medication Administration

Proper medication administration is crucial to asthma control. It is no longer recommended to use inhaled medications without the use of a spacer (4). A spacer device helps deliver doses of inhaled medication in a more streamlined and coordinated movement (4).

However, despite being taught how to properly use a spacer upon prescription of an inhaled medication, many children and families forget to use, or improperly use the device. Spacer use and proper medication administration should be reviewed with every child and their family at all asthma related healthcare appointments and/or emergency department visits.

Ensuring that children and families are using medications correctly may reduce and even prevent serious asthma exacerbations in the future.


Quiz Questions

Self Quiz

Ask yourself...

  1. What age-appropriate interventions can you use during the early stages of childhood asthma treatment to ensure that patients properly utilize their inhalers and peak flow meters?
  2. How would you approach this with a toddler in comparison to an adolescent?
  3. How would you describe to a child how to use an inhaler for the first time, step by step?

Case Study

A father and his 5-year-old son present to the primary care office: The father states that the child has been coughing at night 2-4 nights a week; coughing every morning; and has difficulty breathing with exercise or exertion. The child experienced a cold a few weeks ago and since then, the coughing has not improved.

The father denies any fever. He describes the coughing as hoarse, hollow, dry, and sometimes barky. The child also frequently experiences rhinorrhea and increased sputum, but father denies those symptoms at present. The father mentions that they have been to the emergency department twice in the past 6 months for similar symptoms and the child has received two treatments of nebulized Albuterol (2.5mg) at each visit.

They were not sent home with any medications. Father states that while the Albuterol treatments in the emergency department helped for a couple days, the coughing would return. The family has one dog in the home and the child frequently spends time at his grandparents’ house where he is exposed to secondhand smoke.

The child appears healthy in clinic today. His vital signs read: O2: 100%, Respiratory Rate: 13, Heart Rate: 119, Blood Pressure: 97/62, and Temperature: 98.2F. He is sitting comfortably in the office but will frequently clear this throat and have a harsh cough. Upon listening to the child’s lungs, wheezes are noted bilaterally in the bases. There are no retractions, rhonchi or rales.

The healthcare provider performs spirometry testing to evaluate the child’s lung compliance and level of obstruction prior to administering a SABA medication. After completing the spirometry, the child is noted to have a FEV1 75% of predicated value. A nebulized Albuterol treatment is completed and the child performs the spirometry again. After the treatment, the child’s FEV1 returns to a normal range >85% of predicted value.

Physical exam reveals improvement in wheezing and the child states he can breathe better. Based on the child’s history of persistent coughing >2 nights a week, coughing every morning, limitations on activity due to respiratory symptoms, and an initial abnormal FEV1 (though resolved after SABA administration), the healthcare provider determines that the child has Mild-Persistent Asthma.

Based on the step-wise approach of managing asthma, the child is treated as a Step 2 for symptoms aligning with mild-persistent asthma disease. The healthcare provider prescribes the child a rescue Albuterol inhaler (SABA) and long-term, low-dose Fluticasone (Flovent HFA) inhaler (ICS). The healthcare provider recommends to the father that the child be tested for allergies to help identify possible triggers to asthma symptoms. If the child is found to have significant allergies, an additional allergy medication may be prescribed at that time.

The father and child are educated on proper administration of the medications with use of a spacer and given a peak flow meter to measure the child’s exhaled airflow. The father is instructed on how to find the child’s best peak flow rate over the next two weeks and use that to determine critical values of expected airflow. The child should continue to record the peak flow measurements daily to assess early changes in airway obstruction.

The healthcare provider then develops an Asthma Action Plan with the father and child to provide a guideline of therapy, write important medication and emergency information, and help to identify early asthma symptoms and emergency treatments.

They discuss common asthma triggers to avoid. The father and child are encouraged to keep their pets out of the child’s room as much as possible and outside whenever feasible. The child should use a zippered mattress and pillow protector to prevent exposure to dust mites and flooring should be mopped or vacuumed frequently while the child is outside of the home.

It is also recommended that secondhand smoke exposure is limited by way of having grandparents smoke outside of the home, see the child at his home where there is less smoke, and change their clothes or use a smoking jacket that can be removed after smoking before being with the child.

With new information in hand, the father and child, while overwhelmed, feel they can start to prevent and treat the child’s asthma symptoms. The family should be encouraged to follow-up closely with their primary healthcare provider to ensure appropriate control and reduce chronic airway inflammation.

Summary

Asthma is a prevalent, chronic illness in society. Understanding the disease process, therapy options, and promoting prevention strategies can help manage this chronic disease- reducing complications and improving quality of life.

Online resources offered through national organizations, such as the Centers for Disease Control and Prevention, American Academy of Pediatrics, Healthy People 2020, and the Asthma and Allergy Foundation of America provide excellent information for both patients and healthcare members.

It has been said that an ounce of prevention is worth a pound of cure. This holds true for asthma even more so than many other diseases. Focusing on prevention strategies, proper and prompt treatment, and appropriate use of resources are the cornerstone of asthma treatment.

Quiz Questions

Self Quiz

Ask yourself...

  1. What can you take away from this course on Childhood Asthma, that can help you in your workplace?

Nursing Interventions for Sepsis: Fluid Management

Introduction 

In patients with septic shock, fluid resuscitation is a critical intervention that restores tissue perfusion. However, there is a great deal of variation in the type of fluid, rate of administration, and the total volume of fluid administered that goes into fluid resuscitation protocol in managing a patient with sepsis. 

IV fluids should be prescribed like any other drug we give our patients. A critical evaluation related to the indication and contraindication for different fluid types should be done on each patient (1) 

Circulatory insufficiency and shock result from inadequate perfusion relative to the tissue demands (2). Early fluid resuscitation is essential in determining the outcome of patients with circulatory insufficiency and shock.  

What can cause circulatory insufficiency?  

  • Pump failure; 
  • Insufficient vascular tone (the vasodilation we see in sepsis);
  • Hypovolemia (2).

Patients with distributive shock (the primary shock seen in sepsis) may experience circulatory insufficiency due to the profound vasodilatation that is associated with the inflammatory reaction to an infection (3). 

How Sepsis Affects the Different Organ Systems 

Cardiovascular

As shock progresses and the mean arterial pressure (MAP) trends downward, the cerebrocortical functions are the first to be impaired, which often manifests as a change in the level of consciousness or altered mental status (2). 

Gastrointestinal & Renal

As perfusion decreases from vasodilation or from decreased cardiac function, tissue beds become globally hypoxic. The GI tract and the kidneys are known to be intolerant of hypotension, and precipitous decrease in MAP, which can lead to impaired mucosal function, bowel integrity, or in extreme cases frank ischemic necrosis (2). 

Overall Metabolism

Secondary to developing tissue hypoxia and as a result of anaerobic metabolism in the absence of adequate tissue oxygenation, patients may develop a high lactic acid level as a response to the progressive tissue hypoxia. Serum lactate of 4 or greater is associated with increased severity of illness and poorer outcomes even if hypotension is not present (3). 

With this knowledge, providers should be prepared to fluid resuscitate patients who are hypotensive or have a lactate ≥4 mmol/L to expand their circulating blood volume and restore tissue perfusion pressure (3). 

Quiz Questions

Self Quiz

Ask yourself...

  1. How does sepsis affect the cardiovascular system? 
  2. Why is fluid resuscitation one of the primary nursing interventions for sepsis in patients who are hypotensive or have a lactate of ≥4 mmol/L? 

The Great Debate: Crystalloid vs. Colloid 

Crystalloids 
  • Low-cost salt solutions that are known to be the go-to, easy to grab, and, often, first choice fluids (4). 
  • Isotonic crystalloids are the most commonly administered IV fluid internationally. 
  • Crystalloid solutions were first prepared in response to the cholera pandemic in 1832.  
  • Only about 20-30% of administered crystalloid fluid will stay in the intravascular space. (5). 

Examples: Sodium chloride (Normal saline), Lactated Ringers, or Plasmalyte 

Colloids 
  • Colloids are suspensions of molecules in a carrier fluid with high enough molecular weight to prevent crossing healthy capillary membranes; thus, a larger percentage of the administered fluid will remain intravascular (5).  
  • Colloids are more expensive fluids and are either man-made (starches, dextrans or gelatins) or naturally occurring.  

Examples: Albumin or fresh frozen plasma (4). 

The physiologic rationale behind favoring colloid over crystalloid is the thought that colloids may expand intravascular volume more effectively by remaining in the intravascular space and maintaining colloid oncotic pressure (5).

Quiz Questions

Self Quiz

Ask yourself...

  1. In what types of situations would you use crystalloids versus colloids? 
  2. How does the cost of colloids factor into the decision-making process, especially when weighed against the negligible potential difference in outcomes? 

Choice of Crystalloid Fluid for Resuscitation: Is Normal Saline Really “Normal”? 

The use of saline versus a balanced crystalloid solution has been a topic of ongoing debate. Due to the high mortality, the burden to society, and increasing awareness surrounding sepsis, there has been extensive research done to identify the optimal fluid treatment protocols. Ultimately, provider preference, hospital protocol, and regional availability dictate much of choice due to a lack of evidence-based guidelines on specific fluid choice. 

Fluid composition can have unintended physiological effects, such as altering the pH balance through the metabolism of lactate and acetate, leading to a decrease in bicarbonate, and eventually metabolic acidosis, and the potential for acute kidney injury (6). 

Normal Saline vs. Lactated Ringers 

The Saline Against Lactated Ringers or Plasma-Lyte in the Emergency Department (SALT-ED) study is a pragmatic, cluster, multiple-crossover trial at a single center evaluating the clinical outcomes of patients treated with 0.9% NS versus balanced crystalloids in the setting of resuscitation in the emergency department (7). The trial included 13,347 patients who received a median of 1 liter of fluid (7). Saline increased the risk of death or renal failure when compared to LR/Plasmalyte (5.6% vs 4.7%, p= 0.02). The subgroup of patients with renal injury at the time of admission was more susceptible to adverse kidney events from saline administration (37.6% vs 28%, p= <0.001) (7). This trial confirmed that saline increases the risk of renal failure when compared to balanced solutions.  

These results were then duplicated at Vanderbilt and included critically ill patients. The SMART trial, a pragmatic, cluster-randomized, multiple – crossover trial, was conducted in five intensive care units at an academic center and included 15,802 adult patients (5). Patients were randomized to receive either 0.9% NS or LR/Plasmalyte. Among the 7,942 patients in the balance crystalloid group, 1,139 (14.3%) had an adverse kidney event, compared to 1,211 of the 7,860 (15.4%) patients in the NS group (p = 0.04) (5). In-hospital mortality at 30 days was higher in the NS group when compared to the balanced crystalloid group, as well (11.1% vs 10.3%, respectively, p = 0.06) (5). The mortality difference in the two groups suggests that NS may not only be causing renal failure but may also be causing harm to patients via additional mechanisms, including increased inflammation. (8). 

Normal saline as a resuscitation fluid should not be administered in high amounts as it carries the risk of inducing a hypernatremic hyperchloremic metabolic acidosis (8). Some patients are already extremely acidotic and giving them fluid that will exacerbate their academia is poor practice. The truth is that “normal” saline is not physiologically normal. It is a hypertonic, acidotic fluid that can cause more harm than good, especially in patients who need large volume resuscitation. The development of electrolyte disturbances secondary to fluid administration also depends on the electrolyte status of the patient before resuscitation is initiated. 

All of this is not to say that saline is all bad and should never be used, but to point out that just because, “It’s what we’ve always used,” “It’s easy to grab,” or “The patient is hyperkalemic,” these are not justifiable reasons to use high volumes of NS in the resuscitation of your patients.

How Much Fluid Do Septic Patients Need? 

The concept of prompt IV fluid administration was first accepted after the 2001 study of early goal-directed therapy (EGDT). The results of this landmark study propelled early and protocolized fluid management to the forefront of sepsis management. Because of this study and future studies that replicated the results, the Surviving Sepsis Campaign (SSC) began promoting EGDT fluid resuscitation as a cornerstone of sepsis and septic shock management (5). 

EGDT Study Protocol:  

In the study, patients either received standard therapy, which involved arterial and central venous catheterization and a protocol targeting a CVP 8-12 mmHg, mean arterial pressure (MAP) at least 65 mmHg, and urine output of at least 0.5 ml/kg/hr, or the EDGT group (5). The EDGT group included the aforementioned components but also included a catheter to measure central venous oxygen saturation (SvO2), six hours of treatment in the emergency department before admission, and administration of 500 mL of crystalloid fluid every 30 minutes to achieve CVP goals, vasopressors, and vasodilators to maintain MAP goals, and blood transfusions or dobutamine to achieve ScvO2 70% (5). Overall, in-hospital mortality was found to be 16% less with EDGT when compared to standard therapy (46.5% vs 30.5%; p= 0.009) (5). 

The SSC 3-hour and 1- hour bundle both recommend the initial administration of 30 mL/kg of crystalloid fluid for hypotension or lactate ≥ 4 mmol/L as a fluid challenge with a target CVP goal ≥ 8 mmHg, ScvO2 of ≥ 70%, and normalization of lactate (9).  

A patient may need repeat fluid challenges in the initial phases of sepsis/septic shock. This bolus dose is meant to rapidly expand the patient’s blood volume to allow providers to assess the patient’s response to fluid resuscitation. 

A key concept for dosing fluid therapy in the critically ill population is to actively address ongoing losses (drains, stomas, fistulas, or hyperthermia, open wounds, or various causes of polyuria) paired with the frequent reassessment of the need for further hemodynamic support (10). While fluid administration is a critical aspect of resuscitation, excessive fluid accumulation has been associated with worse clinical outcomes- particularly the development of acute kidney injury (AKI), pulmonary edema, pleural effusions, and in some cases, an increase in ventilator days (10). 

The idea of interrelated phases of fluid management, coined “ebb and flow,” differentiated according to the patient’s clinical status, with evolving goals for fluid need, is highly individualized, but an important concept in the management of the septic patient. This helps to avoid adverse events related to poor fluid management (10). 

Quiz Questions

Self Quiz

Ask yourself...

  1. Balanced crystalloids may have an advantage over saline-based solution for IV fluid resuscitation. How will you incorporate this into your practice?  
  2. What types of patients are likely to benefit from a saline-based resuscitation VS balanced crystalloids? 
  3. Some of the unintended effects of saline administration can be high-priority, such as renal failure and a higher risk of death according to some studies. Should we always use balanced solutions when electrolytes permit? 

Phases of Fluid Resuscitation  

Initial Phase 

In the initial phase of fluid resuscitation, the objective is the restoration of effective circulating blood volume, organ perfusion, and tissue oxygenation. Fluid accumulation and a positive fluid balance are to be expected here (10).  

Second Phase 

In the second phase, the goal is a maintenance of intravascular volume homeostasis (10). The goal is to prevent excessive fluid accumulation and to avoid unnecessary fluid loading. By the second phase, the patient should show evidence of adequate tissue perfusion. 

Third Phase 

In the third and final stage, the objective centers around fluid removal and the concept of “de-resuscitation” as dictated by the state of physiologic stabilization, organ injury recovery, and convalescence (10). During this phase, unnecessary fluid accumulation may add to secondary organ injury and adverse events. 

Below is a photo depicting the potential consequences of fluid overload on end-organ function as adapted by Malbrain et al (1). 

Macro-circulation End Points of Sepsis Resuscitation 

As mentioned previously, resuscitation goals for the septic patient are to return the patient to a physiologic state that promotes adequate organ perfusion and matching metabolic supply and demand. 

Ideally, resuscitation end points should assess the adequacy of tissue oxygen delivery (DO2), oxygen consumption (VO2), and should be quantifiable and reproducible. Since there fails to be a single resuscitation endpoint despite years of research, providers must be able to rely on multiple endpoints to determine the patient’s overall response to therapy (11). The SSC focuses their resuscitation guidelines on the original EGDT protocol, with an emphasis on macro- and micro-circulatory endpoints (11): 

  Ventilated Patients  Spontaneously Breathing Patients 
Central Venous Pressure  12-15 mmHg  8-12 mmHg 
Mean Arterial Pressure  65 mmHg  65 mmHg 
Uterine Output  0.5 mL/kg/hr  0.5 mL/kg/hr 
Central Venous O2 Saturation  70%  70% 
Mixed Venous O2 Saturation  65%  65%
Quiz Questions

Self Quiz

Ask yourself...

  1. 30mL/kg can be a large amount of fluid in patients with high body weights. Would you still follow the recommendation of 30mL/kg in these cases? 
  2. There is much debate about the optimal amount of fluid resuscitation. What are some of the concerns with over and under resuscitation?
  3. Between over and under resuscitation, which is likely more detrimental in terms of mortality? 

Central Venous Pressure 

A previously well-established starting point in determining a patient’s need and subsequent responsiveness to fluids is to utilize a static measurement, such as the central venous pressure (CVP) or pulmonary artery occlusion pressure (PAOP) (11). As most providers know- using the CVP as an initial resuscitation target and estimate of preload adequacy is fundamentally flawed. Factors such as total blood volume, cardiac output/venous return, pulmonary hypertension, cardiac tamponade, arrhythmias, and human error involving leveling of the transducer are all factors that have the potential to impact the central venous pressure (11). The correct interpretation of a CVP value is as follows: a low CVP value of ≤6 almost always indicates hypovolemia. However, a high value does not exclude hypovolemia, nor does it guarantee hypervolemia. 

Lactate 

Moving from a “macro” point of view to a “micro” point of view, providers use several clinical and laboratory values to assess the micro-circulation. Most commonly, lactate, central venous oxygenation, and capillary refill time. 

Lactic acid is one of the most widely accepted biomarkers used to diagnose sepsis-related organ dysfunction. The working theory behind increased lactate in septic shock is that as global tissue hypoxia occurs, oxygenation fails to meet tissue oxygen demand, therefore increasing anaerobic metabolism…and lactic acid level (11). Just like when you show up for that first day of a Spring 5K after spending the last four months on your couch watching Netflix documentaries… need… more… oxygen!!! 

Unfortunately, this basic explanation fails to consider other contributions to elevated lactate. It continues to be widely accepted and used as a marker of micro-perfusion, but providers should be aware that there are still limitations. 

Elevated lactate can be attributed to 4 broad categories: 

  1. Decreased tissue oxygen deliveryyou could see elevated lactate in individuals who have had a tonic-clonic seizure, severe asthma attack, severe anemia, carbon monoxide poisoning, or chose to do one of those Spartan Races in July. 
  2. Underlying diseaseyou could have increased lactate in patients who have fulminant liver failure, lymphoma/leukemia, small cell lung cancer, pheochromocytoma, or thiamine deficiency (sepsis would also fall under this category) (11). 
  3. Drugs & toxins – Drugs and toxins that can often be responsible for an increased lactate include Biguanides, Linezolid, Cyanide poisoning, NRTIs, and beta 2 agonists (11). 
  4. Inborn errors of metabolismThe rarer inborn metabolism errors are the patients who have enzyme deficiencies such as pyruvate dehydrogenase, pyruvate carboxylase, Fructose-1-6-diphosphatase, and phosphoenolpyruvate carboxykinase (11). 

SvO2/ScvO2 

Moving past lactate measurement to more technical measurements of tissue oxygenation, both mixed venous oxygen saturation (SvO2) and ScvO2 have been considered important targets because they can be used to estimate a global balance of cellular oxygen demand versus delivery (11).  

A ScvO2 <70% is indicative of inadequate oxygen delivery to tissues, increased oxygen extraction, or a combination of the two. It is important to note that a true ScvO2 must be obtained via a central venous catheter with the tip appropriately placed at the junction of the superior vena cava and the right atrium (11). 

Assuming it is measured at the correct location, a ScvO2 of 70%-89% is suggestive of a well-balanced VO2/DO2. A ScvO2 ≥90% suggests poor oxygenation utilization at the cellular level, tissue dysoxia, or microcellular shunting (11). Currently, the routine uses of SvO2 and ScvO2 are not supported in the literature, but the role may become more apparent as sepsis end-goal resuscitation research continues to increase in prevalence. 

Capillary Refill Time 

While technology and invasive tests offer pertinent information, these interventions should be performed in conjunction with frequent clinical examinations to assess the response. 

Capillary refill time is a basic examination skill that new literature is examining as a valuable tool to assess regional and global tissue perfusion during septic shock resuscitation. 

Capillary refill time is defined as the duration of the time needed for the patient’s fingertip to regain color after direct pressure is applied to cause blanching. In a healthy patient, the refill time should be <3.5 seconds (11). It is important to note that skin temperature, room temperature, age, and use of vasoactive medications can impact capillary refill time and should be taken into consideration. Assuming the patient’s extremities are normothermic, a refill time of >5 seconds suggests the presence of abnormal micro-circulatory flow (11). 

Serial assessment with normalization within 6 hours is associated with successful resuscitation when compared against traditional resuscitation targets.

Estimating Fluid Responsiveness with SVV and Bedside Echocardiography  

Dynamic indices such as stroke volume variation (SVV), pulse pressure variation, and inferior vena cava variability all have been found to have a better predictive value, sensitivity, and specificity than the static indices (11). In patients who are spontaneously breathing or have arrhythmias, direct measurement tests such as the expiratory occlusion test and passive leg raise may be preferred (11). 

As SVV of >12 has an 88% sensitivity and 89% specificity for predicting fluid responsiveness in a patient without cardiac arrhythmias and requiring mechanical ventilation. Some monitoring equipment may calculate SVV with a standard arterial line only; other times, a special arterial line may need to be inserted to measure SVV (15). 

Sepsis-induced cardiac dysfunction is well described and often presents as a reduction in left ventricular stroke volume and impaired myocardial performance. Noninvasive ways to measure the cardiac output and cardiac indexes include devices such as the FloTrac or Vigileo systems or basic bedside echocardiography, have become more common. The use of invasive pulmonary artery catheters are associated with more risk than patient benefit, and their use has significantly decreased. The information gained from bedside echocardiography includes a rough estimate of cardiac output, LV and RV function, chamber fluid status, IVC size and variability, and global cardiac function. This information can be invaluable when utilized in real-time, especially to measure the responsiveness of treatments. 

Quiz Questions

Self Quiz

Ask yourself...

  1. There are multiple types of endpoints we can use to measure fluid resuscitation and volume status. Which end points are favored in your clinical practice? 

Fluid Challenge Without the Fluid 

What could be better than determining the effect of a fluid bolus without actually infusing any fluid? Though these techniques are imperfect, they can provide insight into the “fluid responsiveness” of a patient. 

Passive Leg Raise 

The passive leg raise test is another noninvasive means of assessing fluid needs by mimicking a fluid bolus. It involves moving a patient from the semi-recumbent position to a position where the legs are lifted at 45 degrees, and the trunk remains horizontal (2). This induces a transfer of 250-350 mL of venous blood from the inferior limbs and the splanchnic compartment towards the thoracic and cardiac cavities, which mimics the increase in cardiac preload induced by fluid infusion. The threshold to define fluid responsiveness with a passive leg raise test is a 10% increase in stroke volume or cardiac output (1). Cardiac output changes can be detected 1-2 minutes after the maneuver is performed using either SVV via a noninvasive technology (Flo-Trac) or by utilizing bedside echocardiography to visualize cardiac function changes (12). A positive response may also be noted if blood pressure increases with a decrease in heart rate, though this is less sensitive and specific. Like capillary refill, the passive leg raise can be done regardless of arrhythmia or mechanical ventilation mode (12). 

End-Expiration Occlusion Test 

The end-expiration occlusion test is another fluid responsive test, but specifically for the subset of patients who require mechanical ventilation. The test consists of stopping mechanical ventilation at end-expiration for 15 seconds and measuring the changes in cardiac output. By pausing mechanical ventilation, there is an increase in cardiac output by stopping the cyclic impediment of venous return that occurs at each ventilator-triggered breath. An increase in the cardiac output above the threshold of 5% indicates fluid responsiveness. 

Putting it Together – Performing Nursing Interventions in Sepsis 

The best approach is to use multiple techniques to measure the efficacy of fluid resuscitation. Relying on any single parameter is not ideal practice and may lead to under or over-resuscitation. The best way to use this data is to perform interventions that increase perfusion (usually a fluid bolus in sepsis) and re-measure the endpoint. A trend toward better perfusion (lower lactic acid level, faster capillary refill, etc.) indicates a positive response. A negative response can be due to either:

  1. inadequate volume of fluid resuscitation; OR
  2. a patient that is no longer fluid responsive.

It can be difficult to discern the difference, so the passive leg raise or occlusion test may be helpful here. There is no fixed rule, but it is generally thought to be better to over-resuscitate than under-resuscitate. 

By systematically using this approach, the aim is to properly resuscitate the patient while avoiding the pitfalls of both over and under-resuscitation. Endpoints should be measured after each intervention. 

For example, if you measure a lactic acid level of 8 and note delayed capillary refill on the exam, you may determine that fluids will augment cardiac output and increase tissue perfusion. Thus, you choose to administer 1L bolus. Once the bolus is complete, you should re-check the lactic acid level and capillary refill. It may not normalize, but there should be an improvement.

Summary 

In summary, fluid resuscitation in sepsis is a controversial topic. Nurses should utilize a variety of endpoints to measure fluid status and perfusion status. Newest evidence is suggesting that LR may have a physiologic benefit over NS, and albumin may have a role in the resuscitation of septic patients.

One Hour Sepsis Bundle


Introduction 

It is nothing new to healthcare workers that sepsis is a big deal and often at the top of the providers differential diagnosis when patients begin to decompensate, and the cause is not yet clear.  

The incidence of sepsis from 1979 – 2000 increased by 8.7%, from 82.7 to 240.4 per 100,000 patients (1). The incidence of sepsis is rising as a result of the aging population, progressive increase in antibiotic resistance, reliance on implanted devices, organ transplantation, and an increasing prevalence of patients with long-term immunosuppressive diseases who are at risk for severe infection and sepsis (1). 

To understand the importance of the sepsis bundle, you must understand why there is an emphasis on treating sepsis as a medical emergency, similar to a STEMI or a CVA. 

Sepsis is a life-threatening syndrome consisting of numerous signs, symptoms, hemodynamic, and laboratory findings, caused by an exaggerated and dysfunctional immune response to severe infection that leads to organ dysfunction (2). Septic shock is a more severe subset of sepsis that commonly presents with circulatory and/or metabolic dysfunction. Septic shock carries a 30-40% mortality risk (2).


Diagnostic Approach to Sepsis 

Early phases of sepsis can be subtle even in the carefully monitored patient, but if the subtle signs are missed, and the clinical signs of septic shock become glaringly apparent, you and your clinical team have already acted much too late.  

Below is a table depicting the most common hemodynamic changes seen in sepsis (1).

Parameter  Finding in Sepsis  Comments 

Heart Rate 


≥ 100 BPM   HR is a major compensatory mechanism for low systemic vascular resistance.
Mean Arterial Blood Pressure  <65 mmHg  Hallmark sign of septic shock if it remains low after adequate fluid resuscitation.
Cardiac Index  >4 L/min/m2  CI usually is elevated in early septic shock; may be depressed in late septic shock.
Central Venous Pressure  6-8 mmHg 

CVP is an indicator of volume status. If it is <6, the patient is likely volume depleted.  

A normal or high CVP value can have different causes. 

Systemic Vascular Resistance  <800 dynes/cm2  SVR is often low in early septic shock; it may become elevated in later phases of septic shock.

Svo2  

ScvO2 

< 70% 

<65% 

Low mixed venous o2 saturation or central venous o2 saturation indicates poor oxygenation to the tissues.
Oxygen Consumption (V02)  >180L/min/m2  Typically increased in early septic shock.

Defining Sepsis 

The updated guidelines on sepsis use the Sequential (Sepsis Related) Organ Failure Assessment Score (SOFA) to define sepsis. The SOFA score assesses the degree of organ dysfunction across numerous domains.  

A score of 2+ reflects an overall mortality of about 10% in the setting of suspected infection (1). The laboratory data included in the SOFA score focuses on coagulopathy, hepatic dysfunction, and/or renal dysfunction (1). Other laboratory data (such as WBC) can aid in the diagnosis of infection but is not used to define sepsis or septic shock. 

A bedside tool called qSOFA (Quick SOFA) was developed to quickly identify adult patients with suspected infection who are likely to have poor outcomes (1). 

 The presence of any 2 of the following is equal to a positive qSOFA:  

  1. Respiratory rate >/= 22/min 
  2. Glasgow Coma Score <15  
  3. SBP </= 100 mmHg (1) 

The qSOFA is best used to identify early organ dysfunction in adults on general medical/surgical floors, whereas the SOFA score is used more in the critical care setting (1). 

The qSOFA tool can be used to quickly screen and identify patients who are at risk for deterioration. It is being used both on admission and as ongoing tool to track changes in patient condition. 

The chart below illustrates common laboratory findings seen in sepsis (1). 

Laboratory Study  Typical Findings  Comments 
White Blood Cell Count  Leukocytosis or Leukopenia  Stress Response, increased margination of neutrophils in sepsis can cause transient neutrophenia; transient granulation.
Platelet Count  Thrombocytopenia  Look for evidence of fragment hemolysis; thrombocytopenia may be accompanied by DIC.
Coagulation Studies  Elevated Prothrombin Time (INR), aPTT, low fibinogen levels, elevated D-dimer; evidence of fibrinolysis  Coagulopathy very common but overt DIC is not common, (>15% of patients).
Liver Enzymes  Elevated alkaline phosphatase, bilirubin, and transaminases; low albumin  Generally a late finding in patients with sepsis; indicates hemphatic ischemia and transamin typically >10 times upper limit.
Plasma Lactate  >2.2mmol/L caused by hypermetabolism, anaerobic metabolism, inhibition of pyruvate dehydrogenase 

Poor prognostic feature if not improved rapidly by fluid resuscitation; diagnosed criterion for septic shock (with suspected infection).

Can have other causes of elevation – high sensitivity with low specificity.

C-Reactive Protein  Elevates as an acute phase reactant from hepatic synthesis  Acute-phase reactant, sensitive, but not specific for sepsis.
Glucose  Hyperglycemia or hypoglycemia  Acute stress response can lead to hyperglycemia, inhibition of gluconeogen can lead to hypoglycemia.
Arterial Blood Gas (ABG)  Respiratory alkalosis (early); metabolic acidosis (late)  Reduced arterial 02 content and mixed venous 02 saturation.
Quiz Questions

Self Quiz

Ask yourself...

  1. Think about your clinical experiences. Have you seen patients with sepsis who presented with atypical signs (hypothermia, respiratory alkalosis, etc.)?
  2. Do you think this delayed their diagnosis and care?
  3. How will you use this information to better detect patients who may have sepsis? 
  4. Over the years, many tools have been identified in hopes of detecting sepsis early. How does the sensitivity and specificity of each of these tools affect their usability? 

A Word on Septic Shock 

Septic shock occurs in up to 15% of patients with sepsis (1). The management of the patient in septic shock hinges on prompt recognition of the patient’s deteriorating condition, and expeditious administration of antibiotic therapy coupled with infectious source control. Simultaneously, the failing organ systems must be supported through measures such as, fluid resuscitation, vasopressors, blood transfusions, respiratory support, and inotropic agents. You can find more details regarding the initial management of sepsis in the Surviving Sepsis Campaign guidelines. 

Septic Shock is defined as hypotension requiring intravenous vasopressors to maintain a MAP ≥65mmHg and serum lactate of >2mmol/L (1). 

Early Septic Shock 

  • Hemodynamics à High Cardiac Output (CO) and Low Systemic Vascular Resistance (SVR)  
  • Extreme vasodilation leading to an increase in cardiac output. This is the bodys attempt to preserve peripheral vascular perfusion.  

Late Septic Shock 

  • As shock progresses, myocardial performance diminishes and circulating blood volume is continually lost to the interstitial space, leading to a profound hypotensive state.  
  • Sepsisinduced myocardial dysfunction may ensure. This results in a potentially reversible heart failure state due to myocardial depression.  

What Is a Bundle and Why Are They Used? 

The Surviving Sepsis Campaign developed the internationally endorsed sepsis bundle separately from their guidelines as a way to guide sepsis quality improvement (3).  

The bundles consist of various components of sepsis care: 

  • fluid resuscitation 
  • timely and appropriate antibiotic administration  
  • blood cultures 
  • and the use of serum lactate levels (4) 

The bundle elements were designed in such a way to be updated as new evidence emerged (3). In response to the most recent guidelines published in 2016, there has been a revised hour-1 bundle as opposed to the previous 3 hour and 6hour bundles (3) (5). 

Evidence has shown an association between compliance with bundles and improved survival in patients with sepsis and septic shock. In a multi-center, retrospective, observational study of adult patients with a hospital discharge diagnosis of severe sepsis or septic shock, overall mortality was lower in those who received bundle-adherent care (17.9%) when compared to those who did not (20.4%) (4). Interestingly, when the patients in the study were divided into subgroups by the suspected source of infection, there was only a statistically significant mortality benefit to bundle-adherent sepsis care in patients diagnosed with pneumonia (4).

Quiz Questions

Self Quiz

Ask yourself...

  1. How do you think the shift from a 3/6 hour bundle to a 1 hour bundle with affect patient care?
  2. How can hospitals adapt to this measure?
  3. Is the allocation of additional resources justified? 

1-Hour Bundle Components and Strategies to Expedite care 

The most critical change in the Surviving Sepsis Campaign bundles is that the previous 3-hour and 6-hour bundles are now combined into a single hour-1 bundle with the intention of beginning resuscitation and management immediately upon presentation (3) (5). While more than one hour may be needed for patient resuscitation to be completed, the initiation should begin immediately upon suspicion that the patient may be presenting with sepsis. 

Measure lactate level.

Serum lactate level serves as a surrogate for direct tissue perfusion measurement (3). In the absence of oxygen – anaerobic metabolism ensues, and lactate levels rise. It often represents the degree of tissue hypoxia present, and increased levels are associated with worse outcomes. If the initial lactate is >2mmol/L, it should be re-measured within 2-4 hours and used to guide resuscitation with the goal of achieving a lactic acid <2mmol/L (3). 

Hospitals should have a threshold of ≥2mmol/L for a critical lactic acid value, which will prompt any abnormal value to be communicated to the provider. Consider having non-nursing personnel collect the lactate level so that the nursing staff is free to focus on other tasks. The recollection of lactates >2 can be automated by many electronic order entry systems and will help reduce fallouts due to re-collection. Point of care lactate is now readily available which can be valuable. 

All critical lactate values should be communicated to both the nurse and the provider. Traditionally this has been done by a call to the nurse, who then notifies the provider. We suggest that the lab calls both the provider and the nurse directly to reduce the potential for error. 

Obtain blood cultures prior to antibiotics.

Blood cultures can become sterile within minutes of the first dose of an appropriate antibiotic (3). By obtaining cultures before administering antibiotics, there is a better opportunity to identify pathogens and therefore improve patient outcomes. Appropriate cultures include at least two sets of both aerobic and anaerobic cultures from two separate venipuncture sites. However, administration of antibiotic therapy should not be delayed past 1 hour in an effort to obtain cultures (3). 

Administration of broad-spectrum antibiotics.

Empiric broad-spectrum antibiotic therapy with one or more intravenous antimicrobials to cover all likely pathogens should be started immediately (3). Once a pathogen is identified, and sensitivities are established, the empiric antibiotics should be narrowed or discontinued if the patient is found not to have an active infection (3). 

Since time is of the essence when treating a patient presenting with sepsis, the empiric antibiotics should be kept in the on-unit medication storage for ease of access. Nurses should have immediate access to these medications. 

All orders for sepsis antibiotics should be ordered as STAT (for the first dose). The providers should be trained to enter antibiotics orders directly after examining patients, if possible. Delays in ordering obviously lead to a delay in medication delivery. The goal should be to have a culture that recognizes and treats sepsis as a medical emergency, just as a code stroke or myocardial infarction. 

Administer IV Fluid.

Early effective fluid resuscitation is critical for the stabilization of sepsis-induced tissue hypoperfusion and septic shock (3). Initial fluid resuscitation should begin immediately upon recognizing that a patient is presenting with sepsis and/or hypotension and elevated lactate (3). Fluid resuscitation should be completed within 3 hours of recognition. Current guidelines recommend that intravenous fluid resuscitation consists of 30 mL/kg bodyweight of crystalloid fluid (3). 

Providers should communicate the need for intravenous fluids verbally to the nursing staff and place orders into the order entry system directly after examining patients. The patient should have 2-3 largebore IVs placed to facilitate the administration of IV fluids and IV antibiotics without sacrificing the timing of one or the other. Oftentimes, placing a central line takes anywhere from 15-30 minutes and will delay overall patient care during the first minutes. If additional venous access is needed, it is advisable to wait until the patient is stabilized so long as adequate, reliable IV access is obtained. 

Apply vasopressors.

A critical part of sepsis resuscitation is restoring perfusion to the vital organs. If a patients blood pressure does not return to normal after the initial fluid resuscitation, then vasopressors should be initiated to maintain a mean arterial pressure (MAP) of >/= 65 mmHg (3). If a patient has profound hypotension and the decision is made by the medical team to initiate vasopressor therapy, there is no need to wait to initiate until central access is obtained (3). Vasopressors can be infused through a largebore peripheral IV safely for a short amount of time (3). 

Within the ER and ICUs, there should be easy access to vasopressors, specifically norepinephrine, vasopressin, and epinephrine, in the event that a patient needs a vasopressor started. Additionally, institutions should have standing protocols for nurses to initiate a vasopressor if a patient is consistently hypotensive despite adequate fluid resuscitation. This will save vital time by allowing the nurse to use their clinical judgment and restore vital organ perfusion quickly and efficiently while awaiting provider guidance. 

Quiz Questions

Self Quiz

Ask yourself...

  1. How can you incorporate these tips and techniques for expedited care into your practice? 
  2. What are some barriers you anticipate facing if you attempted to adopt these strategies? 
  3. Do you think it is feasible for hospitals to adapt a 1-hour bundle?

Code Sepsis 

Despite bundle care and the diligent work of healthcare providers and beside nurses alike, many hospitals have identified an opportunity to save lives and reduce suffering through early sepsis detection, compliance with current standards of care, and determining the appropriate level of care. 

The Emergency Department Code Sepsis Project focuses on timely implementation of the SSC care bundle to reduce mortality and costs and to ensure appropriate level of care placement. By activating a code sepsis,’ it allows not only doctors and nurses to be aware of the urgency at hand but also pharmacists, respiratory therapists, lab technicians, nursing support staff, and unit secretaries. 

In some facilities, a code sepsis is worked into the rapid response team’s framework. For example, if a nurse screens a patient for SIRS criteria and the patient meets the criteria, a page can be sent out from the patients current floor. This will mobilize the appropriate resources to facilitate swift and effective resuscitation. 

The multidisciplinary nature of the code sepsis project creates a strong sense of teamwork centered around applying best evidence-based practice, mobilizing resources, avoiding procedure variability, and improving patient care and safety (6). 

Hospitals that are struggling to meet sepsis measures should consider the addition of a code sepsis or sepsis response team. 

Each organization should strive for a culture that treats sepsis with the same urgency as any other medical emergency. Much of the delay in treatment with sepsis is due to a lack of standardized processes. Hospitals should work to develop sepsis protocols and sepsis response teams to increase compliance with bundles and decrease mortality. 

Quiz Questions

Self Quiz

Ask yourself...

  1. How could a code sepsis benefit your sepsis patients?
  2. Do you think that a code sepsis would expedite care in your facility?

Conclusion 

With sepsis being the number one killer of hospitalized patients in America and the number 1 cause of pediatric deaths, especially in developing countries, knowledge of the entire healthcare team, with an emphasis on nurses is imperative to decrease this statistic and provide expedited care to our patients to save lives. As a nurse, having the knowledge to recognize early symptoms of sepsis and act accordingly to prevent the progression, it will allow you increase care and improve patient morbidity and mortality.  

Chest Tubes Nursing Care


Introduction

Chest tube nursing care and placement is common procedure in many hospitals, yet nurses consistently rank them as one of the most overwhelming drains to care for.

A malfunction in a chest tube can be deadly for a patient in a matter of minutes. Many hospitals have recognized them as a common source of error and patient harm. For these reasons it is imperative that nurses understand how chest tubes function and how to care for them. In this course we will discuss the anatomy, indications, and care of chest tubes.

The ancient Greeks were the first to record techniques used to drain the pleural space (1). Though the process and equipment have evolved over the centuries, the basic principles  of chest tubes nursing care have not changed (1). Today, thoracostomy tube (more commonly known as a chest tube) placement continues to be a very common procedure.

Chest tubes are utilized for a variety of reasons, ranging from emergent placement to routine use after an elective surgery (1). They can be placed just about anywhere– the bedside, the operating room (OR), and interventional radiology.

Most nurses will encounter chest tubes at some point during their career– perhaps frequently, depending on where you work. Thus, it is essential for nursing staff to feel comfortable with chest tube management. Unfortunately, like anything else in healthcare, chest tubes are at risk for complication. Chest tubes nursing care is critical to overall health. Quick identification of potential complications could be the difference between life and death. This course aims to expand your knowledge and increase confidence in chest tube management.

Chest Tubes Nursing Care Basics – What Is a Chest Tube?

Licensed and retrieved from Adobe Stock

Let’s start with a quick refresher on the structure of our lungs. First comes skin (obviously). Beneath that is a layer of subcutaneous tissue, followed by muscle. Then we come to the ribs, which form the basic protective cage that holds our lungs, heart, and some very important blood vessels. Between each rib from top to bottom is a vein, artery, nerve, and more muscle (2). Behind the ribs lies the first layer of the pleural space, called the parietal pleura (2).

This membrane lines the entire chest cavity. Then comes the pleural space, which measures about 15-20 microns wide in its normal state (2). On the other side of the pleural space lies the visceral pleura, which is a membrane that covers the lungs, and then finally the lungs themselves (2).

What this means is that in a normal person, a small potential space exists between the lungs and the chest cavity, called the pleural space. When the pleural space becomes compromised and fills with extra fluid or air, the precarious negative pressure balance that keeps the lungs inflated is disrupted, forcing lung tissue to collapse.

A chest tube comes to the rescue. Known officially as a thoracostomy tube, the chest tube is a hollow plastic tube that is carefully placed by a licensed provider. The tube is driven through the outer skin and muscle, between two ribs and past the parietal pleura to rest inside the pleural space.

Its purpose is to drain the excess fluid or air out of the pleural space so the affected lung can reinflate. The tube is attached to a drainage system to facilitate the movement of the abnormal fluid/air out of the pleural space. The tube remains in place until the fluid/air is removed, the lung is reinflated, or becomes nonfunctional (3).

According to chest tube nursing care experts, chest tubes are generally divided into three categories based on size and method of insertion: large bore, small bore, and tunneled.

Large Bore (Blunt Dissection Technique)

Generally greater than 20Fr in size, large bore chest tubes are placed using the blunt dissection technique (3). A quick aside here: the size “Fr” refers to “French” or the actual french word “Charrière”, which is the name of the frenchman who invented the sizing (3). The sizing is based on the diameter of a tube, with 1Fr = ⅓ mm (for example, a 12Fr tube is 4mm, 12÷3=4).

The blunt dissection technique requires a skin incision large enough to fit a finger (3). A clamp or forceps is used to bluntly dissect intercostal tissues. The tube is inserted and held in place with heavy suturing (3). This technique is more invasive. It also comes with some risks, including damage to surrounding structures, tube misplacement, bleeding, and increased pain.

Small Bore (Seldinger Technique)

Small bore chest tubes are generally less than 14Fr in size. They are placed using the Seldinger technique, which involves using an introducer needle to get access into the pleural space (3). A guidewire is threaded through the needle and the needle is removed. Then the chest tube is threaded over the wire and the wire is pulled out, leaving only the chest tube. The tube is held in place with a suture and/or adhesive dressing. Advantages include a smaller incision, less pain, and it’s less invasive (3). Conversely, they are more prone to blockage because they are smaller (3).

The decision to use a small or large bore chest tube is made by the provider. For the treatment of most pneumothoraces, research shows that small bore chest tubes are as effective as larger tubes and may be less painful (4). Large bore tubes are recommended to treat traumatic pneumothorax due to the need for removal of blood and air (4). In the past, providers used large bore chest tubes to drain thick fluid like blood and pus, but more recent research suggests that small bore chest tubes are also effective if they remain patent and are properly maintained (4).

Tunneled (Indwelling)


chest tubes course image

(Retrieved from Cleveland Clinic Journal of Medicine, 2016)

Indwelling chest tubes are indicated for long-term chest drainage, primarily as a treatment for malignant pleural effusion (3). These tubes consist of a special catheter equipped with a cuff that remains under the skin and acts as an infection barrier (3). The Seldinger technique is used to get access into the pleural space, along with a “peel-away” dilator that allows the tube to be tunneled under the skin. Two small incisions are required for placement. A special vacuum bottle is attached periodically to collect the drainage (3).

Quiz Questions

Self Quiz

Ask yourself...

  1. Think about the anatomy of the lung, including the pleural space.
  2. Where exactly in this space are chest tubes placed?
  3. Is the potential space between the visceral and parietal pleura large enough for chest tube placement in the absence of pathologic conditions (pleural effusions, pneumothorax, etc.)?

Current Practice in Chest Tubes Nursing Care

Bedside chest tube placement has become increasingly routine. Thus, bedside nursing staff may be directly involved with the initial chest tube placement (5).

The nurse may be asked to gather the necessary supplies for placement, ensure patient consent is obtained, and assist with patient education regarding the procedure (5). The nurse may assist the provider during the procedure by participating in a pre-procedure “time-out” and monitoring the patient’s vital signs, comfort, and response to the procedure. Afterward, the provider will order a chest x-ray to verify placement and to confirm the absence of complications from the chest tube insertion. As always, the nursing staff is responsible for ensuring any post-procedure orders are carried out.  

Once the chest tube is in place, verified by x-ray, and attached to a drainage device, nurses are tasked with monitoring the patient and the drainage device. This would include monitoring vital signs as directed, observing for pain and signs of infection, and assessing the tube and drain system (5). An important part of monitoring includes recording the amount and color of chest drainage. How often this is done depends on nursing judgement, facility policy and the provider’s written orders.  

Perhaps the most intimidating aspect of chest tube management is ensuring proper function. It is the nurse’s job to look for signs that there may be a problem. Rest assured, these signs and symptoms will be discussed in detail later in the course.  

There will also be orders for the nurse to change any dressings and provide necessary wound care. This includes routine observation of the chest tube insertion site. Depending on how long the chest tube is in place, nurses may also have to change out the drainage system if it becomes full of fluid.  

Patients with chest tubes may ambulate, if appropriate, and travel to other departments within the hospital for other procedures. Chest tubes nursing care staff (most nurses) are responsible for ensuring the chest tube is properly packed up and stowed away for every adventure. This includes removing the chest tube from suction if suction is ordered and leaving the drainage system lower than the patient’s chest. Remember, it’s okay, the water seal will keep anything from entering the patient during transport and/or the procedure. 

Indications for Chest Tube Placement

A chest tube may be indicated for the following reasons: pneumothorax/hemothorax, pleural effusion, empyema, chylothorax, and post-operatively after cardiac/thoracic surgery (1).

Pneumothorax/Hemothorax

A pneumothorax, also known as a “lung collapse”, occurs when the normal negative pressure gradient within the lungs is compromised (6). Air is introduced into the pleural space where it is not welcome. A pathway to the pleural space may form on the inside of the body when lung tissue is damaged. The connection typically forms at the airway or alveoli (the little air sacs in the lungs that encourage gas exchange) (6).

For example, a patient with COPD or chronic bronchitis may develop enlarged, weakend alveoli called blebs that are prone to rupture. When this happens, air flows into the pleural space because of the difference in pressure, forcing the lung tissue to shrink or collapse in response to the expanding pleural space (6).

A pneumothorax may also occur from an outside source if an abnormal connection forms between the pleural space and the chest wall (6). For example, during a lung biopsy, a needle is introduced into the lungs from the outside. Sometimes a pathway forms, allowing air from the environment to flow into the chest. In an attempt to equalize the pressure, air rushes into the pleural space.

A pneumothorax may also be spontaneous in a condition known as primary spontaneous pneumothorax (PSP) (6). PSP usually occurs in tall, thin young men between the ages of 10-30 (6). The risk is significantly increased with current or past smoking (6).

Finally, a hemothorax is diagnosed when blood becomes trapped within the pleural space. It often occurs with pneumothorax. Hemothorax may result from trauma, abnormal coagulation, spontaneously, or after certain medical treatments (such as a biopsy) (7).

Symptoms of pneumothorax and hemothorax include acute chest pain and shortness of breath (dyspnea). The pain may be worse during inhalation and localized to the affected side (6). The degree of dyspnea is often proportional to the size of pneumothorax (bigger pneumo = more pain), but not always- a small percentage of people are asymptomatic (6).

Licensed and retrieved from Adobe Stock

Pleural Effusion

In a healthy person, the pleural space contains a small amount of serous fluid (about 5-10 ml) that is secreted by the parietal pleura and reabsorbed by the lymphatic system (8). When this carefully balanced system is disrupted, extra fluid can accumulate, known as a pleural effusion.

Pleural effusion is the result of leaky capillaries. Capillaries leak for two reasons: changes in pressure or damage to the vessels themselves (8). Congestive heart failure and cirrhosis are the two most common causes of pressure changes. Capillary damage is most commonly caused by pneumonia, pulmonary embolism, cancer, and GI disease (8).

Pleural effusion in the pediatric population usually stems from congenital heart disease, pneumonia, and cancer (8).

Large right-sided pleural effusion Licensed and retrieved from Adobe Stock

Empyema

Empyema is the development of infected, purulent fluid inside the pleural space (8). Pneumonia is the usual suspect, but empyema can also form from a lung abscess, bronchopleural fistula (an abnormal tract/pathway between the bronchus and the pleural space), esophageal perforation, or complications of trauma and surgery (8).

The development of empyema may begin with just a small amount of extra, sterile fluid that accumulates in the pleural space (8). When an infectious agent is introduced, inflammation brings white blood cells and even more fluid. Eventually, the infected material can grow into the pleural walls and cause tissue thickening, prohibiting lung expansion (8).

Purulent drainage associated with empyema can be thick and therefore difficult to drain. Fibrinolytics (medicines that dissolve blood clots) can be directly administered through the chest tube into the pocket of infection to help break it down and improve drainage (2). tPA is the medication of choice. A small amount of tPA is diluted in saline and infused through the chest tube, which is clamped for a while (1-2 hours) before drainage is resumed (2). The dose may be repeated if necessary.

Symptoms for pleural effusion and empyema include dyspnea, pleuritic chest pain, cough, fever & chills if infection is present, and weight loss. If a large volume of fluid collects, cardiac function may be impaired: the heart cannot pump effectively if there is no room (8).

Post-Operative

Chest tubes are often placed after heart or lung surgery because of the risk for developing pleural effusion or pneumothorax during recovery. They are inserted while the patient is still sedated prior to leaving the operating room.

In chest tubes nursing care, chest tubes are routinely placed following open heart surgery, including cardiac bypass and valve replacements. They are also indicated in major thoracic surgeries, such as pneumonectomy, lobectomy, lung transplants, segmentectomy, and wedge resection.

Patients with chest trauma may require a chest tube in the presence of pneumothorax or hemothorax.

Quiz Questions

Self Quiz

Ask yourself...

  1. Think about situations that call for chest tubes nursing care and the many different conditions that can necessitate chest tube placement.
  2. What is the difference between a pneumothorax, hemothorax, pleural effusion and empyema? What are the causes for each?

Potential Complications

When preparing a patient for chest tube placement, it is important to be aware of potential complications. Chest tubes can be lifesavers but they are not without risk: when placed at the bedside or during an emergency, it is essentially a blind procedure.

Injury to Surrounding Structures

Gastrointestinal Tract

Although rare, it is possible to for chest tubes to be placed beneath the diaphragm into the abdominal cavity. Insertion into the abdominal cavity poses risk for injury of the stomach, bowel, liver, spleen and other abdominal structures (1).

Though the overall risk is <1%, a third of all chest tubes that find their way into the abdomen result in injury to the patient (1). Signs of abdominal placement include the presence of stomach contents within the tube or peritonitis (1). An x-ray would confirm that the chest tube is located below the diaphragm. Inserting the chest tube no lower than the 5th intercostal space helps prevent this problem (1).

Diaphragm

Many chest tubes are placed at the bedside without imaging guidance. Improper placement poses a risk for injury to the diaphragm (1). Laceration, perforation, and muscle injury are the most common injuries (1). Certain conditions increase the risk of diaphragmatic injury, including diaphragm paralysis, late pregnancy, obesity, ascites, and abdominal tumors (1).

Lungs

The lungs are at highest risk of injury during chest tube placement, especially if a patient suffers from decreased lung compliance or pleural adhesions (1). Lung injury is commonly missed because it cannot be visualized on imaging and patients may be asymptomatic (1).

A rare complication of chest tube placement is infarction of the lung. Excessive suction causes aspiration of lung tissue into the chest tube, leading to infarction and tissue death (1). Providers must also beware of lung perforation and accidentally puncturing the pulmonary artery (as evidenced by rapid blood loss, massive hemoptysis, shortness of breath, tachycardia and hypotension) (1).

Cardiac Structures

If the chest tube is advanced too far, the tip may rest too close to the mediastinum, resulting in compression of nearby structures (1). Although rare, it can lead to hemodynamic instability (1). There have also been cases of penetration of cardiac structures.

Other Potential Complications

Pain

Some pain is associated with chest tube placement. At the very least, providers will provide local anesthetic to numb the area while the tube is inserted. Sometimes, patients are also given IV pain medicine or sedation during placement. Patients may also experience pain while the chest tube is in place, so providers will often prescribe PRN analgesia to improve comfort. Some studies have suggested that large bore chest tubes are generally more painful than smaller ones (4). Remember to encourage mobility. A patient’s pain will need to assessed, managed, and controlled.

Fistula

Bronchopleural fistula is both an indication for and potential complication of chest tube placement (1). A fistula is an abnormal pathway or tract that forms between two structures, in this case between the pleural space and the bronchial tree. A chest tube may benefit a patient if a bronchopleural fistula already exists (1). However, if a fistula forms as a result of the chest tube itself, it is associated with high morbidity and mortality (1). Patient symptoms of fistula include dyspnea, hypotension, cough, and persistent air leak (1). Timely chest tube removal can help prevent the formation of a fistula because it limits tube erosion (1).

Bleeding

Providers must be careful when placing chest tubes because the space between each rib contains a vein, artery, and nerve (1). Although rare, cases of hemorrhage and death have been reported as a result of chest tube placement. Luckily, abnormal bleeding is usually apparent right away. However, early diagnosis can be missed if the tube compresses the artery in such a way that it prevents any bleeding while in place (3).

Recurrent Pneumothorax

One of the worst complications is recurrent pneumothorax, simply because it means the chest tube has failed. A new pneumothorax is more likely to occur when the tube is pulled too early and the lung has not properly re-expanded (1). It can also be caused by an air leak or if air enters the pleural space during tube removal (1). If the recurrent pneumothorax is small and the patient is asymptomatic, it can typically be managed with follow up imaging and close observation. Otherwise, the chest tube will have to be reinserted.

Patient Considerations for Chest Tubes Nursing Care

When considering chest tube placement, it is important to evaluate the patient. Because the indications for chest tubes range from routine post-op care to life threatening emergency, the presentation of these patients varies significantly. In all cases, patient or family consent is paramount and should be obtained prior to the procedure.

The only exception to this is a true emergency, the process for which is outlined in your facility’s policies (all the more reason to be familiar with policy!).

Contraindications in chest tube placement should be considered as part of a risk/benefit analysis. For example, there are no contraindications for using chest tubes in the treatment of tension pneumothorax (1).

Tension pneumothorax is a medical emergency. It occurs when a pneumothorax or hemothorax becomes so severe that air can no longer escape from the pleural space. The pressure increases within the chest and forces the mediastinum (heart, great vessels, etc.) to shift out of the way, compressing the remaining unaffected lung.

These patients are at high risk of going into shock or cardiac arrest. Signs and symptoms of tension pneumothorax include decreased breath sounds, hypotension, tachycardia, hypoxia, and tracheal deviation to the contralateral side of tension pneumothorax (16). A tension pneumothorax can be diagnosed from a bedside ultrasound or chest x-ray (16).  

Relative contraindications to chest tube placement include abnormal coagulation or infection at the insertion site (2). Abnormal coagulation puts the patient at higher risk of bleeding. The parameters for placement will vary between facilities, but generally speaking, prospective patients should have an INR < 1.5 and platelets > 50,000 (2).

Infection at or near the insertion site increases the risk of infection in the chest cavity (3). In many cases, an alternate insertion site is available and should be utilized. For patients seeking elective or semi-elective chest tube placement, these relative contraindications should be resolved prior to placement, if possible.

A chest tube is considered elective if the patient is stable. The American College of Chest Physicians (ACCP) guidelines state that a patient is clinically stable with a respiratory rate less than 24 breaths/min, pulse rate 60-120 beats/min, normal blood pressure, and oxygen saturation greater than 90% on room air (6).

The ACCP recommends that all patients with a large pneumothorax (great than 3 cm apical length) get a chest tube (6). Ultimately, the ordering provider will decide if a patient requires a chest tube as an elective procedure or an emergency.


Quiz Questions

Self Quiz

Ask yourself...

  1. Like all procedures, chest tubes are not without risk.
  2. Think about the complications of chest tubes nursing care above.
  3. What signs and symptoms might you see if these are encountered?

Chest Tubes Nursing Care Basics – Where Are Chest Tubes Placed?

As previously mentioned, there are several different techniques used to place chest tubes: the blunt dissection technique for large bore tubes, Seldinger technique for small bore tubes, and the Seldinger technique with a peel-away dilator for tunneled chest tubes. Interestingly, these chest tube techniques can be performed just about anywhere: the OR, IR, and the patient’s bedside.

Operating Room

Chest tubes are usually placed in the OR after cardiothoracic surgery. The tube should be positioned no lower than the 5th intercostal space along the midaxillary line to avoid injury to the diaphragm (1). The second intercostal space at the midclavicular line is an alternate site. However, it is never the first choice because the tube must be driven through the pectoralis muscle (ouch) and it is more likely to produce an ugly scar (3).

Mediastinal chest tubes are commonly placed after cardiac surgery to facilitate drainage of blood and other fluid from the pericardial and pleural spaces (1). The goal is to prevent cardiac tamponade and pleural effusion. These tubes are easy to identify because they emerge from the mediastinum.

Interventional Radiology (IR)

Interventionalists have the advantage of using imaging to assist with chest tube placement. Ultrasound, CT and fluoroscopy (live x-ray) may be used. Imaging allows the provider to observe the chest tube as it enters the body, which helps ensure proper placement.

When placing a chest tube for the treatment of pneumothorax, the provider often uses fluoroscopy for guidance. The pneumothorax is visualized on the monitor while the tube is positioned. Using the Seldinger technique, the final catheter is threaded over the wire to rest in the pleural space.

Interventional radiologists are commonly enlisted to place drainage tubes for the management of empyema or lung infection (8). CT is the modality of choice because it allows better visualization of surrounding structures than fluoroscopy. The provider will take frequent CT scans while a wire is guided into place, then thread the catheter over the wire into the infection (8). Small bore tubes have been shown to be effective in the drainage of thicker fluids, like pus (4).

Finally, approximately 50% of cancer patients develop malignant pleural effusion (8). Malignant pleural effusion is recurrent, usually due to diseased pleura, obstructed lymph channels, or atelectasis (8). Breast, lung, lymphoma, ovarian, and gastric cancers have been known to cause malignant effusion (8). At first, these recurrent effusions may be treated with thoracentesis, a procedure in which the interventional radiologist positions a small catheter into the pleural space, where it remains temporarily to allow pleural fluid to drain. After drainage has ceased, the catheter is removed and a dressing is applied.

Over time, malignant effusions require drainage more frequently, which can be hard on the patient (8). Thoracentesis provides only short term relief of symptoms. Tunneled chest tubes are a more long term alternative for malignant pleural effusion. The catheter contains a special cuff and is tunneled under the skin to minimize the risk of infection. Prior to placement, the interventional radiologist will use ultrasound to locate the effusion.

Bedside

Providers often insert chest tubes at the bedside. After discussing the risks and benefits of the procedure with the patient, providers should obtain informed consent. Nursing staff would be required to assemble the appropriate supplies and be available to assist as needed. Full aseptic technique is required, so medical staff should wear gowns, gloves, masks and use sterile drapes (3).

Chest tube insertion is made much simpler if the patient is positioned appropriately. The head of the bed should be raised to 45-60 degrees with the patient resting in the supine position and slightly rotated. The ipsilateral arm is placed behind the neck or head so it is out of the way, providing easy access to the chest (ipsilateral meaning “same side”).

For posterior fluid collections, the patient should sit on the side of the bed with the provider standing behind (3). The position can be made more comfortable by allowing the patient to rest his or her arms upon a side table. Bedside ultrasound will allow the provider to visualize any fluid collections.

Note: In all cases, post-procedure x-ray is required as soon as possible to confirm chest tube placement and to verify the presence or absence of complications from the insertion. 

Large right-sided pneumothorax

Notice the lack of parenchymal (lung) markings on your left side. Remember that chest radiographs are flipped, thus this is the patient’s right side. This lack of lung marking is due to a pneumothorax- thus the lung is compressed by air in the pleural space. 

Licensed and retrieved from Adobe Stock

Chest Tube Drainage Systems

After a chest tube is in place, it must be attached to a drainage system to facilitate the removal of excess fluid and promote lung reinflation. There are four basic types of drainage systems: Heimlich valves, three-compartment systems, digital systems, and vacuum bottles.

Heimlich Valve

A Heimlich valve is a one-way valve shaped a bit like a thin cylinder that attaches to the distal end of the chest tube. It is called a one-way valve because air is permitted to flow only one direction: out.

The valve itself is composed of a rubber flutter that occludes with inspiration to prevent air from entering the chest. The flutter opens during exhalation to allow the trapped air to escape the pleural space. The pneumothorax shrinks slowly over time with each breath. Heimlich valves are more commonly used for ambulatory patients when suction is not required (3). Its small size allows patients to move freely. Figure 1 is an example of a Heimlich valve (11).


(Figure 1)

Three-Compartment System

The most commonly used drainage systems are three-compartment systems, such as Atrium® and Pleur-evac®.

Like the name suggests, they contain three interconnected chambers: the collection chamber, water seal chamber, and a suction chamber. The collection chamber fills with air or fluid that drains from the chest tube. The water seal uses a column of water to prevent air from flowing into the pleural space with inhalation (3). Finally, the suction chamber allows the provider to adjust the level of suction against the chest tube.

If needed, the drainage system is attached to a wall regulator to apply active suction (3). Alternatively, these drainage systems can also be set to drain by gravity if the device is positioned below the chest (3). These drain systems require careful observation for air leaks. Figure two is a drawing of a three-compartment system (11).

Figure 2: Drainage system

Digital Drain System

A more modern approach to chest tube management, digital systems use a computer to monitor drainage, air leaks, and pleural pressure (3). All measurements are calculated internally and displayed on a screen. They do not require wall suction, so patients may ambulate with ease (3). Because they are more compact and basically manage themselves, some patients are discharged with their chest tube in place, resulting in shorter hospital stays overall (3). Digital systems are typically used for patients who develop a pneumothorax after thoracic surgery.

Vacuum Bottle

Remember, tunneled catheters are commonly used to drain recurrent pleural effusions associated with malignancy. Instead of constant suction and drainage, pleural fluid is allowed to accumulate and then drained periodically as needed. Frequency of drainage ranges from occasionally to multiple times a week. The tunneled catheters are equipped with a special one-way valve that opens and drains when a vacuum bottle is attached (3).

Quiz Questions

Self Quiz

Ask yourself...

  1. Think about the different types of drainage systems.
  2. What are the pros and cons of each system?
  3. How does the troubleshooting differ for each system?

Nurse Roles and Responsibilities: How to Manage Chest Tubes

It is the responsibility of the nursing staff to monitor chest tubes and report any potential malfunction. Because chest tube patients may reside in virtually any hospital department (or even as an outpatient), it is essential that nurses feel comfortable around them. Chest tube management includes observing and maintaining the insertion site, recording output, and managing the drainage system.

Observe the Patient

Perhaps most importantly, the nurse should observe the patient. Check vital signs as ordered by the provider or facility policy. Assess for pain. Some discomfort is expected after chest tube placement. Provide pain medicine as needed. Auscultate breath sounds frequently and encourage deep breathing, especially during the post-procedure period. Diminished breath sounds, changes in vital signs and increased work of breathing could indicate the re-accumulation of air or fluid in the pleural space.

Maintain the Insertion Site. Chest tubes are commonly sutured to the skin to hold the tube in place. The insertion site is covered with a dressing to protect the area. Dressing changes occur as ordered by the provider or are dictated by facility policy. Most chest tubes require an occlusive dressing, meaning the dressing should adequately cover the site and be well-secured, which reduces the risk of developing an air leak (1). Expect to change the dressing if it becomes soiled. Chest tubes nursing care nurses should observe the insertion site frequently for signs of infection, including fever, redness at or around the site, swelling, warmth, and purulent drainage.

Although they are sutured in place, there is a risk for dislodging the chest tube if it is pulled too hard. Securing the tube to the patient’s side with a piece of tape is one way to reduce the risk of dislodgement (9). Advise the patient to ask for help when getting out of bed.

Record Output. The nursing staff is also in charge of observing and recording chest tube output. The frequency of recording the output is dictated by nursing judgment and written orders from the provider or facility policy. Drainage fluid is often bloody, serosanguinous (pink), or purulent, depending on the reason it was inserted. Whatever the color, it should lighten in color and lessen its drainage amount over time. The most common type of drainage system is the three-compartment system, such as the Pleur-evac® or Atrium®. All drainage is contained within this system, meaning the container cannot be emptied. Instructions vary between facilities, but it is common practice to document the amount of drainage directly onto the container by marking the level of output with a pen or marker. When full, the drain system is removed and a new, clean one is attached. Check your facility policy of when to call the physician for excessive drainage. Always call the physician for excess drainage when there is a change in the patient’s vitals signs or signs of a worsening condition. 

Manage Drain Systems

Heimlich Valve. Nurses should assess that the Heimlich valve is securely attached to the distal end of the chest tube. The one-way flutter valve allows air to leave the chest but prevents air from seeping back inside. It does not require suction, so the patient may move around freely. Heimlich valves do not possess a true collection chamber, rather, any drainage will freely leak from the distal end of the valve. Thus, the Heimlich valve is not the system of choice for patients with significant drainage.

Three-Compartment System. Again, these are the most commonly used systems. They should be positioned below the patient’s chest at all times. The nurse is responsible for monitoring the three compartments: collection chamber, water seal, and suction. As discussed above, the nurse will simply document the drainage any drainage that collects in the collection chamber.

The water seal serves two functions: to prevent outside air from flowing into the chest and the detection of air leaks. An air leak within a chest tube may indicate a serious problem. The water seal should be easy to find. When the water seal is functioning correctly, the water level will fluctuate (rise and fall) with breathing. If the nurse observes intermittent or constant bubbling within the water seal, an air leak is present (1). The most severe type of leak is a continuous air leak which is observed throughout the entire respiratory cycle. All air leaks need to be reported to the physician immediately and the patient needs to be reassessed for further signs of respiratory distress. Digital draining systems are able to quantity the leak and display dynamic real-time pleural pressures (12). A persistent air leak can be caused by either an alveolar-pleural fistula or bronchopleural fistula (12). 

Chest tubes often require suction to help gently pull excess fluid and air from the body. Three-compartment systems are equipped with a dial that allows staff to set the level of suction, usually between 0 and -40 cm H2O. The provider’s orders or facility policy will dictate the level at which suction should be set. Part of the nurse’s assessment is verifying that the suction dial is set correctly. Additionally, nursing staff should check that the suction tubing is connected securely to the wall suction regulator.

Digital Drain System. Thanks to technology, digital drain systems are pretty easy to manage. The device collects and displays all of its data to the nurse, including the amount of drainage, intrapleural pressure, and the presence of any air leak. It simply needs to be recorded.

Tunneled Catheters. Tunneled catheters should be clamped unless they are being drained. These catheters contain a one-way valve that will not open unless a vacuum bottle is attached. Tunneled catheters are usually managed at home by a willing family member or trained home health provider, thus the patient and family may require extensive education prior to discharge.

Clamping the Tube. With the exception of tunneled catheters, as a general rule, chest tubes should not be clamped unless it is necessary to replace the drain system or it is ordered by the provider (9). If an air leak is present, a clamped tube can lead to tension pneumothorax (9). There is no need to clamp a chest tube during patient transportation or ambulation. If the drainage system is positioned below the chest as indicated, it will continue to drain with gravity after suction is turned off (9).

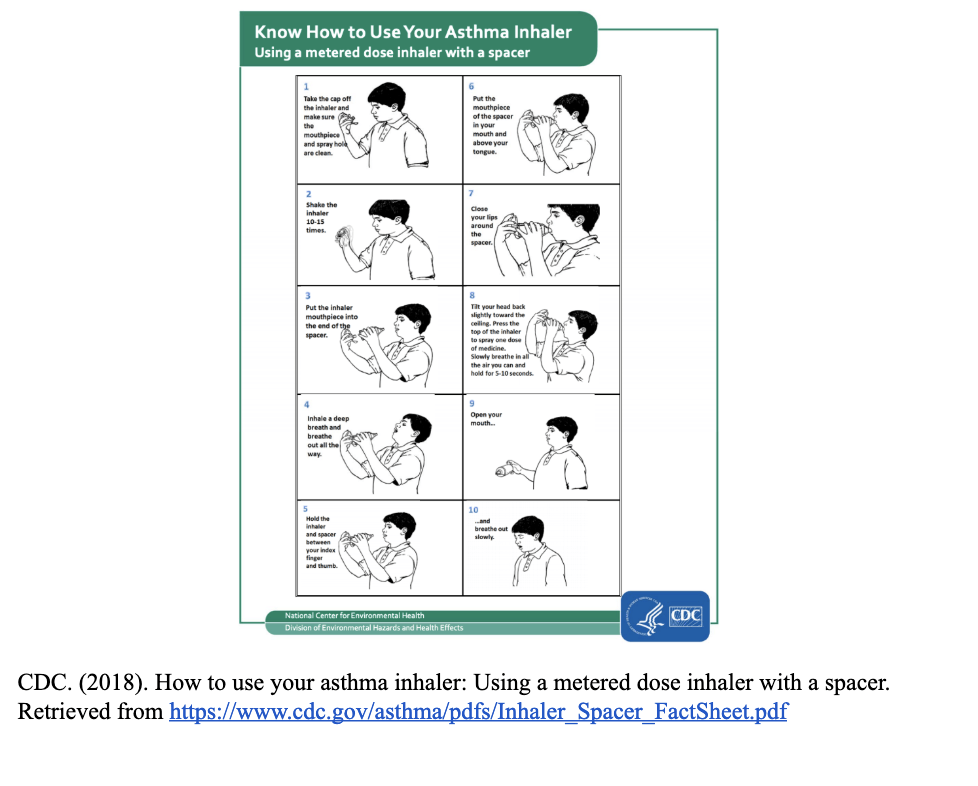
Chest Tubes Nursing Care Troubleshooting: When to Call the Doctor

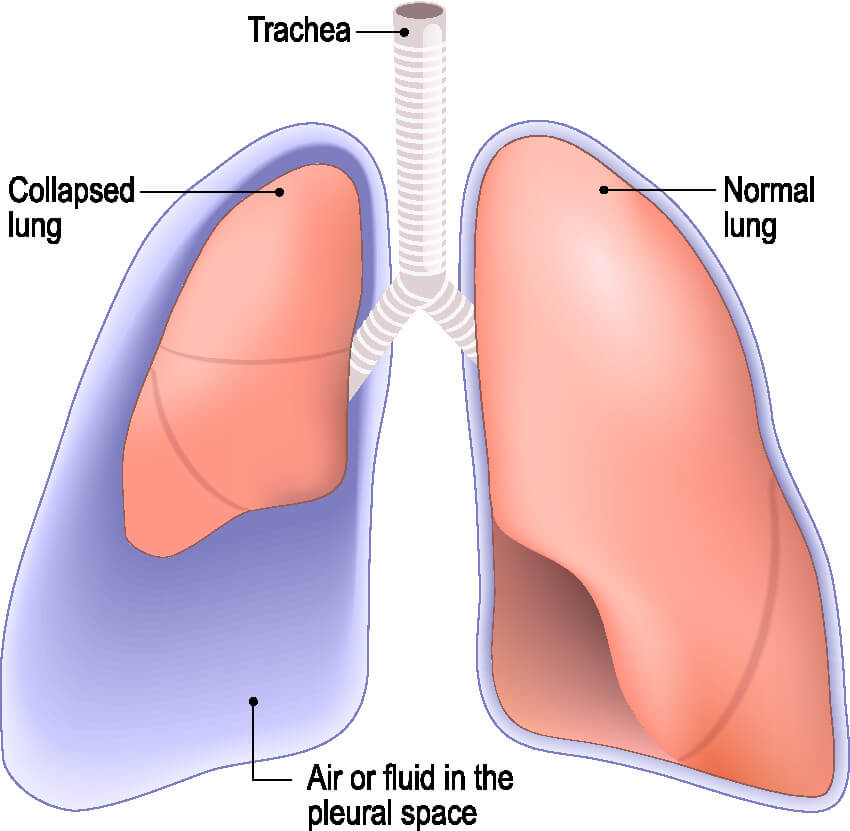
Like anything else, chest tubes are prone to complications. It is essential for nurses to be able to identify a malfunctioning tube quickly and know when to alert the provider. A worsening pneumothorax can lead to a longer hospital stay for the patient, or at worst tension pneumothorax and death.

Tube/Drain Malfunction

Chest tubes should be assessed regularly by nursing staff. The chest tube must be well-connected to the drainage system and wall suction (if necessary). If the chest tube becomes disconnected from the drainage system, the two ends should be cleaned well with an antiseptic, like alcohol pads, prior to being reconnected (1). You can also stick the open end of the chest tube into a bottle of sterile water or saline to quickly create a water seal (13). Do not clamp the tube in case there is an air leak, as the patient could develop a tension pneumothorax (1). If the tube is completely pulled out from the patients’ chest, immediately apply pressure and apply a sterile petroleum impregnated gauze over the site and call the physician immediately (13). 

Infection

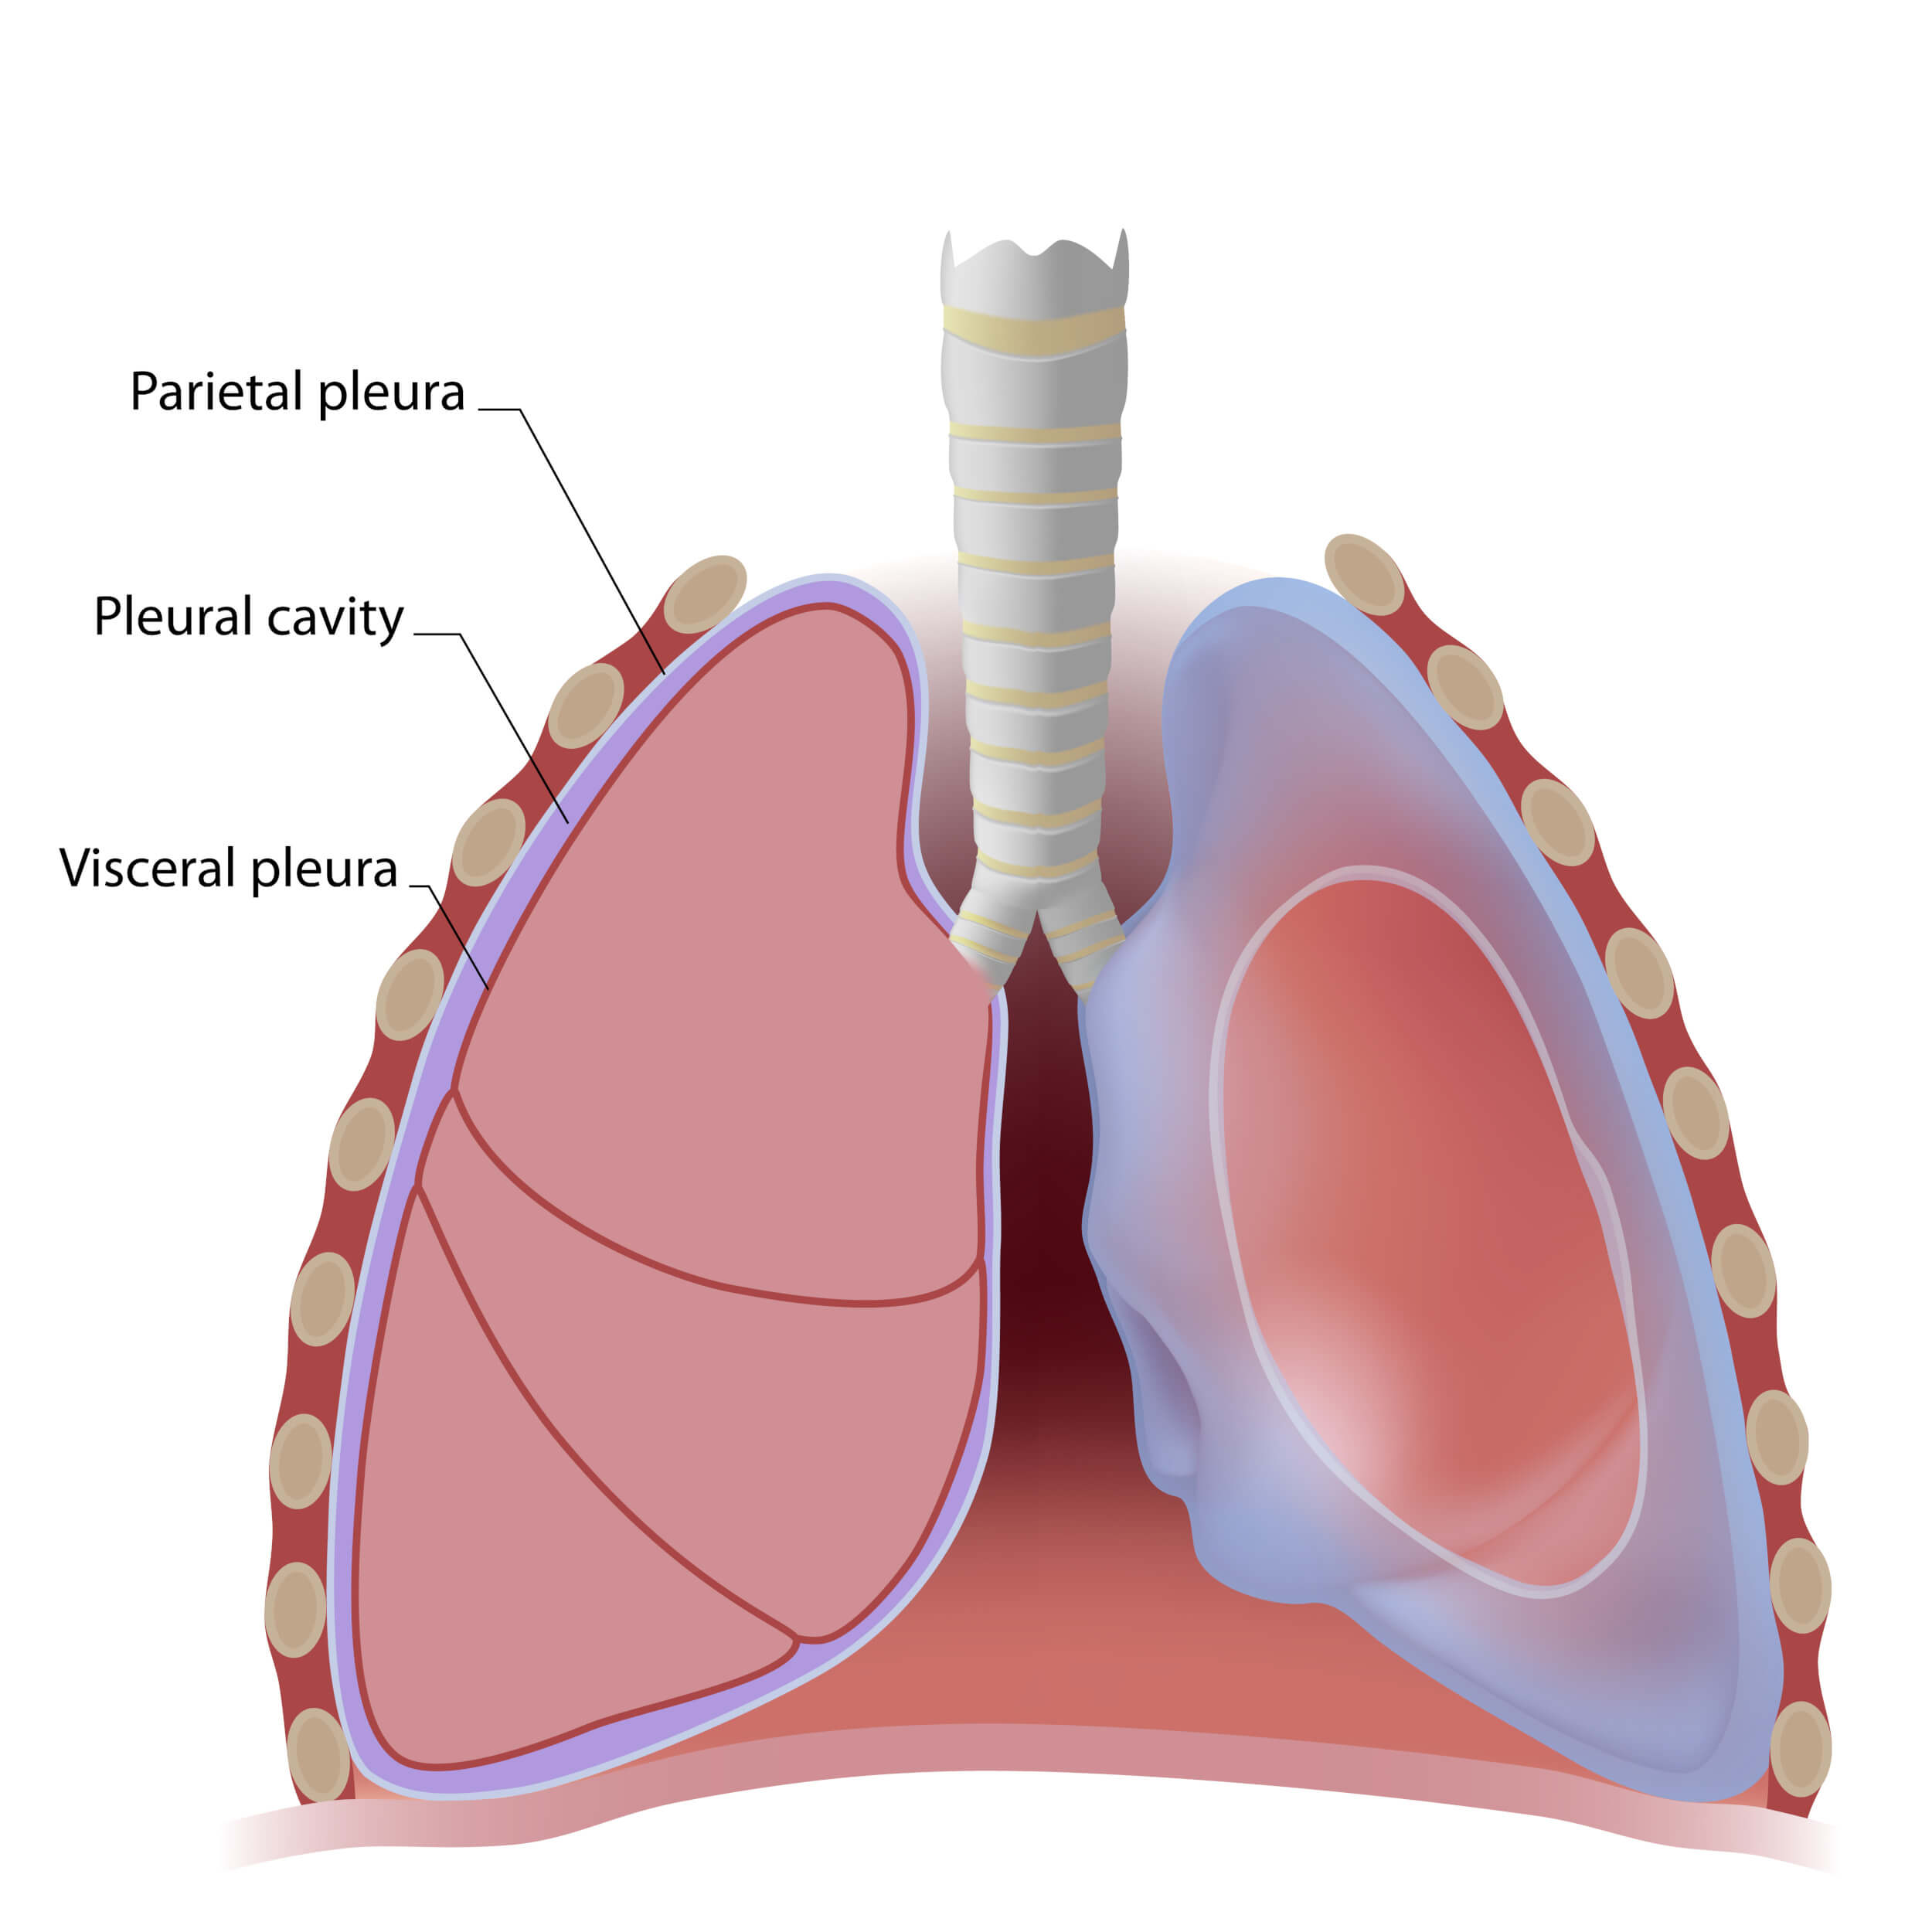
Infection is always a risk when a foreign body is present. Because chest tubes allow direct access into the chest cavity, it is essential to watch closely for any signs of infection. Infection may develop at the insertion site or inside the chest cavity (empyema/abscess).

Signs of infection at the insertion site include fever, redness, swelling, warmth, or purulent drainage. The site needs to be kept clean and soiled dressings should be replaced quickly and efficiently.

Chest tube patients that also have pleural effusions are at higher risk of developing empyema (1). Chest tubes are considered a “clean contaminated” procedure, meaning the chest cavity is accessed cleanly, but a risk for contamination remains as long as the tube is in place (1). The risk of empyema after chest tube insertion is as high as 25% in some populations. A nurse might suspect the development of empyema/abscess if the patient exhibits symptoms of infection: fever, tachycardia, respiratory distress and purulent drainage from the chest tube. A prompt call to the provider is warranted.

Kinks & Clots

The smaller the chest tube, the more likely it is to become clogged or kinked. Sometimes it is easy to spot a problem with a simple inspection of the entire apparatus. Pay particular attention to areas of the tubing covered with tape, such as the insertion site or taped connections. Straighten out the the tubing when patients are lying in bed or sitting in the chair.

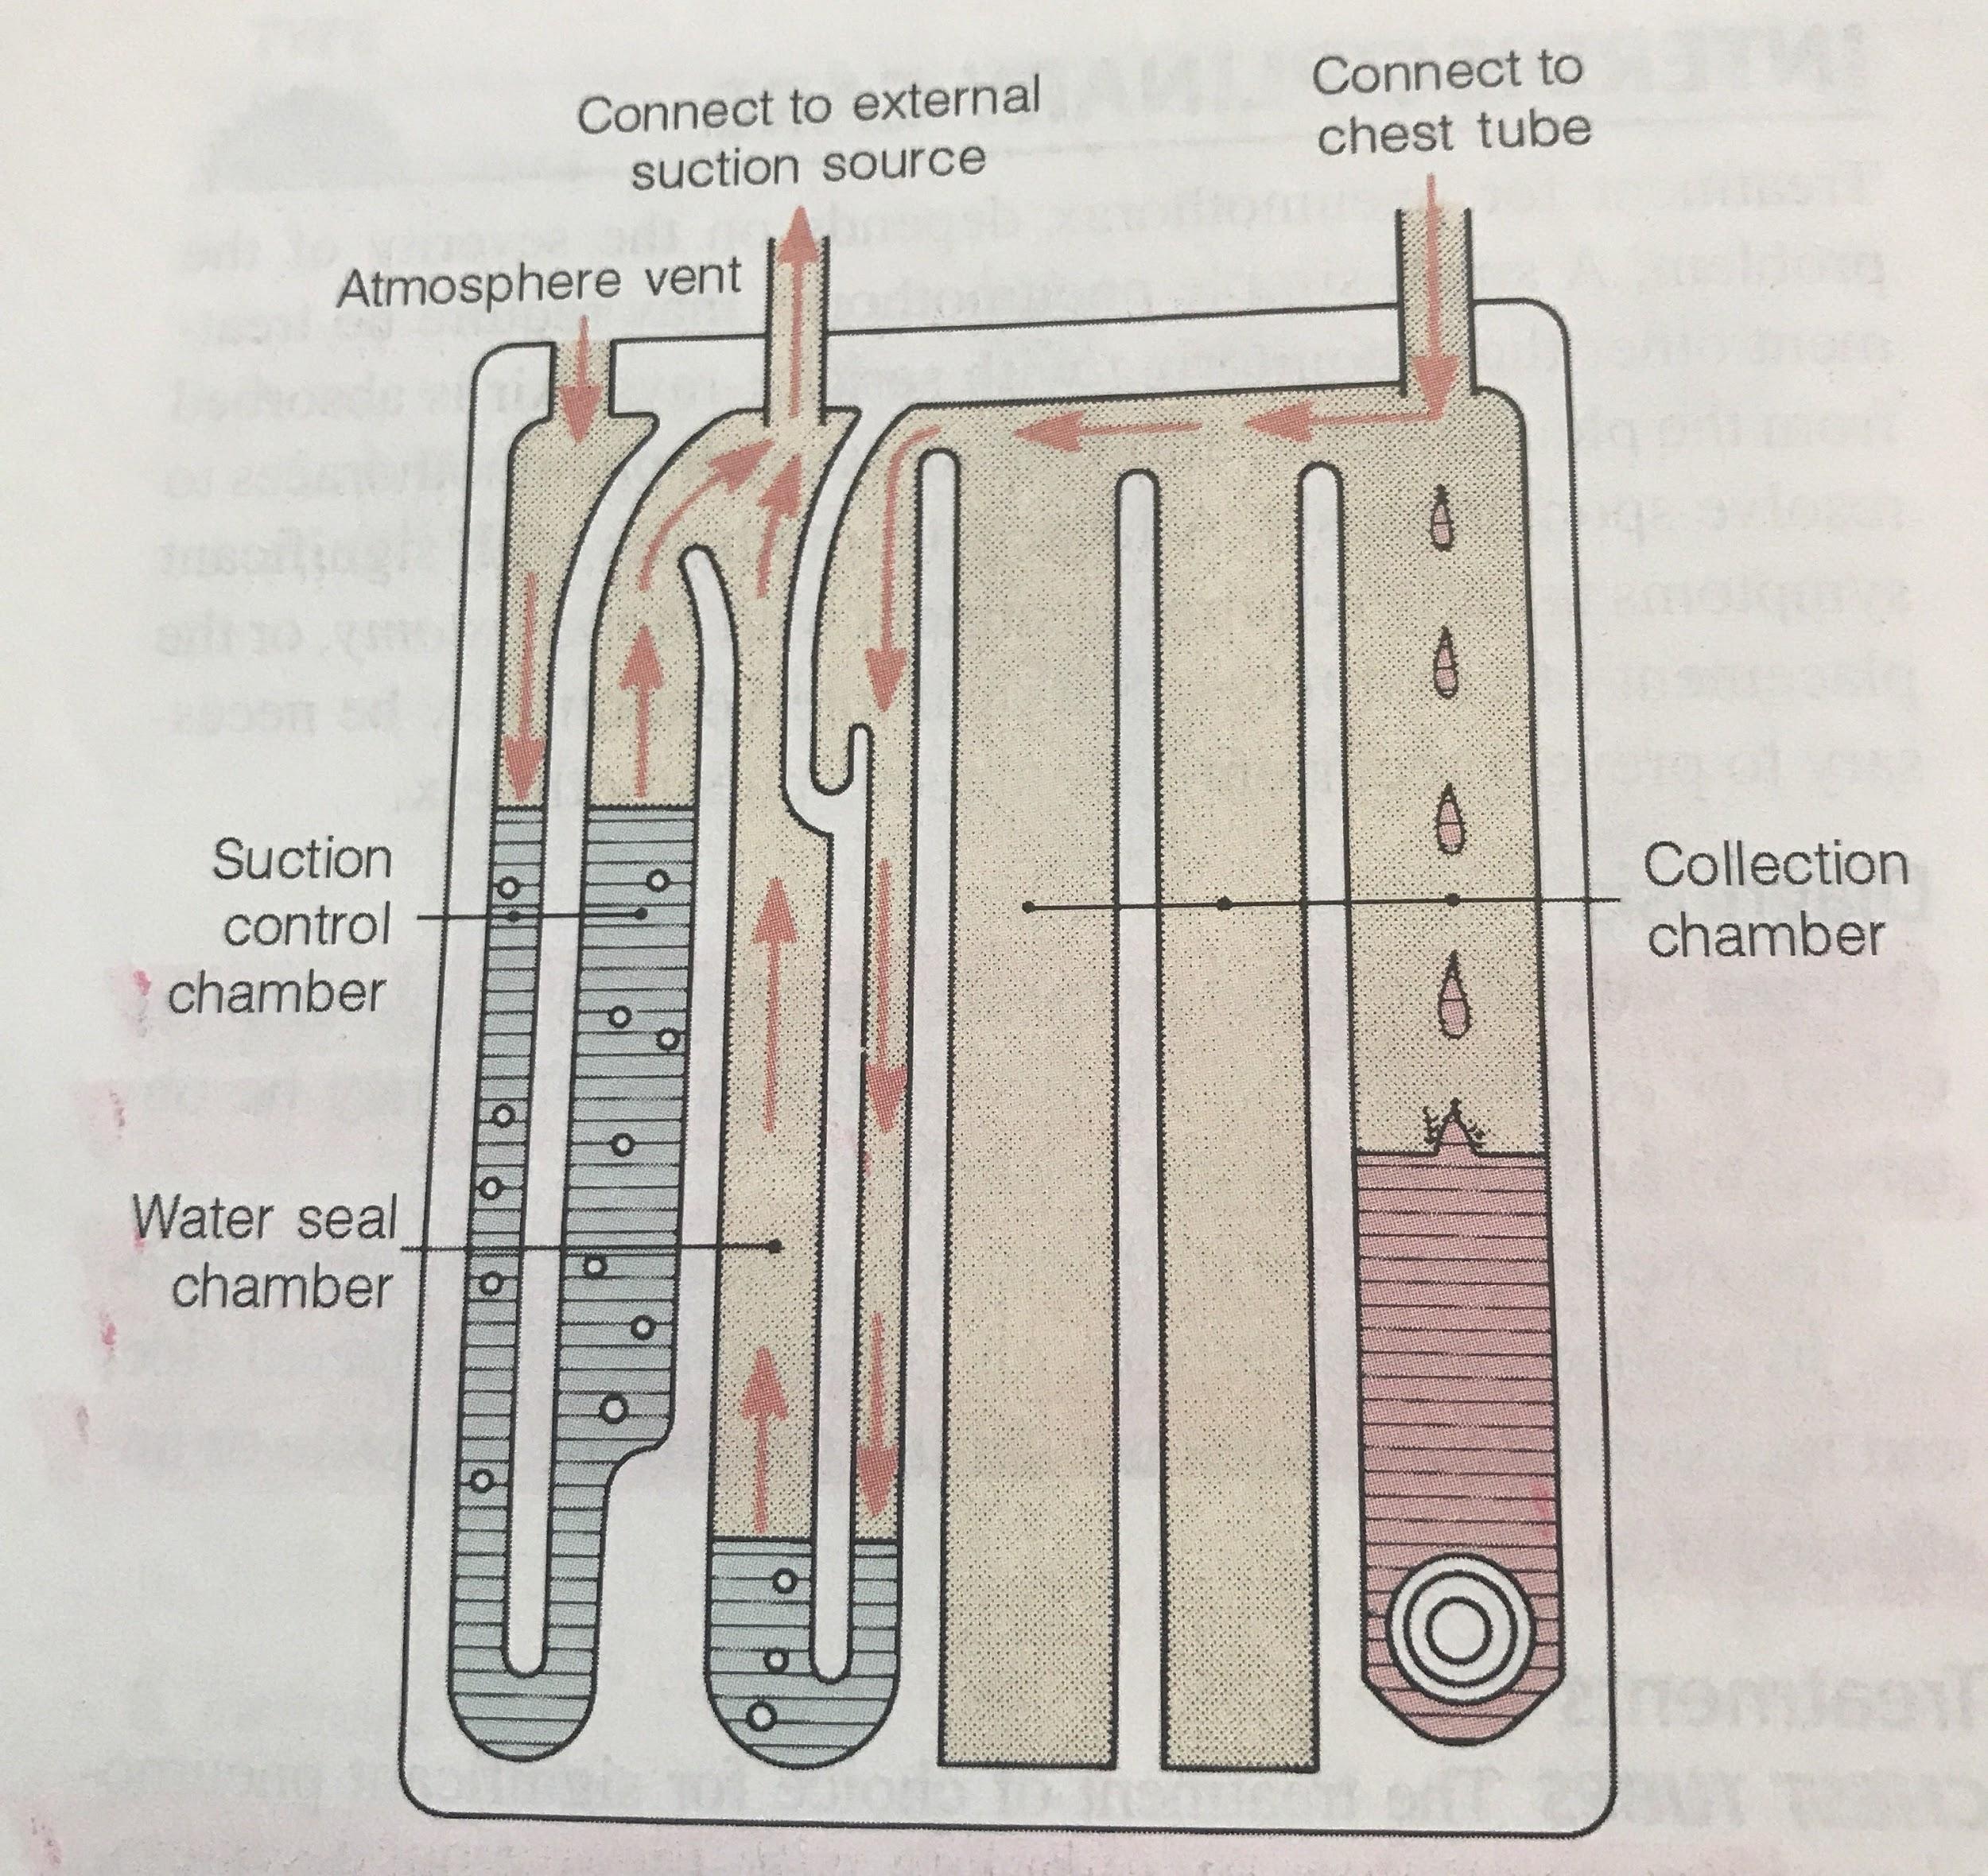
Pay close attention to the drainage system. A digital system or three-compartment syndrome will alert you if there is a problem. A digital system will literally sound the alarm in the event of a kink or clot because it monitors pressures. Three-compartment systems are not fitted with alarms, so they require closer observation to detect an issue. Earlier, it was mentioned that it is normal for the water seal in three-compartment systems to fluctuate with breathing or coughing. If the water seal is not fluctuating with breath, you may have a kink or clot. The water seal is not fluctuating because the tube cannot drain past the blockage.

Kinks are easy to fix: simply straighten out the tube or resolve kinked connections. Clots can be a little more difficult to handle. Luckily, ⅔ of clots resolve themselves (1). Historically, providers have used techniques such as milking or stripping the tube to help remove clots. The use of these procedures is questionable. Prophylactic milking/stripping has not shown any tendency to prevent clots from forming (1). Also, these techniques have actually been shown to cause harm by increasing pressure within the pleural cavity, resulting in increased bleeding, tissue entrapment, and dysfunction of the left ventricle (1). Thus, tube milking and stripping should probably be avoided altogether.

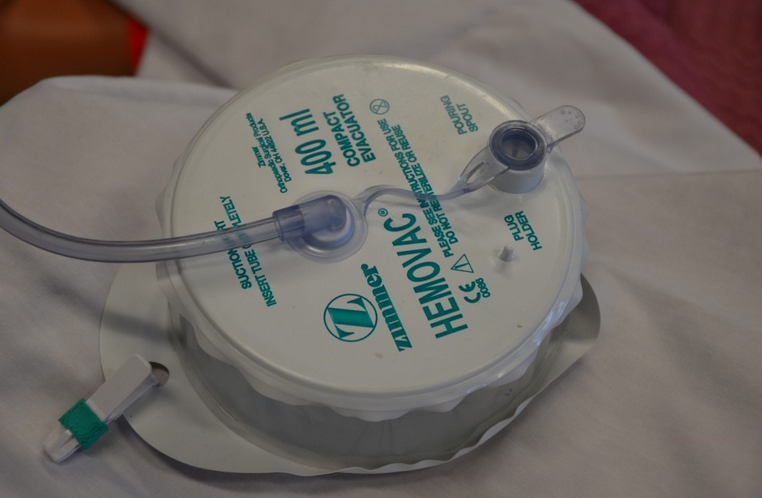
What do you do if you see a clot then? If the clot is located in the drain system tubing, simply replace the system. Attach a new Pleur-evac® or Atrium® system and remove the affected tubing. If that doesn’t resolve the problem, notify the provider. Chest tubes can also become kinked inside of the patient, so the provider may order a chest x-ray to confirm proper tube placement (2).

Loss of Suction

Ensure that the drain tubing is securely attached to the wall suction regulator and that the tubing is unclamped. The regulator should be turned on. Check that the suction dial on the drain system is set to the appropriate suction setting and that the suction is continuous, not intermittent. If all connections are appropriate, the wall regulator or drain system is malfunctioning and should be replaced. Maintaining appropriate suction is critical, as too little suction will prevent lung re-expansion, while too much suction can damage lung tissue (9). 

Drain System Malfunction

The best course of action is to replace the drain system and re-assess the problem. If it was truly an issue with the drain system it should resolve by replacing it.

Air Leak

The easiest way to assess for an air leak is to observe the drainage system. Again, a digital system will alarm if it detects a problem. With a three-compartment system, an air leak will cause intermittent or constant bubbling within air-leak detection compartment of the water seal. Air leaks are a concern because they allow air to flow back into the pleural space (1). The whole point of the chest tube is to get the air out of the chest. Air leaks can occur in a couple places: at the insertion site or within the tubing/drain system (1).

If an air leak is observed in the water seal chamber, the next step is to find out where it is coming from. This is one case where clamping the tube (temporarily, of course) can help diagnose a problem. First, clamp the tube close to the patient (10). If bubbling within the water seal continues, this means there is a leak in the tubing or drain system. Although made of strong material, these drain systems are not infallible. Tubing can be cut or damaged accidentally, and it may not be easy to spot. Assess the tubing for cuts or holes. Ensure all connections are secure, as loose connections are an easy way for air to sneak inside. Replace the drain system if the tubing or container is damaged.

On the other hand, if you clamp the tube and the air leak disappears from the water seal, this means air is leaking near the patient (10). In this case, the leak stems from the insertion site or somewhere inside the chest (10). An air leak at the insertion site occurs because the dressing is insufficient or the hole is too big. This is why an occlusive dressing is a must. Apply new petroleum gauze and cover with a sterile, occlusive dressing at the site where the tube enters the skin (10). This prevents air from leaking into the chest at the skin.

Unfortunately, sometimes the skin site is too large relative to the tube itself, meaning the tube is too small for the skin incision that was created (1). The tube should fit snugly into the skin incision, without gaps. If you suspect the skin incision is too large, notify the physician. Often, a simple stitch can tighten any loose skin at the insertion site (1).

Finally, if you have accounted for all of the potential problems listed above and an air leak remains, the problem is likely inside the chest (10). Potential causes of persistent air leak include residual pneumothorax, pleural injury, a malpositioned chest tube, or fistula (10). Notify the provider right away if all attempts to resolve an air leak have failed.

Tube Dislodgement

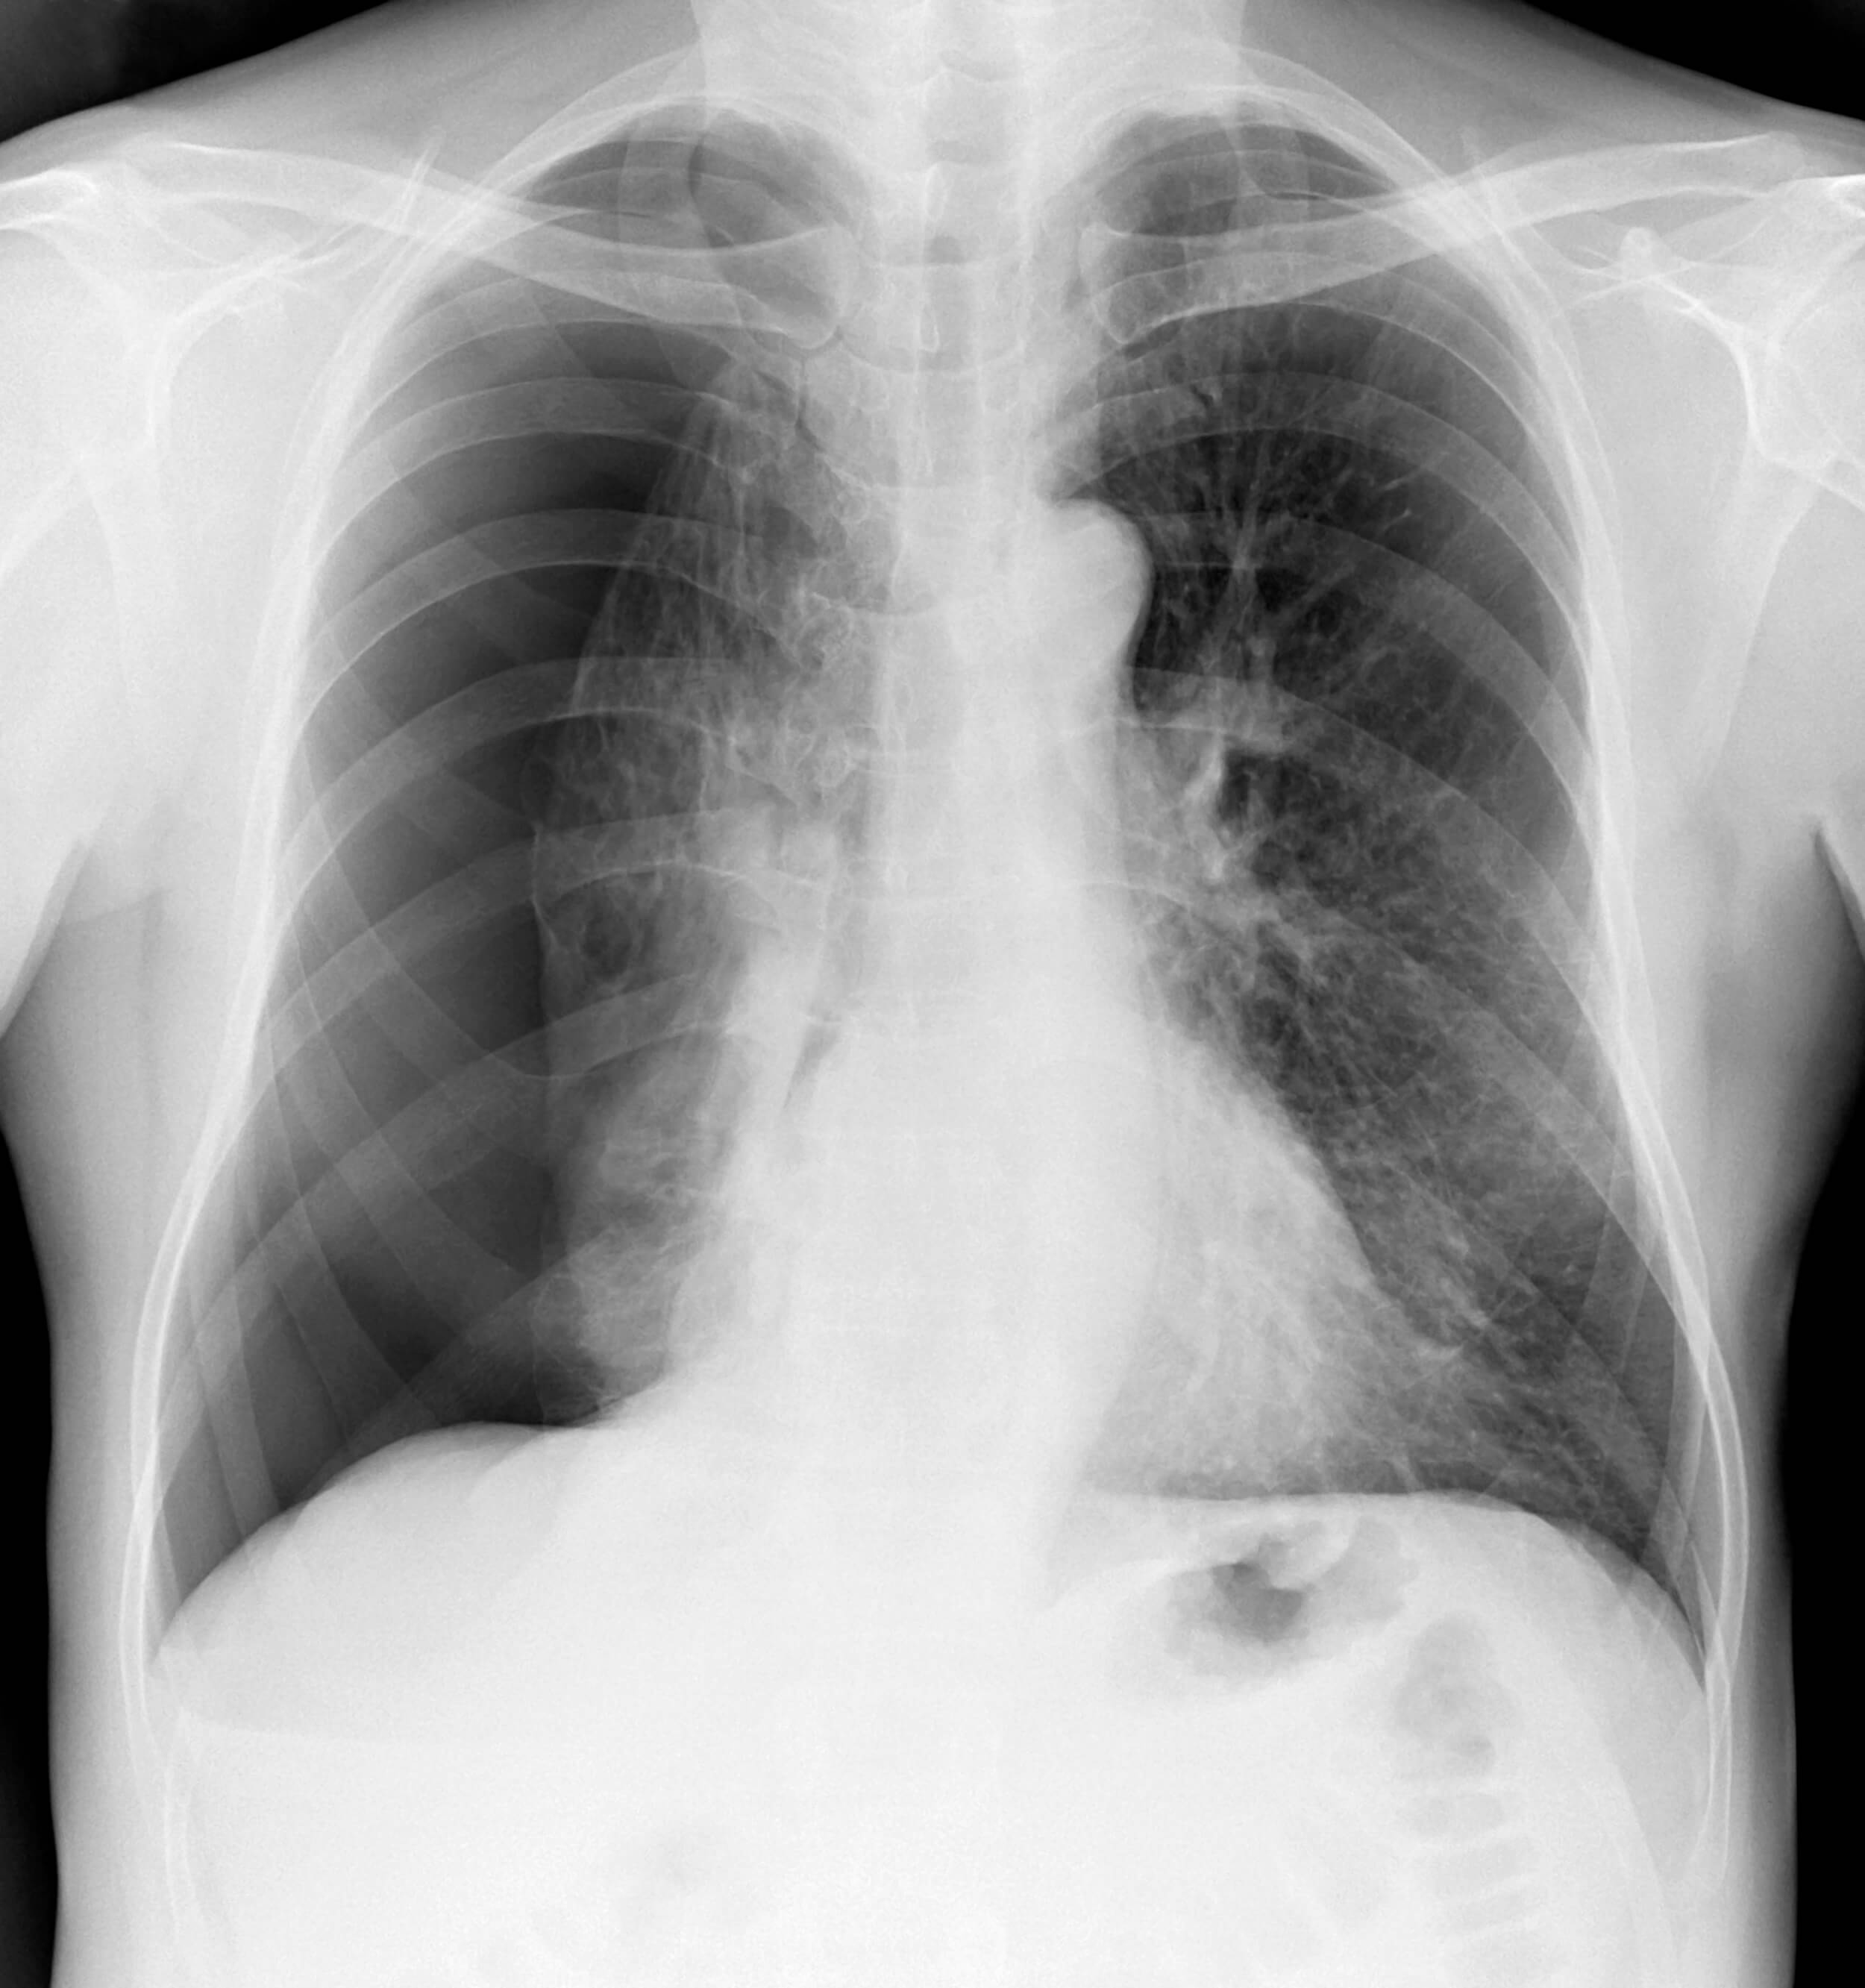
Sometimes, the tube comes out despite every precaution. It may be pulled out partially or completely. After a partial removal of the tube, quickly and calmly secure the tube to the patient with a new dressing and tape. Obtain a set of vital signs and assess for pain and any new symptoms, such as shortness of breath or dyspnea. Notify the provider immediately. Follow up imaging (usually an x-ray) may be ordered to determine chest tube location and assess for any residual pneumothorax.

If the tube is pulled completely out, put on gloves and quickly cover the insertion site with your hand to prevent air from flowing into the chest (10). Stay with the patient and call for help. When help arrives, ask a coworker to get the necessary supplies for a new occlusive dressing: petroleum gauze, dry sterile gauze, and tape. Apply the dressing and notify the provider immediately. If the patient is in distress, call for help. Remember, chest tubes can be placed at the bedside pretty quickly in an emergency. And try to stay calm!

Under normal circumstances, chest tubes are removed once drainage has ceased, breath sounds return to normal, and/or imaging shows a resolution of the pneumothorax (9).

Chest Tubes – Frequently Asked Questions

Why raise the arm for chest tube insertion?  

Regardless of the patient’s position, sitting up, or lying in a supine position (preferred), the patient’s arm on the side of the chest tube insertion should be abducted and flexed with the hand above the head to expose the proper area of insertion. The main reason to place the patient in this position is to ensure easy access to the chest for clean and proper insertion.  

How to change a chest tube dressing: 

Most chest tubes require an occlusive dressing meaning the dressing should adequately cover the site and be well-secured, therefore reducing the risk of developing an air leak.  

  1. Gather necessary materials:
    – Sterile gloves
    – Abd pad or drain sponge
    – 4×4 gauze
    – Xeroform gauze
    – ChrloraPrep
    – Tape   
  2. Wash your hands with soap and water and don sterile gloves.  
  3. Open the packaging of materials so you can grab the materials as you need them while maintaining sterility.   
  4. Remove the patient’s old dressing. Inspect the chest tube site for redness, skin breakdown, suture condition, drainage amount and color, and if air leaks are present.  
  5. Remove old gloves, and don new gloves.  
  6. Clean the site with ChloraPrep. Begin at the insertion site and move outward. Repeat the process additionally and allow the site to thoroughly dry 
  7. Place the Ceroform gauze to create an air-tight seal at the insertion site.  
  8. Split the 4×4 dressing and place it around the patient’s chest tube. Apply two additional 4×5 sponges over the previous layer of dressing that covers the chest tube 
  9. Apply tape over the dressing – some like to use foam tape. Note the time, date, and initial of the nurse changing the dressing 
  10. Remove you gloves and wash your hands thoroughly.  

This is an example of a dressing change. Some institutions have hospital policies related to chest tube dressings. Please use this as a guide and not as fact. Always follow hospital institutional protocol.   

How is it determined which chest tube to use?  

The decision to use a small or large-bore chest tube is made by the provider. Research shows that small-bore chest tubes are as effective as larger chest tubes for the treatment of most pneumothoraxes and may be less painful. Large bore chest tubes are recommended to treat traumatic pneumothorax due to the need for the removal of blood and air.  

When a patient is experiencing shortness of air, and you notice the chest tube is clamped, what do you do?  

Unclamp the chest tube and monitor the patient. If the shortness of air does not improve, call the provider, and obtain a chest X-ray. 

Conclusion

Chest tubes are a life-saving intervention for the patient with pneumothorax, hemothorax, chylothorax, pleural effusion, empyema/infection, and also those recovering from major cardiothoracic surgery. The technique for chest tube placement depends on the size: large tubes are placed using the blunt dissection technique and small tubes are inserted with the Seldinger technique. Radiologists use the Seldinger technique and a peel-away dilator to insert tunneled chest tubes.

Both small bore and large bore chest tubes are effective in treating pneumothorax, hemothorax, empyema/infection, and preventing complications after surgery. The size of the tube really depends on provider preference. There are advantages and disadvantages to either size. Large bore tubes are less likely to form kinks or clots, but may be more painful. Small bore chest tubes are less invasive, but form clots much more easily. Tunneled chest tubes are a great way to provide a palliative care to patients suffering recurrent malignant pleural effusions.

While there are no true contraindications for chest tube placement, a few relative complications exist. Sometimes, chest tube placement is a true emergency, such as the need to treat a tension pneumothorax. In these cases, the benefits outweigh the risks. For more stable patients of chest tube nursing care, providers should ensure that consent is obtained and the patient’s blood is coagulating appropriately prior to chest tube insertion.

When possible, patients and their families should be aware of potential risks with chest tube placement. Bleeding, damage to surrounding structures, bronchopleural fistula, recurrent pneumothorax, and pain are some potential complications of initial chest tube placement.

Chest tubes may be placed in the OR, IR, or even at the bedside. Once inserted, the tube should be connected to a drainage system to pull air out of the chest and prevent air from returning to the pleural space. Types of drainage systems include Heimlich valves, three-compartment systems, digital systems, and vacuum bottles for tunneled catheters.

Nurses are responsible for chest tube management after insertion. Roles and responsibilities include monitoring and recording drain output while continually assessing for signs of infection, air leaks, suction loss, or drainage system dysfunction. The ability to quickly identify a malfunctioning tube is essential for protecting our patients. Often, a problem found within chest tubes nursing care is solved with a quick fix, like replacing the drainage system if the tubing becomes damaged. However, persistent questions and concerns require a prompt call to the provider.

Quiz Questions

Self Quiz

Ask yourself...

  1. Think about the different types of complications that can occur in chest tubes nursing care. 
  2. How would you react and manage each complication?
  3. When would you call the provider/doctor for further assistance? 
  4. What are some life-threatening complications that can occur as a result of chest tube malfunction?
  5. How can chest tubes save a life?

Drains: Everything You Need to Know


Introduction

Picture this: you walk into your hospital unit, fresh off a good night’s sleep. You find your patient assignment and head over to get report. Then the outgoing nurse says something that makes your heart skip a beat. “This patient has an abscess drain. You need to flush it every X hours, record the output every X hours, call the doctor if __ happens…” Before long, your head is spinning, and then you realize you’ve been spelling ‘abscess’ incorrectly for who knows how long! You think to yourself “I really need to know more about the nursing care of drains!”

Drains can be intimidating, especially with little to no prior experience in drain management. They often come with a specific set of instructions that can be somewhat confusing. What’s worse, a patient may suffer a serious delay in recovery if something goes wrong. Nobody wants to be the one to make that call to the doctor about a malfunctioning drain. Fortunately, like anything else, managing drains becomes much easier with experience and a little education.

Types of Drains

A patient may require drain placement for various reasons. Often, they are placed at the end of a surgery or percutaneously to help eliminate any fluid that may accumulate within the wound. A common type of surgical drain is the Jackson-Pratt ® . Certain organs may require a drain to assist with the removal of their contents, such as foley catheters or nasogastric tubes. Drains may also be placed to help remove fluid or air from body cavities. A chest tube is a good example of this type of drain. Finally, if a patient develops an abscess, a drain is often required to help remove the infected fluid more quickly.

Drains serve a very important purpose (other than driving the patient and his/her nurses crazy). The accumulation of fluid in the wrong place can have a detrimental effect on the patient’s health and healing (1). Excess fluid in the surgical site can cause significant pain as well as injury to surrounding tissues and organs (1). It can also increase the chance of infection (1).

Medical drains can be divided into multiple categories.

Drains are often described as being active or passive. Passive drainage allows for gravity to help remove excess fluid, without the use of pressure (2). An example of passive drainage would be placing a foley catheter to gravity or using a penrose drain. A penrose drain is a relatively flat, ribbon-like tube that creates a passage from a wound to the open air, which allows any excess fluid to simply flow outward (2). The area surrounding the opening is often lightly covered with gauze to collect fluid as it drains and must be changed when saturated (2).

The following image is an example of a penrose drain (3).

Active drains use actual pressure, typically negative pressure, to help remove excess fluid from the body.

An example of an active drainage system would be a Jackson-Pratt (JP) ® drain or hemovac ®. With both types of drains, the pressure is created by compressing the collection container, which creates a low pressure vacuum that pulls the fluid out of the body (2). The following images are examples of hemovac (12) and JP ® drains (3).

hemovac drain


Open vs. Closed

Drains can also be described as open or closed. An open system simply means that it is open to air. An example of an open system would be a penrose drain, as described above. A closed drain, on the other hand, is not open to the environment. Rather, the draining fluid is contained within the system, and the collection bulb or bag is simply emptied from time to time, as needed. A JP ® drain is an example of a closed drain.

Surgical vs. Percutaneous

While not a technical classification, it is interesting to note how the drain is placed. Surgical drains are usually positioned in the operating room or, more rarely, at the bedside by the physician. The JP ® is an example of a surgical drain.

Drains may also be placed percutaneously.

Percutaneous: (adjective) effected or performed through the skin (4)

Percutaneous drains are placed without surgical intervention. Rather, Interventional Radiologists use imaging, such as CT, ultrasound, or fluoroscopy to guide a needle into a fluid collection (5). This technique is generally less invasive (6). Before surgical or percutaneous insertion of a drain, the patients coagulation status and hemostasis risk must be evaluated (13). 

Quiz Questions

Self Quiz

Ask yourself...

  1.  What are the advantages and of open vs closed drainage systems?

Infections 101: A Brief History of Drains

Before the advent of antibiotics, the development of an abscess or postoperative infection was often a death sentence (7). Thanks to advances in modern medicine, suffering patients now stand a chance. In certain situations, infections can be treated simply with a course of antibiotics. However, if there is any concern for the development of sepsis, further intervention is needed (6).

Until the 1970s, the most effective (and only) way to treat infection and abscess was surgical intervention (7). Surgeons would attempt to remove the infected material while striving for “directness, simplicity, and above all, avoidance of unnecessary contamination of uninvolved areas” (7). Unfortunately for these patients, this meant that a second surgery was required to heal them from complications of their first surgery. Even with the addition of antibiotics, these situations were associated with significant morbidity and mortality (6).

Luckily, rapid advances in technology allowed for the development of a less invasive solution. The advent of fluoroscopy, ultrasound, and especially CT provided physicians with a tool to see inside the body without having to cut someone open. The first studies involving the use of medical imaging for percutaneous drain placement were published in the late 1970s (7). Over the next several years, multiple studies reported success rates ranging from 60-80% using these new techniques (8).

Doctors are now able to drain up to 3 separate abscess/infection sites percutaneously (8). Recent studies report technical success of up to 90% with percutaneous drain placement, and it can offer immediate improvement in sepsis, with return to hemodynamic stability within 1-2 days (9). CT is considered the imaging modality of choice because of its ability to fully visualize the infection and surrounding structures as well as provide a pathway from the skin to the destination (9).

Patient Considerations for Percutaneous Drain Placement

Not every infection or fluid collection requires percutaneous drain placement or even surgery. Thus, it is important for physicians to work together to determine the appropriate treatment for each patient individually. When a patient is found to have an abscess, multiple doctors may get involved, usually either a surgeon or interventional radiologist (sometimes both) and a clinical pharmacist if an infection is suspected or confirmed.

It is essential that providers choose patients carefully, as ineffective or incomplete drainage of the infection can lead to significant morbidity and mortality (8). For example, percutaneous drainage is sometimes avoided in patients with chest infections, such as empyema, abscess, and pleural effusion because of the risk of pneumothorax (9). Additionally, pyogenic and fungal abscesses in the lung parenchyma often resolve with more conservative management, namely through supportive care and antibiotics (9). Pancreatic abscesses remain at high risk of treatment failure with percutaneous drain placement, thus surgery is usually still the intervention of choice (9).

Conversely, there are many types of abscesses that respond well to percutaneous drainage. Liver abscesses have a very low risk of complications with this type of drain placement, around 1-4% (9). It is also very effective in managing infections related to visceral perforation, which may result from Crohn’s disease, prior operations, diverticulitis, and appendicitis (9). Deep pelvic abscesses respond well to percutaneous drainage, although these can be more challenging and require careful planning because of the presence of nearby organs (9).

Percutaneous drainage is often considered for patients who are too ill for surgery, in the hopes that it may improve sepsis and promote increased strength/rest (8). It is also recommended for patients who have a good response to antibiotics and low risk of mortality.

Quiz Questions

Self Quiz

Ask yourself...

  1.  How has the increased use of medical drains altered the medical care and approach to managing abscesses?
  2. Deciding who may benefit from a drain and who needs conservative therapy is difficult and nuanced.
  3. How would you consult with on this subject?
  4. Should medical therapy be initiated while awaiting intervention?

Image-Guided Drainage: How Does it Work?

When first contemplating percutaneous drainage, doctors must first decide which modality to use: fluoroscopy, ultrasound, or CT. As mentioned previously, CT is most often used to guide drain placement because of its superior visualization.

The interventional radiologist will typically review any available imaging beforehand to plan the most appropriate route for drain placement. Care must be made to avoid major vessels and other important structures (6). To minimize the risk of complications, physicians are advised to use the safest, most direct route and attempt placement in the most dependent part of the fluid collection to encourage effective drainage (6).

Once the patient is properly positioned on the table, the physician will use the CT, ultrasound, or X-ray to guide the placement of a special needle, taking frequent pictures to monitor its progression from the skin through soft tissue and into the infection (6). Once the needle is in place, a wire is passed through the needle into the fluid collection and then the needle is removed, leaving only the wire in place.

Next, a drainage catheter is threaded across the wire to its final resting place. The tip of the catheter rests within the fluid collection. The drainage catheter contains holes to help fluid pass out of the body. Once the tube is in place, the wire is removed. A drainage bag is attached. Throughout the procedure, pictures are taken to ensure correct placement. Patients are often given moderate sedation to make them more comfortable, but not in every case.

Drain Management

Care for the patient with a drain can seem intimidating, but it doesn’t have to be. Often, the physician will write orders to guide nursing staff while caring for these patients. Drain management may also differ depending on what type of drain the patient has. If there are no orders it is reasonable to contact the physician who placed the drain for clarification.

Surgical Drains

Two of the more common types of surgical drains are the hemovac ® or JP ® drain. As mentioned previously, both of these drains are active, closed systems, meaning they use negative pressure to help remove excess fluid from a surgical wound, all of which is stored within the collection device.

When managing JP ® or hemovac ® drains, it is important to note the color of the drainage fluid. The fluid is typically bloody or purulent at first, but should gradually lighten to a light pink, clear, or yellow color (10). Indications for removal may vary, but in general, these drains remain in place until the daily output decreases to less than 30 ml (10).

Follow any written instructions provided by the ordering physician. Nurses will also be responsible for emptying the drain, observing the site and documenting findings. The drain should be emptied no later than when it becomes half full, as it will lose suction and become ineffective (2). Observe the insertion site for drainage and signs of infection. Be sure to keep the skin clean. These drains may also be sutured in place. The drains should be further secured with medical adhesive or pinned to the patient’s gown with a safety pin to secure the drains before mobilizing and to avoid accidental removal. 

Percutaneous Drains

Percutaneous drains usually look a little bit different. The interventional radiologist uses a special type of drainage tube that is also sometimes called a ‘pigtail’. These tubes do not always have to be sutured in place, for they may contain a string that, when pulled, curls the distal end of the tube, making it a bit harder to pull out. They are then usually adhered to the skin with a dressing.

Again, it is important to note the color of the drain output. Keep in mind that percutaneous drains are often used for abscess or infection, meaning fluid will be purulent and/or bloody. Check for any specific written instructions for drain management. Monitor the drain site regularly for signs of infection or drainage. Empty the drainage bag as directed or as needed and document findings. These drains may also use a collection bag that applies suction through negative pressure.

Percutaneous abscess drains are more likely to require flushing because the purulent drainage can be thick and pose a risk for occluding the drain. They may be equipped with a three-way stopcock to allow for easy flushing.

percutaneous drain

(French pigtail catheter [Cook Inc., Bloomington, IN; C-PCS-830-LOCK]).

How to Flush a Drain Using a Three-way Stopcock

The first step is to review any written orders and become familiar with policies regarding drain flushing. You may be required to have a provider order in order to flush a drain. Then gather some supplies: gloves, an alcohol pad, “dead end” cap or clave, clean pad/towel, and saline flush syringes. Prepare by applying gloves and laying out a clean towel or pad underneath to create a workspace and catch any drainage. Flushing a drain is usually painless, but advise patients that they may feel a little discomfort.

Take a look at the figure below (11). It is an example of a three-way stopcock. It has three different ports and an “off switch” that swivels. Whichever direction the off switch is pointing closes that port so fluid cannot flow. In the example provided, the switch is closed to the patient, meaning that fluid cannot pass into the bag.

Step 1. Find the Flush Port

To flush the drain, find the flush port located on the stopcock. It should be pretty easy to spot, as it is usually the only port that is free (since one end of the stopcock is connected to the actual drain tube, the other to the drain bag). The flush port should be capped with either a “dead end” cap or a clave. If there is a dead end cap, it will have to be removed, since saline cannot be flushed through. If a clave is present, the saline syringe can be screwed in directly.

Step 2. Prepare the Flush Port

Next, turn the off switch so it is pointing toward the flush port, if it isn’t already. This will close the flush port or “turn it off” so that drainage cannot leak out. If a dead end cap is present, remove it. Wipe the flush port with an alcohol pad and attach a new, sterile clave, if available. Claves make future flushing much easier because the flush syringe can be attached directly. If a clave is already present, wipe it thoroughly with an alcohol pad.

Step 3. Prepare the Saline

Attach a saline syringe to the flush port. 5-8 ml is usually plenty. If the ordering physician wrote specific instructions on how much saline to infuse, follow the directions closely. The off switch will have to be turned before flushing is possible. At this point, the switch is facing the flush port, which prevents fluid from exiting or entering. The attached saline simply will not flush, no matter how hard the plunger is pushed.

Step 4. Flush the Drain

Saline can be flushed either into the drain or into the bag, depending on which way the off switch is turned. To flush the drain itself, a nurse would have to direct the saline toward the patient. This means the off switch needs to be turned toward the bag. The bag is now “off” and won’t get any flow, allowing saline to travel through the flush port and up the drain into the patient. Once the saline is flushed, turn the off switch back to the flush port. This will reopen flow into the bag. The saline that was just infused should now travel freely through the drainage tube and into the bag. Observing this allows the nurse to know that the tube is draining correctly.

Sometimes the contents of the abscess can be thick or contain particles that can clog the tube leading to the bag. Thus, the drain bag may also need to be flushed. Simply follow the same steps listed above, only, instead of turning the off switch to the bag, it should be turned to the patient. This will prevent flow from entering the drainage tube, leaving a pathway from the flush port into the drain bag. The nurse should be able to see the saline traveling into the bag. Once the bag is flushed, return the off switch to face the flush port. This allows for an open pathway from the drain into the bag.

Step 5. Assess the Drain

After flushing, it is important to note any patient discomfort, as well as document how much saline was flushed. Before leaving the bedside, and always when assessing a patient’s drain, ensure that the off switch on the stopcock is turned toward the flush port. This will allow drainage to flow seamlessly from the patient into the bag.

*Note, not all drains are meant to be flushed, especially those that do not contain a flush port and/or three-way stopcock. Never flush a drain without a provider’s order. Do not attempt to flush a drain if you suspect it has been pulled away from its original position.

Properties of a Well-Functioning Drain

Since humans lack x-ray vision, the inner workings of a drain can seem a little mysterious. What is going on in there? How can a nurse know if it is doing what it is supposed to do? Repeat imaging (CT, ultrasound, etc.) is the best way to visualize how infections and abscesses change over time. However, it is costly and unnecessary to expose patients to extra radiation as a matter of curiosity.

To get some idea of how a drain is functioning, one has to look at the drain itself. Even though drains may look different, they function in similar ways, thus these considerations can be applied to both surgical and percutaneous drains.

Output

The hallmark of a well-functioning drain is output. The purpose of a drain is to get fluid out of the body. Therefore, if the collection bag/bulb is capturing drainage fluid, this is a good indication that it is working correctly. Remember that the fluid is often bloody at first, but should lighten over time. The drainage from an abscess may also be bloody at first before appearing purulent.

Skin Site Clean/Dry

The skin at the site of a drain should be kept clean and dry (2). Minimal amounts of fluid may leak around the tube, causing crusting on the skin or a small amount of visible drainage. This can be gently wiped away with clean gauze soaked with normal saline or warm, soapy water (10). Apply a fresh clean gauze at the site to protect the skin from breakdown (10). If a large amount of drainage is leaking from the skin and around the tube, this is not normal and should be addressed.

Stopcock in the Proper Position

Ensuring that the three-way stopcock (if present) is in the proper position is essential for proper function. The off switch should be pointing to the flush port at all times, unless the nurse is preparing to flush the drain. Turning the off switch to the flush port prevents fluid from draining outside of the system and creates an open pathway from the drain into the drain bag.

Active Suction

All active drains should be monitored closely to ensure that the bulb or accordion is adequately compressed (2). Constant negative pressure must be maintained in order for the drain to work. To compress a JP, use the “side-in method” where the nurse compresses the JP bulb at its largest diameter (in the middle) with fingers and thumb to compress the bulb (14). The drain should be emptied when it is approximately 25 percent full to maintain the pressure within the bulb (14). 

These drains may require frequent assessment and emptying, especially at first. Examples of active drains include JP®, hemovac®, and most percutaneous drains.

Is this Normal? Drain Troubleshooting

Unfortunately, drains can develop complications. It is essential to know what to look for so that potential problems can be identified early. As mentioned previously, a delay in reporting or discovering a drain malfunction may cause delays in patient healing. Luckily, the problems are fairly easy to spot if you know what to look for.

Bleeding

Some bleeding is normal. The act of placing a drain may cause bleeding from nearby small vessels (9). This is usually self-limiting, which is why the nurse may note bleeding in the early hours after placement. The drainage should gradually lighten. Prolonged bleeding or the development of new bleeding warrants a prompt call to the physician.

Leaking

A leaky drain can be a messy business. If the source of the leak is not immediately known, the nurse should evaluate the drain. Assess the tubing for cracks or holes. Ensure all connections are tight. Sometimes the drainage bag/bulb may be punctured. If so, it is often easily replaced.

Leaking may also occur because the drain is occluded or kinked (2). Assess the tubing carefully for signs of obstruction. Flushing the drain can help dislodge occlusions. Again, never flush a drain without orders from the physician.

A drain may also leak at the skin. Minimal amounts of leakage can be expected because the drain creates a track for small amounts of fluid to escape. Moderate to severe leakage can cause skin breakdown and is not normal. It suggests that the drain is malfunctioning in some way, often due to an occlusion or displacement of the drain. Fluid travels the path of least resistance. If it can’t pass easily through the tube, it will find another way out. Notify the physician, who may order follow up imaging, like a CT scan. If a percutaneous drain is leaking, the patient may have to be sent down to interventional radiology for assessment and possible replacement.

No Output

Drain output may cease for two reasons: there is no more fluid or the fluid can’t get out. It is easy to assume the former. Yet, when faced with a drain without drainage, It is important to use critical thinking and common sense. Drainage usually tapers off, meaning it will drain a little less over time. An abrupt cessation of fluid could indicate a problem. Assess the drain for kinks or obstructions. If the drain is occluded, fluid may begin to leak around the tube at the skin. Carefully document drain output as dictated by the physician or facility protocol. Any time there is a concern, the physician should be notified.

Infection

Infection may occur with both surgical and percutaneous drains. It usually forms one of two ways: during initial drain placement or as a result of continued catheter presence (9). Infection may form during initial placement if the needle punctures a non-target area (such as the colon) or from prolonged dilation, which is why the procedure should be completed in a timely manner (9). Infections may also form at the skin if a drain is present for a long time (9).

The nurse should assess the drain site frequently. Signs of skin infection include redness, increased pain, swelling, fever, and purulent drainage (10). Additionally, sepsis is always a concern for the patient with an abscess (9). A patient with sepsis will sicken very quickly, with rapid increase in fever, chills, and rigors (9). Vital sign monitoring is essential. If the nurse suspects a new infection of any kind or deterioration, notify the physician immediately.

Displacement

Living with a drain takes some getting used to. It can be easy for patients to forget it’s there. Sometimes the tubing can become tangled up in the bed sheets or left behind when a patient stands up. Although drains come equipped with reinforcements, such as a suture or dressing to help keep the tubing in place, it is possible to pull the drain at least partially or sometimes completely out of the body.

If a drain is pulled out entirely, the nurse should cover the site with some gauze to catch any drainage. When drains are placed, they form a pathway from the abscess or infection to the skin. The tube’s job is to provide a conduit for the fluid to escape. If the tube is removed abruptly, that pathway still exists temporarily, so fluid will continue to leak out of the body in the absence of the tube. Do not attempt to put the tube back in, as it is no longer sterile. Notify the physician.

If the drain is only partially removed, reinforce the dressing as best as possible to maintain its current position and call the physician. Again, do not attempt to push the tubing back inside the patient. The physician may order imaging to assess the drain’s location (2). Removal and/or replacement may be necessary.

Drains – Frequently Asked Questions

What is an Accordion Drain?  

An accordion drain is used to remove fluid from a wound, abdomen, or lung space. The drain is comprised of a bag and vale that does not allow air or fluid to return back into the open space, wound, or lungs. An accordion drain is considered a closed drainage system, meaning that the drain is formed by tubes draining into a bag.   

What is the difference in a Penrose Drain and a Jackson Pratt Drain (JP Drain)? 
Penrose Drain 

A Penrose drain is a flat, ribbon-like tube usually made of latex, creating a passage from a wound. The drains are open to air, allowing excess fluid to flow outward. The surrounding area on the outside of the body is covered in gauze to collect the fluid, as it drains. The gauze must be drained frequently as it becomes saturated.  

A Penrose Drain is considered a passive and open draining system – meaning that it allows for gravity to remove the fluid without the use of pressure.  

Part of the Penrose drain is inside of the body cavity, with one or both ends coming out of the incision.  

Although they are tubular, most of the drainage occurs outside of the tube, more so around it. It is used more as a “space-holder” to keep the tissue area open, allowing drainage to flow out.  

Indications for a Penrose Drain 

  • Wounds 
  • Infected area or abscess 
  • Underneath of skin graft 
  • Septic joints 
  • Tendon sheaths 

*NOT suitable for the abdominal or thoracic cavity 

Jackson Pratt Drain (JP Drain) 

A JP drain is considered an active and closed drainage system meaning that it uses negative pressure to remove excess fluid from the body. The pressure is created by compression the collection container (which looks like an egg), creating a low-pressure vacuum pulling fluid from the body. It is closed, meaning that it is not open to the external environment; instead, the fluid is contained within a collection bulb.  

The drain is sutured in place at the skin at the insertion site to promote stability and prevent wound breakdown and pulling. The drain is left in place until the drainage is minimal. If pulled too early, the patient may be at risk of developing a seroma or hematoma.  

Indications for a JP Drain
  • Superficial wounds where there is pre-existing or anticipated fluid build-up.  
  • Surgery if large amounts of drainage is expected, such as: 
    • plastic surgery 
    • breast surgery 
    • orthopedic procedures 
    • chest surgery or drainage 
    • infected cysts 
    • neurosurgery 
    • biliary surgery 
    • pancreatic surgery 
How do you flush a Jackson Pratt Drain (JP Drain)?  

You should not flush a JP drain without a stopcock. There is no indication for doing so, it will only present additional bacteria into the drain.  

IF you must, and there is a stop-cock present, make sure it is done under sterile conditions with sterile saline.  

What is a Hemovac drain?  

A Hemovac drain is used to remove fluids that build up within a body after a surgical procedure. It is a circular device connected to a tube. It may be anchored in place by sutures. The Hemovac is an active closed system that creates suction to removed fluid. 

Summary

This course is designed to help readers become more familiar with drains. They come with all sorts of indications: to facilitate healing after surgery or infection, to assist with draining contents from affected organs, or remove fluids that have accumulated in body cavities.

Drains are classified based on their function: open or closed, passive or active. Familiarity with the different types of drains gives the nurse a basic understanding of how they work- which is important because they can look very different, depending on the manufacturer.

In the old days, surgery and antibiotics were the only way to treat intra-abdominal infections. Significant advances in technology have allowed interventional radiologists to specialize in using medical imaging (CT, ultrasound, X-ray, and MRI) to place drains without making an incision. However, patient selection is still very important, and physicians must know which patients are good candidates for percutaneous drain placement and which are better off heading to the OR.

This course is also designed to provide a basic understanding of drain management and troubleshooting. It is important for nursing staff to understand how a drain is supposed to behave when it is functioning normally so that potential problems are easier to spot. When in doubt, consult the physician. Always be aware of any written orders or policies that dictate drain management, as practices may vary from place to place.

As with anything else, the best way to become more comfortable with drains is to be around them!

Quiz Questions

Self Quiz

Ask yourself...

  1. Image guidance has revolutionized drain placement.
  2. What are the advantages of surgical drains and what is their role currently?
  3. Managing drains can be intimidating at first.  How would you troubleshoot the common issues listed here?

Transaortic Valve Replacement (TAVR) Nursing Care

Introduction

Aortic stenosis is the second most common valvular heart disease in the Western world, and it is usually diagnosed in patients over the age of sixty-five. (1) With a burgeoning elderly population, it is estimated that the number of Americans over the age of sixty-five will double by the year 2060 (2). Consequently, many more patients with aortic stenosis will be encountered in the clinical context.

Intervention to replace the aortic valve in these patients is crucial because once diagnosed with critical stenosis patients have a mortality rate of 75% within three years. (1) Aortic stenosis is the second most common valvular heart disease in the Western world, and it is usually diagnosed in patients over the age of sixty-five. (1) With a burgeoning elderly population, it is estimated that the number of Americans over the age of sixty-five will double by the year 2060 (2).

The number of TAVR procedures is likely to increase as the procedure matures and the elderly population continues to grow.

The rate of aortic stenosis in the elderly population is estimated to be between 3.4-12% depending on severity. A recent metanalysis compiled data from seven studies and observed a total of 9,723 patients aged seventy-five years or older. The study showed the prevalence of aortic stenosis to be approximately 12%. The estimated rate of severe aortic stenosis, in the same study, was estimated at 3.4%.

Figure 1: Valves of the heart

This image depicts the left and right coronary arteries as they branch off the aortic valve. The left coronary artery sits behind the left coronary cusp and the right coronary artery sits behind the right coronary cusp. The remaining cusp is termed the non-coronary cusp as there is no coronary artery associated.


Given the prevalence of aortic stenosis in the sample population, researchers estimate that approximately 27,000 patients will become eligible for trans-aortic valve replacement each year. (6) Therefore, having a full understanding of aortic stenosis and its effects on the body is essential to provide care for patients undergoing a TAVR procedure.


Normal Anatomy and Function of the Aortic Valve

The aortic valve works in conjunction with the other three valves of the heart to keep blood moving forward. A brief review of a normally functioning aortic valve helps us understand how the pathology of aortic stenosis causes such profound effects on the rest of the body systems.

The aortic valve is situated between the left ventricle and the aorta. This area is also called the left ventricular outflow tract or LVOT, which simply means the track that flows out of the left ventricle. The opening of the aortic valve, known as the valve area, normally measures 2.6-3.5 cm2. (7)

The aortic valve is referred to as a semilunar valve because when closed it looks like three semilunar structures coming together to form a Y-shape (Figure 1). The aortic valve can be divided into four elements (8) and they are as follows:

  1. One annulus
  2. Three cusps (leaflets) with four layers
  3. Three sinuses
  4. Three commissures

The three semilunar shaped pockets, known as cusps (or leaflets), attach to a fibrous ring known as the annulus. The annulus is a part of the cardiac skeleton, a dense network of connective tissue that lies between the atria and ventricle reinforcing the structure of the heart (9). The annulus also acts as a shock absorber by transferring the force of the high-pressure circulatory system into the framework of the cardiac skeleton causing less wear and tear on the leaflets.

The cusps are named as the right coronary cusp, the left coronary cusp, and the non-coronary cusp. They are named this way because just behind the cusps, on the ventricle side of the outflow tract, lie three nodules, known as the sinus of Valsalva. The sinus is the area where the left and right main coronaries attach to the aorta (Figure 1). During diastole, the sinuses fill with blood that was just pushed out of the ventricles. As the ventricle begins to relax, the coronary sinuses drain blood into the coronary vessel system, preparing for the next contraction by providing oxygen and nutrients to the heart muscle.

The cusps are pearlescent in appearance and have four layers all less than 1mm thick; each layer has a distinct function (Table 1) (10). The names of the layers are as follows:

  1. Endothelium

  2. Fibrosa

  3. Spongiosa

  4. Ventricularius

The layers are connected in the following arrangement starting from the aortic endothelium and working toward the ventricular endothelium:

Aortic Endothelium > Fibrosa > Spongiosa > Ventricularis > Ventricle Endothelium

Figure 2. Aortic Valve Histology – Microscopic view of the aortic valve leaflet layers.

Table 1. Layers and Function of the Aortic Valve Leaflets

Layer Composition Location Function
Fibrosa fibroblasts and collagen fibers in a circular arrangement Faces the aorta Fibers are arranged in a circular pattern. Distributes the pressure load from the surface of the leaflet out to the annulus
Spongiosa Mucopolysaccharides, mesenchymal cells, and fibroblasts The base where the leaflet attaches to the annulus Resists the compression of the cusps
Ventricularius mucopolysaccharides, mesenchymal cells, and fibroblasts Faces the left ventricle Fibers are arranged in a radial pattern to distribute force and maintain shape of the valve
Epithelium Squamous Cells Wraps the outside of the leaflet continuous with the aorta and ventricle Provides protection from shearing forces

Aortic Valve’s Role in the Cardiac Cycle

We have looked at the composition of the aortic valve now let’s look at its role in the cardiac cycle, starting with the venous circulation. (Figure 32) Deoxygenated blood from the body travels to the heart through the superior and inferior vena cava:

  1. The superior and inferior vena cava empty into the right atrium of the heart. The atrium contracts, the tricuspid valve opens, and the blood flows into the right ventricle. As the right atrium relaxes, the tricuspid valve closes.
  1. The right ventricle contracts and opens the pulmonic valve. Blood travels into the pulmonary circulation to eliminate waste and reoxygenate. The oxygen rich blood then travels from the pulmonary circulation into the left atrium of the heart.
  2. The left atrium contracts, opening the mitral valve and blood flows into the left ventricle. The atrium relaxes and the mitral valve closes. The left ventricle contracts, sending blood out of the aortic valve and to the body through the aorta and carotid arteries. The valve will close when the pressure in the aorta is higher than the pressure in the ventricle.

Closure of the aortic valve is part of the second heart sound, S2, and is heard as the “dub” part of “lub-dub.” Originally, the S1 and S2 heart sounds were thought to be the sounds of the valves snapping shut. However, we now know that the heart sounds occur because of vibrations that happen just after the valve has shut (11).

As the aortic and pulmonic valves initially close some blood flows back and hits against the valves. The blood hitting against the valves causes vibrations that travel along the corresponding chamber producing the “lub” or “dub” sound as it travels.

Figure 3: Blood Flow Through the Heart


Pathophysiology and Assessment

In aortic stenosis, the leaflets of the aortic valve become calcified, scarred, and stiff. The calcifications narrow the valve opening from the normal 2.6-3.5 cm2 to ˂1 cm2. The narrow valve obstructs the left ventricular outflow tract (LVOT), increasing the work the heart must do to overcome the obstruction or the afterload. To compensate for this obstruction and increased afterload, the heart begins to squeeze harder, increasing pressure in the left ventricle.

Left ventricle pressures have been reported as high as 300 mmHg in some cases (11). The constant exposure to high pressure causes the left ventricle to fibrose, thicken, and remodel. The increased muscle mass also demands more oxygen which causes stress on the microvasculature of the heart and contributes to the symptom of angina (12).

Typically, the left ventricle can relax and to allow for passive filling from the left atrium. The passive filling of the ventricle makes up the 80-85% of the end-diastolic volume, and the remaining 15-20% is provided by the “atrial kick” at the end of diastole. However, aortic stenosis patients have stiff, non-compliant ventricles that do not relax enough for proper filling during diastole; these patients depend on the atrial kick for 40% of their blood volume (7).

Therefore, abnormal rhythms such as atrial fibrillation or tachycardia cause patients with aortic stenosis to lose the benefits of the atrial kick, which causes a subsequent decrease in cardiac output to the body which leads to syncope and in some cases sudden cardiac death.

Ultimately, in the course of aortic stenosis, the left ventricle will dilate, fail, lead to pulmonary congestion, shortness of breath, and chest pain, which are the hallmark symptoms of aortic stenosis. Patients presenting with the classical triad of aortic stenosis have a 2-5 year prognosis if untreated (7).

Hallmark symptoms: Syncope Angina Dyspnea

In severe aortic stenosis, blood from the left ventricle is being pushed out of a tiny calcified and critically stenosed opening at tremendous pressures creating what is called a “nozzle effect”. It is termed the “nozzle effect” because blood is spraying out of the aortic valve like water out of a fire hose (11).

As the blood hits the sides of the aorta, it causes vibrations that are heard, sometimes even without a stethoscope, and are felt like the thrill of a fistula. The murmur of aortic stenosis is heard and felt loudest in the 2nd intercostal space on the right side (Figure 5) this is the area directly over the aorta (13). The murmur can be heard best during systole since this is when blood is spraying out of the ventricle and creating turbulence in the aortic arch.

Figure 4: Left Ventricular Remodeling

Left ventricular hypertrophy (LVH) develops in response to elevated pressures in the ventricle. Patients who develop LVH are 4.5 times more likely to experience adverse events. Sustained exposure to increased afterload causes apoptosis, or cellular death, in the ventricles which leads to dilation and heart failure. Heart failure contributes to the hallmark symptoms of syncope, angina, and dyspnea.

It is important to be able to identify the murmur of aortic stenosis given that many patients can go decades without any symptoms, and earlier detections can lead to earlier treatment and fewer long-term complications and morbidity. The murmur of aortic stenosis is considered a mid-systolic murmur described as a harsh crescendo-decrescendo murmur. Initially, as blood is pushed out of the ventricle, there is no sound, but as the ventricle squeezes harder the turbulence of the blood flow causes the crescendo and gradually as the ventricle begins to relax the decrescendo ensues.

In the late stages of the disease, S2 may be obscured by the murmur or even lost as the aortic valve becomes less compliant; this is an abnormal finding. The presence of S4 is indicative of left ventricular hypertrophy that develops over time in aortic stenosis (13). The S4 rhythm is called a gallop rhythm because it sounds like the hoof-beats of a horse (13).

When listening to a normal heartbeat, during S2 with inspiration, you may be able to distinguish two heart sounds; this is a normal finding called physiological splitting, and it only indicates that the pulmonic valve is taking a bit longer to close due to the inspiration. However, in aortic stenosis, it takes the aortic valve longer to close due to delayed emptying and the ventricles inability to relax. This abnormal finding is called paradoxical splitting, and it is heard during expiration rather than inspiration. (7)

Pulsus Tardus is a weakening of the carotid pulse that can be felt with light palpitation of the carotid artery. Pulsus parvus et tardus is when the carotid upstroke is delayed (7, 13). The carotid upstroke can be assessed by listening to the heart for systole and noting by palpation how long it takes to travel to the carotid artery.

The Murmur of Aortic Stenosis

Figure 5. The Murmur of Aortic Stenosis

The murmur of aortic stenosis is best heard over the second intercostal space at the sternal border and may radiate toward the carotids. Also, depending on the turbulence of blood flow the murmur may be palpable as a thrill

Quiz Questions

Self Quiz

Ask yourself...

  1. Have you ever cared for a patient with severe aortic stenosis?
  2. Did they exhibit any of the hallmark symptoms?
  3. How did their AS affect their care plan?

Etiology & Risk Factors

There are a few ways in which aortic stenosis can occur. These causes are listed below from most to least common.

  1. Idiopathic calcification
  2. Congenital bicuspid valve
  3. Rheumatic heart disease
  4. Radiation or Endocarditis
  5. Genetic elevation of lipoprotein (a) (13)

Idiopathic calcification occurs mostly in patients over the age of sixty-five; this by far is the most common cause of aortic stenosis and is found in 3 to 5% of the general population (14). Risk factors for patients in this class to develop aortic stenosis include smoking, male gender, hypertension, hyperlipidemia, and diabetes. They are mostly the same risk factors associated with atherosclerosis (1).

Bicuspid aortic valve disease, a congenital condition, is a condition where a person is born with only two cusps on the aortic valve. Bicuspid valve disease is the most common congenital heart disease and is found in 1 to 2% of the population (15). Symptoms usually show up in this group around 40-50 years of age as age-related changes begin to affect the bicuspid aortic valve. Nearly 40% of these patients also have aortic dilatation which can lead to rupture, a medical emergency (15).

Rheumatic aortic disease, now a rare cause of aortic stenosis, is caused by an autoimmune response to group A streptococci, which leads to scarring along the commissure of the valve leaflets lessening their pliancy and causing an obstruction to the outflow tract of the left ventricle (14). Rheumatic aortic stenosis can easily be remedied with antibiotics and with the combination of rapid strep testing and access to antibiotics this is very rarely encountered in the clinical area.

Some cases of aortic stenosis are believed to be caused by a genetic variation in the genes that express lipoprotein (a). The elevation of lipoprotein (a) along with low-density-lipids are thought to induce inflammatory changes on the layers of the valve leaflets leading to valve calcification and stenosis (16, 17). Other rare causes of aortic stenosis include; endocarditis, radiation therapy, Paget disease, Fabry disease, ochronosis, and end-stage renal disease (14).


Natural History of Aortic Stenosis

In aortic stenosis the aortic valve causes an obstruction of the left ventricular outflow tract. The heart attempts to overcome this obstruction by pushing harder. This causes a tremendous difference in pressure between the left ventricle and the aorta. This difference is measured and termed the transvalvular gradient. Transvalvular gradients higher than 50 mm Hg with a small valve area such as 0.8 cm2 is considered “severe aortic stenosis”.

In severe aortic stenosis the left ventricle compensates in two ways:

  1. Remodeling
  2. Thickening

Remodeling happens on a cellular level and is caused by changes to the cellular matrix in response to elevated pressure. Thickening of the heart muscle occurs because of how hard the heart must push against the transvalvular gradient (Fig. 4.). The more the heart muscle is worked the larger it becomes, just like any other muscle of the body. The thickening, however, has consequences.

The first being that the muscle of the left ventricle has thickened, but the excess tissue leaves no room for blood in the ventricle. Less blood in the ventricle leads to less blood being pushed out to the body. This leads to diastolic heart failure. These patients can appear to have a normal Ejection Fraction (EF), but this can be deceiving. Let’s look at normal ejection fraction vs. the ejection fraction of a patient with diastolic dysfunction.

The Normal Ejection Fraction
A. The heart fills will 100 ml
B. The heart ejects 60 ml
B/A=0.60 or 60%

The Ejection Fraction of Diastolic Dysfunction
A. The heart can only fill 50 ml
B. The heart ejects 30 ml
B/A=0.60 or 60%

The ejection fractions are identical, but the patient with diastolic dysfunction is filling up with half the blood and pumping out half the blood of the normal patient. The deficit leads to under perfusion to the body, which leads to exertional chest pain. On the other hand, because the ventricle cannot fill up enough or pump out enough blood begins to backup from the left ventricle to the left atrium and finally all the way back to the vasculature of the lungs.

The vessels of the lungs begin to leak excess fluid causing pulmonary edema and dyspnea. This dyspnea is especially increased during exertion, because on top of the fact that the heart cannot push out enough blood, now there is tachycardia which decreases the amount of time the heart has to fill up. Patients with aortic stenosis often adjust their activity level over time so that they do not over exert themselves which leads to the chest pain and shortness of breath.

Now let’s look at the other scenario. Aortic stenosis patients with systolic dysfunction usually have an ejection fraction that is lower than normal. In this scenario the left ventricle has become worn out and is unable to pump blood to the rest of the body. The ventricle dilates and thins causing it to lose its ability to pump effectively (fig. 4). Let’s compare the ejection fraction to that of a normal patient.

The Normal Ejection Fraction
A. The heart fills with 100 ml
B. The heart ejects 60 ml
B/A=0.6 or 60%

The Ejection Fraction of Systolic Dysfunction
A. The heart fills with 100 ml
B. The heart ejects 30 ml
B/A=0.30 or 30%

In this case the ventricle has enough room for the normal amount of blood, but the muscle of the ventricle is only able to squeeze out 30 ml to the body. If you notice in both scenarios the patient is only pushing 30 ml of blood out of the ventricles; so regardless of whether the patient has systolic or diastolic heart failure they end up with the same consequences of chest pain from under-perfusion and shortness of breath from blood backing up into the pulmonary vasculature.

As patients with aortic stenosis progress slight changes in heart rate, afterload, and vascular resistance mean wide swings in symptoms and if not corrected can lead to sudden death. With excessive fluid volume aortic stenosis patients will develop dyspnea while dehydration will not allow the ventricle to fill adequately.

Tachycardia does not allow the ventricles to fill while bradycardia will decrease the cardiac output further. Patients with aortic stenosis are best kept close to their baseline vital signs while preparing for the TVAR procedure.


Overview of Procedure

The transcatheter aortic valve replacement or TAVR procedure is approved for patients who have severe symptomatic aortic stenosis and who are at high risk for surgical valve replacement.

Sheaths are used to make a conduit for the valve deployment device. The valve is round and made of a metal mesh network to which bovine leaflets attached.

The TAVR procedure does not require that the heart is stopped to perform the valve replacement, though the heart is usually paced at a high rate during deployment.


Diagnostic Imaging

Diagnostic imaging is crucial if a TAVR is to be planned. Solid imaging of the aortic valve decreases the risk of sub-optimal valve deployment during procedure, which can result in paravalvular regurgitation, aortic injury, heart block, or embolization of the valve prosthesis (18).

The gold standard of evaluation of aortic stenosis is the transthoracic echocardiogram (TTE). In this section we will look at what a diagnostic TTE assesses. Performing a TTE helps to (19):

  • Confirm the diagnosis of AS
  • Identify the cause of AS
  • Assess valve morphology
  • Identify the severity of the valve lesion
  • Note left ventricular remodeling
  • Estimate functional capacity of the left ventricle
  • Assess for the presence of mitral valve regurgitation
  • Assess for concomitant pulmonary hypertension

Morphology

Echocardiography can be used to determine the number of leaflets that are present and if the valve is tricuspid or bicuspid. This is of importance since the bicuspid valve is not yet approved for replacement via TAVR.

Another morphological notation on echocardiography is the presence of calcification on the valves. The ultrasound can quantify the amount, location, and severity of the calcium deposits (20).

Rheumatic valve disease is usually differentiated by the pattern of calcification. While rheumatic heart disease usually shows calcification at the commissure line, aortic stenosis usually affects the base of the leaflet and works in an outward pattern (14).


Severity

Echocardiographic parameters classify the severity of the valve lesion into mild, moderate, and severe stenosis. The severity of the disease is determined by the valve area, valve gradients, and peak velocity.

Table 2. Measure of Severity in Aortic Stenosisb

Classification:

Mild

Moderate

Severe

Aortic Valve Area (AVA) cm2 >1.5 cm2 1.1-1.5 cm2 ≤1 cm2
Mean Gradient mm Hg ˂20 mm Hg 20-39 mm Hg ≥40 mm Hg
Peak Velocity (m/sec) 2.0-2.9 m/sec 3.0-3.9 m/sec ≥4 m/sec

Based on information from Mixon & Dehmer


Aortic Valve Area

The aortic valve area (AVA) is a calculation that measures the obstruction of the left ventricular outflow tract, by the stenosed valve. The normal aortic valve area is 2.5-3.5 cm2. The more stenosed the valve, the smaller the aortic valve area.

Figure 6. Peak Velocity Illustration

The narrowed opening in aortic stenosis causes a “nozzle” effect as the force from the ventricle ejects blood across the valve at a high speed, known as peak velocity. (figure B) The normal peak velocity shown in (figure A) is smooth with laminar flow


Le, K. (2019) Peak Velocity Illustration. BA.


Valve Gradient

The valve gradient is another calculation that measures the difference in flow across the valve. The gradient can be calculated on echocardiography or performed directly in the cath lab. In the cath lab, the pressure in the left ventricle and the pressure in the aorta are measured simultaneously. The difference between the two numbers is the gradient. High pressures in the ventricle with low pressures in the aorta is indicative of aortic stenosis. The normal mean gradient is ˂20 mmHg.

Peak Velocity

The peak velocity is a calculation that estimates how fast the blood is traveling across the valve and is measured in meters/second. The standard peak velocity is 2.0-2.9 m/sec. Peak velocity is related to the “nozzle effect,” where the ventricle is trying to push blood out of a narrowed opening. The enormous pressure generated translates into a higher peak velocity.

Left Ventricular Hypertrophy

Left ventricular hypertrophy (LVH) is abnormal thickening and reshaping of the left ventricle in response to the extreme pressures generated in the ventricle as it pushes against the stenotic valve. LVH is present in approximately 67% of patients diagnosed with asymptomatic severe aortic stenosis (12). The onset insidious and can develop long before the onset of symptoms. LVH increases the risk of adverse cardiovascular outcomes up to 4.5-fold (12). Therefore, echocardiographic evaluation of the left ventricle is useful to estimate the functional capacity and determine the severity of LVH before the TAVR procedure.

Mitral Regurgitation

The echocardiography is also able to detect concomitant Mitral Regurgitation (MR). MR is when the blood flows backward from the left ventricle into the atrium. This process can either be acute or chronic. Acute cases of MR usually occur in the setting of myocardial infarction, infective endocarditis, rupture of a chordae tendineae, or malpositioning of the aortic valve during TAVR (18).

In acute cases, there is an overwhelming back up of blood from the left ventricle to the left atrium and back to the pulmonary circulation. The rapid onset does not allow time for compensation, and it can easily lead to pulmonary congestion, hypoxia, reduced cardiac output, hypotension or even shock (18).

Non-acute cases of MR can occur when the left ventricle becomes hypertrophic, and subsequently the annulus of the mitral valve becomes dilated, which is common in aortic stenosis (18).

Regurgitation can lead to pulmonary congestion and edema. The mitral valve can be repaired along with the aortic valve in patients undergoing SAVR, but it is not yet performed in conjunction with TVAR. Ultimately, the decision to perform TAVR vs. SAVR in these patients is based on the heart valve team and the patient.

Other Imaging Modalities

Other imaging modalities include computed tomography (CT) or cardiac magnetic resonance (CMR). Cardiac catheterization is recommended in all patients since concomitant coronary artery disease is found in 50% of patients with aortic stenosis (7).

Many modalities are used so that a complete picture of the valve can be obtained before the procedure.

Quiz Questions

Self Quiz

Ask yourself...

  1. To recap the information we have covered thus far, answer the following questions:
  2. What is the most common cause of AS?
  3. What is the natural history of untreated AS?
  4. What type of imaging is considered the “gold standard” for evaluation of AS?

Decision to Intervene

The heart valve team is tasked with deciding the best pathway for the patient based on current evidence and guidelines. The team typically consists of cardiologists, structural interventional cardiologists, imaging specialists, cardiovascular surgeons, a cardiovascular anesthesiologist, and cardiovascular nursing professionals (18).

The patient and family are involved in each step of the process, and they may be assigned a heart valve coordinator that works closely with them ensuring high-quality education and information for the decision-making process.

The decision to proceed to intervention is based on several factors (18):

  1. The patients goals and beliefs
  2. The presence or absence of symptoms
  3. The severity of the lesion
  4. Remodeling of the ventricles
  5. Pulmonary or systemic congestion
  6. A change from baseline heart rhythm
  7. Risk/benefit based on age
  8. Co-morbidities and life expectancy

Evaluation of Risk

The Society of Thoracic Surgery Predicted Risk of Mortality (STS-PROM) is a scoring system that is based on years of data collected by the Society of Thoracic Surgery. The heart valve team takes the STS score and classifies the patient into low, intermediate and high risk for surgical intervention.

Before surgery other factors are also measured such as the frailty index which takes into consideration the patients ability to perform activities of daily living, assesses any weight loss in the previous year, and tests the patient’s ability to rise from a chair. The patient may also be asked to perform a six-minute walk test or pass the Mini-Mental State Exam that assesses cognitive function.

Patients are further classified into stages A-D3 (Table 4.). These stages describe the severity of stenosis, characteristics of the stenosis, and presences or absences of symptoms.

The AHA/ACC guidelines are made to go along with the STS-PROM assessment. For example, a patient at high surgical risk, with symptomatic severe aortic stenosis would fall into the TAVR category, while a patient at intermediate risk with severe symptomatic stenosis would be recommended for SAVR. Intervention recommendations for stage A-D3 can be found in Table 4., while absolute contraindications for TAVR are listed below:

Contraindications for TAVRc
Based off information from Nitya & Kumar

  • Bicuspid or non-calcified aortic valve
  • Peripheral vascular or aortic disease
  • Coronary artery disease requiring revascularization within 30 days
  • End stage renal disease
  • Severe left ventricular hypertrophy
  • LVEF<20%, severe mitral regurgitation
  • Significant neurological disease
  • Life expectancy <1 year

Ultimately, Surgical Aortic Valve Replacement (SAVR) is preferred in patients with low to intermediate surgical risk. However, for patients at high surgical risk measured by STS score>10% TAVR is the preferred intervention (7).

Table 4. Staging and Timing of Intervention
Based on information from Kanwar, A., Thaden J.J., and Nkomo, V.

Stage

Definition

Intervention Recommended

Criteria for Intervention

Symptoms

Additional Testing

A

At risk of AS

Watch and Wait

Medical Therapy:

ACE, ARB, Beta Blocker if tolerated.

N/A

None

None

B

Progressive AS

Watch and Wait

Medical Therapy:

ACE, ARB, Beta Blocker if tolerated.

Intervention AVR largely based on decision between surgeon and patient.

None

TTE every 3-5 years for mild severity (Vmax 2.0-2.9 m\s)

TTE every 1-2 for moderate severity (Vmax 3.0-3.9 m\s)

TTE with any change in symptoms.

C1

Asymptomatic severe AS

SAVR is recommended once patient becomes symptomatic, symptoms are elicited on stress test, or undergoing another cardiac procedure.

calcified AVA ≤ 1.0 cm2 and an aortic velocity ≥ 4-5 m/s or mean gradient ≥ 40-60 mm hg

None or May have exercise induced symptoms

TTE every 6-12 months for

(Vmax ≥ 4 m\s)

Exercise stress testing to:

Confirm otherwise hidden symptoms, assess response to exercise, determine next steps.

C2

Asymptomatic severe AS with LV dysfunction

SAVR

LVEF <50% with calcified AVA ≤ 1.0 cm2 and an aortic velocity ≥ 4 m/s or mean gradient ≥ 40 mm hg

None

D1

Symptomatic severe high-gradient AS

In the absence of severe co-morbid disease SAVR is recommended.

In presence of severe co-morbid disease TAVR is recommended.

calcified AVA ≤ 1.0 cm2 and an aortic velocity ≥ 4 m/s or mean gradient ≥ 40 mm hg

Symptoms mainly with exertion: dyspnea,

angina, syncope, heart failure

D2

Symptomatic Severe low gradient AS with low LVEF

In the absence of severe co-morbid disease SAVR is recommended.

In presence of severe co-morbid disease TAVR is recommended.

UNDER STRESS TEST: LVEF <50% with calcified AVA ≤ 1.0 cm2 and an aortic velocity ≥ 4 m/s or mean gradient ≥ 40 mm hg

Symptoms at rest: syncope, dyspnea, heart failure

Low dose dobutamine stress test

D3

Symptomatic Severe low gradient/low flow

In the absence of severe co-morbid disease SAVR is recommended

In presence of severe co-morbid disease TAVR is recommended

UNDER STRESS TEST: LVEF ≥50% with calcified AVA ≤ 1.0 cm2 and an aortic velocity ≤ 4 m/s or mean gradient ≤ 40 mm hg

Symptoms at rest: syncope, dyspnea, heart failure

Low dose dobutamine stress test

Quiz Questions

Self Quiz

Ask yourself...

  1. Many patients with AS are not surgical candidates due to the above mentioned contraindications.
  2. How will you approach this with patient and families?
  3. How will you explain the rationale behind the risk stratification?

Pre-Planning Stage

Choice of Valve

Multi-detector computed tomography (MDCT), is the preferred imaging method to determine the annular size of the aortic valve, and it facilitates the decision of what valve should be chosen (18). The 3D data set that MDCT provides produces a more tangible image by which to choose valve size; and it is also able to measure the annulus of the aortic valve during systole when the valve is usually wider and fully open.

The MDCT scan measures the aortic root which produces an anatomical image of the sinus of Valsalva, the coronary ostia, and the size of the aorta and sinotubular junction (18). These views can be used to seat the valve properly since any obstruction to the coronary ostia can lead to ischemia and possible cardiovascular arrest.

MDCT imaging can help determine whether a balloon-expandable, self- expanding, or mechanical deploying valve should be chosen. The balloon-expandable valve fits over a balloon and when the balloon expands it pushes the valve onto the annulus of the aortic valve.

Figure 7. Common TAVR Access Sites

A self-expanding valve expands in a spring-like manner without the need for a balloon. The mechanical valves have a seal to reduce paravalvular leak and can be expanded by the cardiologist in a controlled manner. However, the Lotus valve was the only mechanical valve on the market and has been pulled temporarily due to issues with its locking mechanism (21).

Regarding preference, Otto et. Al states that a self-expanding valve is a gentler option and may be preferred in patients with “severe calcification of the valve and outflow tract with a risk of rupture, patients with an extremely oval-shaped annulus, or for small transfemoral access” (18).

If a patient requires the transapical approach, as in the case of severe atherosclerosis of the vasculature, the only valve approved for use is the balloon-expandable version (18). Many versions on the market today can be repositioned if malpositioned (18). Often, however, the choice of valve is merely physician preference.

Choice of Access

The outer diameter (OD) of the sheaths used for valve deployment range anywhere from 6.9 cm to 8.68 cm depending on the intended valve. Access sites are thoroughly imaged to ensure an entry point that is non-tortuous and mostly free of atherosclerosis which can put the patient at risk for cerebral embolization (18). If entry through the femoral artery is not feasible, other options include transaxillary, transapical, direct aortic, carotid, or transvenous approach (Figure 7).

Procedure Considerations

Hybrid Operating Room

Facilities, where TAVR procedures are performed, have a dedicated hybrid operating room that is a mix between a cath lab and a standard operating room. There is a cardiopulmonary bypass machine available if the procedure is converted to open-chest. Coronary occlusion wires are on hand if coronary embolization occurs intra-procedure, and anesthesia is equipped with advanced airway supplies if necessary. A crash cart and defibrillator are nearby, and defibrillator pads are placed on the patient per routine.

Anesthetic Considerations

Many of these patients have both cardiovascular and non-cardiovascular risk factors. Cardiovascular collapse is a real concern and proper anesthetic management can decrease this risk. Optimal hemodynamics should be maintained through the case, and attention should especially be paid to hypotension. Prompt administration of vasoactive medications aids in the avoidance of hypoperfusion.

While general anesthesia with endotracheal tube is the most common delivery method of anesthesia in TAVR patients, studies have shown that moderate sedation decreases the need for vasoactive medications (18, 22). However, an endotracheal tube should be considered if imaging by TEE is expected due to patient comfort.

If moderate sedation is to be utilized, the practitioner must be certain that airway securement can be done quickly in the event of respiratory or circulatory collapse. Due to the amount of equipment surrounding the patients head, attention should be paid to the environment and maneuverability in the event of emergent intubation (18).

Intra-Operative Complications

This procedure is performed on a high-risk population; therefore, complications are not uncommon. There are many different types of complications; however, if recognized promptly most can be managed or reversed.

Some complications are caused by improper placement of the new valve; these complications look different based on whether the valve is deployed too high or too low. Valve placement on the aortic side can cause a blockage of the aorta, injury to the aortic intima, or blockage of the coronary arteries. Valve placement too far into the ventricle can interfere with the mitral valve, causing mitral regurgitation, and subsequent pulmonary edema.

Also, pressure on the atrioventricular node can lead to conduction abnormalities and possible heart block (20). In these cases, the valve is retrieved and repositioned if possible. A transvenous pacer is inserted at the start of the procedure, which is used if the patient experiences complete heart block or any other non-perfusing rhythm.

If the surgical valve fails to cover the entire annulus, a paravalvular leak may occur. The leak can usually be corrected by inflating a balloon inside the valve, effectively pushing it outward to create a better seal, if this fails the valve may need to be recaptured and repositioned or replaced with a larger size.

Some complications are systemic such as cardiovascular collapse, shock, stroke, and myocardial infarction. Shock or hemodynamic collapse is always a risk in unrepaired aortic stenosis patients. The best management is to keep the patient within tight hemodynamic parameters, however, if cardiovascular failure ensues, and is irreversible the patient should be placed on coronary bypass.

If the ventricle or annulus is ruptured the procedure should be converted to an open heart. Also, if coronary occlusion and subsequent ischemia ensues the procedure should be converted to an open CABG. In the event of an embolic stroke catheter-based retrieval should be attempted.

In the event of a hemorrhagic stroke anti-coagulation should be reversed and treatment with this type of stroke is conservative. Access site complications such as dissection of the artery may require endovascular or surgical repair. Lastly, bleeding complications can be related to systemic heparinization that may need to be reversed.


Post-Procedure Considerations

Post-Procedure Monitoring

When obtaining report some items to note are; size and type of valve placed, concern of mal-placement or leak, the type of sheath that was used, and the number of vascular access sites the patient has.  

  • Was the repair transapical and if so were any drains placed?  
  • Were any irregular arrhythmias noted post-deployment?  
  • Does the patient have a transvenous pacer still in place?  
  • Is the patient pacer dependent, if so what are the settings, and where is the sheath and control box?  
  • What type of closure device was used?  
  • Were there any bleeding incidences in the surgery suite? When and what was the last ACT?  
  • Does the patient have any risk factors for bleeding; such as von Willebrand factor deficiency?  
  • Are any hematomas noted?  

If there are hematomas what size and how firm are they? If the patient has a femoral access as they are at risk for retroperitoneal hematomas- this may manifest as back pain, hemodynamic instability, and bruising along the flank. It is also advisable to mark the borders of the hematoma as a reference since patients can bleed insidiously.  

  • Is the patient having any pain?  
  • What type of anesthetic was used local, monitored anesthesia care, or general? 
  • If it was general anesthesia, what type of airway was used?  
  • Time and dose of last known pain medication and was local anesthetic used at the access site?  
  • How much vasoactive medication was necessary during the procedure?  
  • How much fluid was administered intraoperatively?  
  • Is there a urinary catheter and how much was the urine output during the procedure? 
  • How much contrast dye was utilized for the procedure? 

TAVR Complications Ordered Most to Least Common
Based off information from Nitya & Kumar (7)

  1. Bleeding (15%)
  2. Vascular site complications (10-15%)
  3. Need for permanent pacemaker (5-15%)
  4. Significant perivalvular leak (10%)
  5. Stroke (2-5%)
  6. Death (2-5%)
  7. Acute kidney injury (1-2%)
  8. Coronary Occlusion (0.6%)
  9. Valve embolization (0.3%)

If there are hematomas what size and how firm are they? If the patient has a femoral access as they are at risk for retroperitoneal hematomas- this may manifest as back pain, hemodynamic instability, and bruising along the flank. It is also advisable to mark the borders of the hematoma as a reference since patients can bleed insidiously. Is the patient having any pain?

What type of anesthetic was used local, monitored anesthesia care, or general? If it was general anesthesia, what type of airway was used? Time and dose of last known pain medication and was local anesthetic used at the access site? How much vasoactive medication was necessary during the procedure? How much fluid was administered intraoperatively? Is there a urinary catheter and how much was the urine output during the procedure? How much contrast dye was utilized for the procedure?

These questions take into consideration some of the most common complications such as; bleeding, vascular site complications, need for permanent pacemaker, significant perivalvular leak, stroke, and acute kidney injury. Occurrence rate on each complication can be found above (TAVR Complications Ordered Most to Least Common).

Bleeding and Vascular Site Complications

Before the procedure, patients undergo a series of imaging scans to identify potential vascular access sites. The scans included are a left and right heart catheterization and aortography, transthoracic and transesophageal echocardiography, computed tomography and angiography of the chest, and computed tomography of the abdomen and pelvis (23).

However, it is still estimated that about 15% of patients experience periprocedural bleeds which outranks all other complications (7). Many of these bleeds are related to the vascular entry site which carries a complication rate of 10-15%.

Proper monitoring of the access site, and the 5 P’s pain, pallor, pulse, paresthesia, and paralysis helps to identify any occlusion of the artery which is considered a surgical emergency. Most bleeding can be resolved by proper monitoring and intervention by manual pressure applied to the site. However, for continuous uncontrolled bleeding manual pressure should be applied, an ACT should be assessed, and if manual pressure is not adequate, the patient will require surgical stenting of the vessel (24).

Acquired Von Willebrand Syndrome

Aortic stenosis patients are also at high risk to acquire von Willebrand syndrome. (25) This happens because the stenosed aortic valve causes shearing forces and as blood crosses the valve clotting factors are destroyed; which in some cases this can lead to an induced VonWillebrand syndrome.

This condition can subsequently cause Heyde’s syndrome which is a gastrointestinal bleed caused in the setting of absent or defective von Willebrand factor. Replacing the valve may decrease the shearing effect, but it takes time for clotting factors to stabilize. The adenosine diphosphate closure time (CT-ADP) is a bedside test that is run much like an activated clotting time which may be useful in helping to identify paravalvular leaks and patients at risk for bleeding complications (25).

Atrioventricular Blockage

Complete heart block is a condition where the electrical signal of the heart is blocked and cannot travel through the atrioventricular (AV) node. This is characterized by a complete dissociation of p-waves and QRS complexes. Patients can also experience different degrees of AV dissociation which may lead to 1° AVB and 2nd° AVB.

While it is known that AV blockage can occur after TVAR, it is not well understood why this happens. Some studies have attempted to predict which patients are at risk for AV blockage post-TAVR. Studies have shown that larger valve sizes and the Edwards Sapien 3 Valve in particular have a higher rate of AV block. (27)

In another interesting study, patients with a QRS >120s were found to have a 38% rate of permanent pacemaker placement after TVAR, while none of the patients with a QRS ≤120s had any semblance of heart block. (28) In yet another study they found that longer P-R intervals, QRS duration, history of Right Bundle Branch Block (RBBB) and pre-existing 1°/2° block were more common in patients that required permanent pacemakers post procedure.

(29) Most incidences of heart block occur immediately after the procedure (30) while the patient is in the critical care unit. A thorough look at the patients pre-operative EKG and cardiac history may reveal patients at risk of needing a pacer post-operatively, allowing the nurse to prepare for placement of a transvenous pacer or utilization of one that is already in place.

Stroke

The mechanism by which stroke occurs after procedure is debatable, but both embolic and hemorrhagic strokes may occur after TAVR. However, more advanced catheters and valves lessen the risk of stroke. (31) The risk of stroke does appear to be the same as patients undergoing surgical aortic valve placement (SAVR), however, one study found that TVAR patients who experienced a TIA post-procedure had a lower 1-year survival rate (31).

Patients who are immediately post-op and in the ICU are at the most risk of experiencing a stroke or transient ischemic attack (TIA). However, after the immediate preoperative period, the risk of stroke/TIA decreases dramatically (31). Since it is postulated that debris from the valve is the cause of many neurological events studies are examining the use of cerebral protective devices such as a filter to decrease the incidence of embolic stroke. (32) Additionally, the use of antiplatelet therapy does seem to minimize the risk of embolic type strokes. (31) A full neurological exam should be performed upon admission per standard practice.

Patients may still be sleepy from procedure at this time, but it is important to assess for a proper baseline since TVAR patients are at high risk for stroke especially within the first twenty-four hours. Full neuro assessments that include a pupillary check should be performed every four hours at minimum or per hospital policy. Abbreviated neuro assessments may be performed in between full assessments and they should include at minimum an assessment of balance, dizziness, headache, blurred vision, facial drooping, and speech difficulty. Performing regular neurological checks will aid in early identification and treatment for TAVR patients Policies will vary by institute but a sample schedule may be as follows:

  • Full neurological exam x1 then q 4hrs
  • Abbreviated exam q 15 min x 8
  • Abbreviated exam q 30 x4
  • Abbreviated exam q hr


Acute Kidney Injury, Pain Management and Early Mobilization

Acute Kidney Injury

The development of acute kidney injury after TVAR is associated with a four-fold increase in mortality. (33, 34) Risk factors for AKI after TVAR are hypertension, COPD, pulmonary disease, and blood transfusions (33-35). Some hospitals employ a preoperative infusion of acetylcysteine and IV bicarbonate as a protective measure against the contrast dye, but there is conflicting evidence as to whether this actually decreases risk.

Measuring intake and output for patients at risk for AKI are nursing measures that may help with early diagnosis and treatment. Proper fluid management and avoidance of hypovolemia may reduce the risk of AKI.

Pain Management and Early Mobilization

Pain management should be titrated to the patient’s needs. Ideally, pain medication should be adjusted so that the patient is comfortable during early ambulation and remains alert and oriented. Early mobilization is linked to shorter hospital stays and a decreased risk of venous thrombus. (36) Patients with femoral access sites will usually need to lie with the head of the bed in ≤15° for a minimum of six hours to ensure hemostasis, then they may resume sitting and walking activities.

Patients with other access sites may be able to ambulate sooner dependent upon hospital policy. Patients should make a goal of walking the unit at least 3-4 times a day if possible.

Discharge Planning

Respiratory problems, infections, and bleeding events are the main reasons that TVAR patients are readmitted (18). Proper education throughout the hospital stay may help decrease the incidence of these events.

Most patients will be sent home on a regimen of aspirin and clopidogrel for at least six months to prevent thrombus formation of the newly placed valve. Education should be provided for the patient on how to monitor their access site for any signs of bleeding and they should be aware that the clopidogrel will put them at greater risk for bleeding.

The patient should be instructed on how to keep the incision site clean and how to apply any dressings if necessary. Educate the patient making them aware that ambulation along with coughing and deep breathing will decrease the chance of pneumonia and respiratory infections.

Any medication changes should be discussed, and the patient should go home with a medication reconciliation form stating what dose should be taken and at what time.

Quiz Questions

Self Quiz

Ask yourself...

  1. Knowing the most common complications, how will you adjust your assessment and monitoring of post-op TAVR patients?
  2. What signs and symptoms are you likely to see if any of these complications occur?

Liver Transplant Nursing Care


Introduction

In 1967, Dr. Thomas Starzl was the first to successfully perform an orthotopic liver transplant (OLT) in a hepatoblastoma patient. Although the patient ultimately died 18 months later of metastatic disease, this was the beginning of several major transplant surgery breakthroughs including the introduction of brain-death criteria in 1968, and the introduction of immunosuppressive medications in 1979 (1).

52 years later and the process of a liver transplant is far from a perfect science. Patients require lifelong close follow up, have frequent infections, and can occasionally need re-transplantation due to graft dysfunction.

Purpose Statement

Liver transplant patients require meticulous care both pre and post-transplant, and it is paramount that advanced care clinicians in all medical subspecialties are knowledgeable on the basic medical problems and risks of organ transplant.

The purpose of this module is to provide a comprehensive overview of the liver transplant process and an extensive review of the inpatient management of the post-transplant patient. By educating clinicians on the transplant process and the care of the transplant patient, it is the hope of the medical community that the success of liver transplant will continue to grow.

Stages of Liver Disease

As most of us know, there are litanies of liver diseases that can cause organ dysfunction. Despite the long list of liver diseases, they tend to all progress in a similar fashion. Here, we will break down the stages of liver disease from the healthy liver to cirrhosis.

A healthy liver has numerous important functions including helping to fight infection, cleaning the blood of bacteria, produces coagulation factors, produces bile to digest fat and absorb certain vitamins, metabolizes and removes toxic byproducts of medications, and processes food into storable energy. It has the ability to regenerate when injured, but as damage occurs from infection or disease the liver loses the ability to function at full capacity (2).

The first stage of liver injury is inflammation, where the liver may be tender and enlarged (2). This can be during the course of your immune system trying to fight off an infection, and can cause a patient discomfort or they may be asymptomatic depending on the severity of inflammation (2).

If the liver dysfunction is left untreated, the liver will begin to develop scar tissue and slowly replace healthy tissue. This process is referred to as fibrosis. As scar tissue replaces healthy tissue, blood flowing through the portal system can be impaired therefore making it more difficult for the healthy parts to function appropriately. There numerous scoring systems to grade fibrosis in order to give an objective trajectory of the degree of liver fibrosis and a prediction of how the fibrosis will progress. A popular scoring system is the METAVIR scoring system, which uses a liver biopsy sample to assign a score for “activity” or how the fibrosis is projected to progress and a score for the degree of fibrosis itself (3). The scores range from A0 (no activity) to A3 (severe activity), and F0 (no fibrosis) to F4 (cirrhosis) (3).

As fibrosis progresses, it leads to cirrhosis which is defined as irreversible scarring of the liver. At this stage of liver disease, the liver cannot heal, but progression of scaring can be prevented. There are four stages of cirrhosis: Stage 1 is considered to be compensated cirrhosis as it involves scaring of the liver, but few symptoms (4). Worsening of portal hypertension and the development of varices characterize stage 2 cirrhosis (4). Stage 3 cirrhosis is characterized by the new onset of ascites and is the hallmark stage of decompensated cirrhosis (4). Stage 4 cirrhosis is characterized by the development of end-stage liver disease (ESLD) and is fatal without a liver transplant (4).

Quiz Questions

Self Quiz

Ask yourself...

  1. How will you explain the stages of liver disease to patients?

Causes of Liver Disease

Liver disease is the twelfth most common cause of death in US adults, resulting in 34,000 deaths annually from cirrhosis alone (5).

Liver transplant is indicated in patients with severely decompensated cirrhosis that has surpassed the limits of medical management or once a patient with cirrhosis has experienced complications such as ascites, hepatic encephalopathy, variceal hemorrhage or hepatocellular dysfunction and results in a MELD >/= 15 (6). The most common cause of decompensated cirrhosis remains the hepatitis C infection (HCV). The fortunate caveat to this is that direct-acting antiretroviral agents (DAAs) are becoming more readily available and the incidence of OLT related to HCV infection is expected to decrease (7).

Due to the high prevalence of HCV in the community and in-patient settings, providers should be aware of the DAA classes and the basic mechanisms of action. DAAs work by directly targeting the hepatitis C virus to prevent viral duplication, and therefore offer shorter treatment times, less side effects and higher overall cure rates (8). There are four classes of DAA, and the drug chosen is based on the patient’s specific hepatitis C genotype. Most DAA drugs are combination drugs that combine two separate classes of DAAs to maximize viral replication inhibition. Common combination DAA drugs include Mavyret, which is a combination of two DAA drugs, and has an approximate cure rate of 97-100% (9).  Treatment is between 8-12 weeks and costs $26, 400 for 8 weeks of treatment (9).

Common side effects reported in clinical trials include; headache, insomnia, nausea, fatigue and asthenia (9). Another well-known DAA is Harvoni (Ledipasvir and Sofosbuvir), which has a sustained viral response of 93-99%, and has varying treatment lengths depending on the patient’s degree of liver disease (10). Treatment length ranges from 8 weeks in patients who are treatment naïve with no cirrhosis to 24 weeks for patients with previously treated HCV and compensated cirrhosis (10). The cost of a 12 -week regimen is averaged at $94, 500 (10). Most insurance plans offer partial coverage, but even if a patient’s plan does not cover the cost there are numerous patient assistance programs that can be used to assist with the cost of the treatment.

The other main indications for liver transplant in order of decreasing frequency are; alcoholic liver disease (18%), idiopathic/autoimmune hepatitis (12%), primary biliary cirrhosis (10%), acute liver failure (7%), hepatitis B virus (6%), metabolic liver disease (3%), cancer (3%), and fulminant hepatic failure (2%) (11)

Less common reasons a patient may qualify for a transplant in the absence of liver failure include treatment of portopulmonary hypertension, hepatopulmonary syndrome, correction of primary hyperoxaluria (done with a simultaneous kidney transplant), and management of cystic fibrosis induce cirrhosis (10).

Quiz Questions

Self Quiz

Ask yourself...

  1. What are some modifiable and non-modifiable risk factors for liver disease? 
  2. How can patients alter their lifestyles in order to reduce their chances of developing liver disease?
  3. HCV infection treatment represents an opportunity to reduce the burden of liver disease. What type of screening and treatment programs are being offered to patients?

Case Study – Meet The Patient

You are an acute care nurse practitioner working in a busy ICU. You begin your shift with a new admission, Ms. Mino. She was an ICU to ICU transfer overnight, and the overnight resident figured you’d just do the HPI on pre-rounds because the patient “wanted to sleep”!

Ms. Mino is a 65-year-old woman with a PMH of all the good stuff. HTN, T2DM, hypercholesterolemia, and arthritis. She drinks 1-2 glasses of wine on special occasions and does not smoke.

When Demand Exceeds Supply: How Do We Allocate Livers?

While the best results are achieved in patients who are still relatively healthy, the patients who need a transplant most urgently are those who are critically ill and have acutely decompensated. In order to properly allocate organs, a model that prioritizes the sickest first was developed. The Model for End-Stage Liver Disease (MELD) was originally developed to predict the 3-month mortality of patients who underwent a transjugular intrahepatic portosystemic shunt (TIPS) placement (12). It was adopted by the United Network for Organ Sharing (UNOS) in 2002 as the model for liver allocation in the United States.

The MELD score is the product of an equation using the patient’s bilirubin, INR, and creatinine to produce a number that directly correlates to the patient’s need for a transplant in the next 3 months (9). The equation is as follows (from 12):

MELDScore = 10 * ((0.957 * log(Creatinine)) + (0.378 * log(Bilirubin)) + (1.12 * log(INR))) + 6.43

In 2016, UNOS modified the MELD score to also take the patient’s sodium level into account. Hyponatremia is directly correlated with the severity of cirrhosis and independently predicts mortality independently of the MELD score. MELDNa score benefits patients who have a low MELD score but suffer from profound hyponatremia. The equation for MELD-Na is as follows (from 12):

 MELDNa= MELD – Na – [0.025 × MELD × (140 − Na)] + 140

Additionally, there are certain patient populations such as those with HCC or portopulmonary hypertension that receive MELD exception points in order to accurately depict their wait list mortality. The exception to the MELD system is referred to as Status 1A and is reserved for patients who have a sudden and severe onset of liver failure and are expected to only live a matter of hours without a transplant (13).

Quiz Questions

Self Quiz

Ask yourself...

  1. What are the strengths and weakness of our current transplant system?

Case Study – History of Present Illness

On exam, she is awake, alert and able to participate in your HPI. Her husband, Jim, is with her and looks concerned. She states that she has been mostly in her normal state of health minus a chest cold that her grandson gave to her last week, but “with some cold medicine, I felt good enough to work on my garden all week!. “All the kneeling on the hard ground really made my back and knees hurt, though.

Don’t ever get old! It’s all-downhill from 40, I swear. I actually fell just once trying to get up from doing some planting in my flowerbeds the other day. Nothing major just kind of toppled over and landed pretty hard on my right knee and side. Can you believe that! I used to be an athlete!”

When asked what brought her into the hospital originally, Jim states that he noticed the whites of her eyes that a strange tint to them. “Almost yellow-ish”, he says. She replies “yes, and my urine has gotten very dark and I don’t have much urge to urinate, but I probably wasn’t drinking enough when I was out in the yard. This pain in my right side hasn’t really gotten any better either”.

You review her home medications, and they are as follows: Glipizide 5mg daily, Amlodipine 10mg daily, Tylenol for arthritis PRN. She states that due to her fall she’s been taking a little more than her doctor told her to take- 3 tablets 3x/day as needed. She’s also been taking NyQuil to help her coughing at night- 2 tablespoons before bed and 2 tablespoons if she wakes up coughing in the middle of the night.

You do some quick math, and yes- that comes out to about 6,500- 7,150 mg of Tylenol a day. Acute Acetaminophen Toxicity with Acute Liver Failure jumps to the top of your differential. Luckily, she is encephalopathic, but she could become critically ill very quickly. Around this time, her labs come back.

  • Cr: 2.5
  • Bilirubin: 4.8
  • INR: 3.2
  • Sodium: 133
  • Acetaminophen level: 50
  • AST: 7,377
  • ALT: 3,570
  • Alk Phos: 109

Using the MELD calculator, this is a MELD score of 35, which would be enough to list her as a Status 1A transplant candidate.

Evaluation Process

Evaluation for a liver transplant is an extensive and multidisciplinary process that focuses mainly on the allocation of donor organs to recipient’s with the physical and psychosocial health to withstand a taxing surgery, and adopt the new lifestyle that comes with being a transplant recipient. The evaluation process is a multifaceted process involving; transplant hepatologists, transplant surgeons, social workers, nutritionists, financial counselors, transplant coordinators, and a psychiatrist.

Patients are expected to abstain from alcohol consumption, tobacco and ilicit drug use, which can pose a challenge if the patient had a prior substance abuse problem. Additionally, patients are educated to avoid NSAIDs and use less than 2,000 mg acetaminophen daily for pain control. Patients are also educated on adopting healthy eating habits. Transplant medications can increase the risk of developing obesity, heart disease, diabetes, bone loss, and hyperkalemia, and diet modifications can help manage these side effects.

During the evaluation by the hepatology and transplant surgery team, the patient’s history is reviewed with focus on the duration, severity, complications, and past medical management treatments of the primary liver disease (14). Drug and alcohol dependency issues, current functional level and level of debility as it relates to the liver disease are discussed at length. The physical exam aids in confirming signs of advanced liver disease, as well as, identifying exam findings that may impact the success of OLT (cachexia, muscle wasting, overall debility) (14).

This is also when the patient can be assessed for variceal hemorrhage prophylaxis, hepatitis A/B vaccination if applicable, and HCV treatment pre and post-transplant, if applicable (14).  The surgical consultation serves as a first-pass education to the patient and family regarding the surgical procedure, donor and graft types, potential complications, rejection rates, and the necessity of lifelong immunosuppression.

During the psychosocial evaluation, social workers and mental health professionals evaluate the potential organ recipient for evidence of compliance with medical directives, adequate support from caregivers, and no psychiatric disorders that may impact compliance post transplant or include harmful behaviors, such as alcohol, tobacco, or illicit drug use (14). There is no psychiatric disorder that leads to an absolute contraindication to transplant as long as there is adequate preparation, education, and able social support (14).

A large part of the psychosocial evaluation is making sure the patient has active insurance that will help to pay for their new lifelong need of medical care, and ensuring that the patient has a caregiver identified that will assist them in getting to and from clinic appointments especially if they patient is under the influence of narcotic pain medication post-operatively (14).

The patient undergoes a battery of laboratory tests to evaluate hepatic function, electrolytes, renal function, viral serologies (to establish Hepatitis A/B/C, CMV, Epstein-Barr virus, and HIV status), tumor markers, ABO-Rh blood typing, and creatinine clearance (14).

Results of the hepatic panel, chemistry panel, and electrolytes have the potential to change the patients MELD score, therefore increasing their status on the waitlist. Conversely, if the patient responds to medical management and the lab work improves, their MELD score will reflect improvement in their hepatic function and therefore move them to a lower position on the waitlist.

The renal function and creatinine clearance are crucial to establish a baseline, evaluate the patient for the need of a simultaneous liver-kidney transplant, and to renally dose their medications post-transplant.

Results of viral studies will dictate whether the patient needs treatment pre or post transplant for a viral illness. There are also programs in place that match HIV + donors to HIV + recipients, and new programs are beginning to emerge that include HCV + recipients with HCV + OR – recipients. As transplant surgery continues to advance, it is very likely that practitioners will be seeing HCV – recipients receiving HCV + organs and undergoing acute HCV treatment post-operatively.

The patient will also undergo ultrasonography to assess the patency of the portal vasculature and triple-phase computed tomography or gadolinium MRI to exclude a complicating hepatocellular carcinoma (HCC). If there is identification of HCC, attention will be paid to the size and number of lesions in order to direct the next steps in the evaluation process (14). The Milan Criteria uses tumor size, number, presence of extrahepatic and major vessel involvement to aid in differentiating between patients who should undergo OLT and those who would not be suitable (14).

An important aspect of the transplant evaluation process is cardiac evaluation. As with any surgical procedure, there is a great cardiovascular risk and the patient must undergo a noninvasive echocardiogram, as well as, noninvasive stress testing and a basic cardiovascular exam to rule out a severe cardiovascular disease that would hinder a good long-term outcome (14).

Patients who have advanced liver disease may not be able to achieve the target heart rate during an exercise stress test, and may need to undergo a stress test with pharmacological stress test and cardiac catheterization if coronary artery disease cannot be confidently excluded (14).

If >70% coronary artery stenosis is detected, revascularization may be attempted prior to liver transplant, although cardiac surgery in a patient with decompensated cirrhosis carries a risk that does not have documented benefit. In addition to evaluation of the patient’s coronary arteries, attention must be paid to the assessment of valvular heart disease and the presence of ventricular dysfunction.

There is no fast and hard rule of when heart function is too poor to undergo transplant surgery. Traditional medical therapies are utilized to optimize the patient’s cardiac function prior to surgery, and they are closely monitored post-transplant to ensure that medical management is sufficiently treating their underlying cardiac disease.

Quiz Questions

Self Quiz

Ask yourself...

  1. The evaluation process can be difficult for patients and families.
  2. It provides an opportunity for hope but at the same time may end without a definitive treatment.
  3. How can you explain the process and offer emotional support during the evaluation?

Case Study – The Workup

After completing your HPI, you go back to the office and call a STAT consult to both hepatology and transplant surgery. You explain the patient’s background, your preliminary data, and concern for acute decompensation if she remains untreated. The transplant surgery team comes to evaluate the patient, and on their exam she was lethargic, answered questions but quickly fell back to sleep.

When she extended her hand to shake the physicians hand, he noted a flapping tremor. Her husband provided the details of the HPI for her. They ask for a full hepatic panel, viral serologies including CMV, EBV, hepatitis panel, and HIV status. They also ask for ABO-Rh blood typing to be done in case the patient needs to be cross-matched with an organ donor. Her standard labs are increased in frequency to every 8 hours to assess for metabolic changes, decline in coagulation ability, and trend of liver enzymes.

A MRA abdomen and pelvis is ordered to evaluate her portal vasculature. Cardiology is consulted for pre- surgical cardiac clearance, an EKG is done and records of her last stress test are requested from her private cardiologist that she sees for her hypertension management.

Her viral serologies are all negative, and her abdominal imaging shows no contraindications to liver transplant. She is listed as a Status 1A transplant candidate by the afternoon.

Hepatology recommended initiated an N-acetylcycstine infusion to help medically manage her acetaminophen toxicity, and to give Vitamin K 10mg IV to help with her coagulopathy while organ offers are evaluated. Both teams will continue to follow her case closely, and update the ICU team and family if an organ becomes available.

Living Donor Liver Transplant: The Other Kind of Transplant

Organ transplant has become a victim of its own successes. The number of patients awaiting an organ transplant far exceeds the availability of deceased donor organs. Living donor liver transplantation (LDLT) has expanded the donor pool while also providing patients with a lower MELD score a chance to receive a transplant.

Indications for LDLT vary between the pediatric and adult populations. In adults, the concept of putting a healthy individual at surgical risk poses an ethical dilemma if the organ recipient has an increased risk for mortality post-transplant. Ideal LDLT candidates are separated into two main categories.

First, patients with hepatocellular carcinoma that is confined to the liver and is not associated with liver decompensation (15). This group of patients will not mount a MELD score suitable for deceased donor liver transplant (DDLT), but as their disease progresses and becomes extrahepatic they will quickly become unsuitable for a transplant altogether.

The second group of patients includes those with disease severity that is not reflected in their MELD score, such as patients with severe refractory encephalopathy, complicated cholestatic liver disease, ascites, or cachexia (15).

The projected outcome of the transplant recipient is weighed considerably before putting a healthy live donor at surgical risk. In a report by Berg et al. (16) the mortality rate associated with receiving an LDLT was lower than receiving a deceased donor liver transplant, but this depends largely on the severity of illness in the recipient.

As discussed previously, the sicker the patient prior to transplant the higher their post-operative mortality. Sicker patients with higher MELD scores tend to do poorly with an LDLT because the partial graft is unable to meet the needs of a severely chronically ill patient (15).

Evaluation of the living organ donor is comprehensive and aims to medically and psychologically assess the patient. The medical evaluation begins with a detailed history and physical exam, which should include assessing the patient’s BMI, as obesity is a risk factor for developing hepatic steatosis.

Patients undergoing the preliminary work up to be a live organ donor should be assessed for risk or history of viral hepatitis, non-alcoholic fatty liver disease, cardiovascular disease, malignancy, and bleeding disorders. Further medical workup includes routine blood work, including blood typing, viral serologies (HBV, HCV, HIV, CMV, EBV), autoimmune markers, and coagulation studies (18).

A CT scan or MRI is completed to estimate the volume of the left lateral segment or right lobe to assess whether the mass is appropriate for a particular potential recipient (18). Imaging also allows for the identification of any space-occupying lesions or the presence of steatosis. The role of liver biopsy in the donor is dependent on the transplant site’s protocol and the patient being evaluated.

A biopsy may be indicated in the potential donor who has elevated liver enzymes, an elevated BMI, or steatosis is suspected (18). The psychological evaluation of the patient centers around ensuring that the potential donor is educated on the procedure and is afforded ample time to make an informed decision about the procedure.

Due to the rigorous process, only a small number of potential donors end up being suitable for participating in an LDLT. In the Adult-to-Adult Living Donor Liver Transplantation Cohort (A2ALL) only 40% of donor candidates were accepted for donation (18).

While LDLT has many advantages, it is not without risk to the healthy donor. Farkas et al. (1) reports that the donor has a post-surgical morbidity risk of 30% and a mortality risk of 0.8%. The most common cause of morbidity was mild pleural effusions (16.4%), followed by biliary leaks and strictures (15). A significant risk of LDLT for the adult donor is small for size syndrome (SFSS).

This syndrome can occur when there is inaccurate size matching and the residual hepatic mass is inadequate for the donor’s metabolic needs. SFSS is characterized by prolonged cholestasis with elevated serum bilirubin levels, elevated liver enzymes, coagulopathy, ascites, and in severe cases primary non-function with subsequent shock and death (19).

Despite these potentially life-threatening complications, the overall risk for the donor in LDLT is low, and patients are supported medically, and psychologically by the medical team throughout their entire transplant process.

Quiz Questions

Self Quiz

Ask yourself...

  1. What are the advantages and disadvantages of living donor transplants?

Contraindications of Transplantation

Contraindications to liver transplant can be grouped into two categories: absolute contraindications and relative contraindications. While absolute contraindications are dependent on the patient’s disease process, relative contraindications rely heavily on the clinical judgment of the medical team. Absolute contraindications include active alcohol abuse, or less than 6 months of sobriety, uncontrolled sepsis, metastatic hepatocellular carcinoma, and uncorrectable cardiopulmonary disease causing a surgical risk (1).

Traditionally, patients infected with HIV were considered to be unsuitable for transplant due to the concern that immunosuppression post-transplant would accelerate their HIV infection (20). However, due to the use of antiretroviral therapy, the prognosis of HIV patient’s has improved substantially and HIV/AIDS without co-infection of hepatitis B or hepatitis C is viewed as a relative contraindication to transplant and are viewed on a case-by-case basis (20).

Relative contraindications include psychosocial conditions, such as poor social support, or repetitive noncompliance with medical care (21). Additional relative contraindications include advanced age, severe obesity, severe malnutrition, and other comorbidities that could potentially outweigh the benefit of transplant.

Transplant Complications

Patients recovering from a liver transplant typically spend some time in the intensive care unit. As the practice of liver transplantation has evolved, the length of ICU stay has decreased dramatically where most patient’s requiring ICU level of care post-transplant have a 24-hour median length of stay (22). Patients with preexisting conditions, intraoperative events or postoperative complications may require a prolonged ICU stay, and often require the expertise of multiple disciplines to manage their postoperative care.

Infections are the leading cause of postoperative morbidity and mortality in liver transplants. Razonable et al. (22) estimated that more than half of liver transplant patients will develop an infection in the first year post-transplant.

The risk of developing a postoperative infection is directly related to the patient’s level of exposure to infectious agents and the level of immunosuppression. Commonly seen infections include urinary tract infections, wound infections, bacteremia, and fungemia.

Many times, the causative bacteria will be a drug resistant organism and require home IV antibiotic administration. Additionally, transplant patients are at higher risk of contracting viral illnesses and frequently get readmitted with enterovirus, adenovirus or rotavirus.

In the first month postoperatively patients are most likely to develop infections related to the surgical procedure and hospitalization, such as bacterial and fungal wound infections, urinary tract infections, bloodstream infections, pneumonia, and Clostridium difficile colitis (22).

Patients should be treated empirically with antibiotic coverage, ideally with a third-generation cephalosporin, perioperatively to decrease the risk of postoperative infectious complications (22). Treatment of bacterial infections involves characterization of the causative organism, source control, and an appropriate antibiotic regimen.

Immunosuppression should be immediately decreased and may need to be temporarily stopped in order to adequately control a post-operative infection (16).

Patients are also at risk for specific opportunistic infections in the early postoperative period. Herpes simplex virus (HSV) reactivation disease is the most common opportunistic viral infection and can quickly progress to disseminated multi-organ infection and failure (22). Dissemination to visceral organs is primarily observed in immunocompromised patients, and should be on any practitioner’s differential if a patient appears to be ill and has had previous herpes viral outbreaks even if there are no active lesions present.

Although the incidence of viral sepsis is somewhere around 1% in developed countries, there is clear documentation of HSV dissemination leading to fulminant hepatitis, pneumonia, encephalitis, and sepsis (12).  Treatment of HSV should focus on prophylaxis with antiviral agents, such as acyclovir or ganciclovir.

Cytomegalovirus (CMV) status of the donor, regardless of positive or negative must be recorded in the recipient’s chart. CMV affects the recipient’s ability to mount an immune defense and may cause a predisposition for developing postoperative infections (23).

To combat this, patients are started on either a prophylactic or treatment dose of valganciclovir immediately after transplant depending on their risk of contracting CMV from their donor.

For example, if a recipient is CMV negative pre-operatively, but the donor is CMV positive then this patient will require treatment levels of valganciclovir and close monitoring of their CMV titers to ensure they don’t contract CMV viremia.

Post-transplant acute kidney injury (AKI) has been reported to occur in 9-78% of cases with 10% progressing to end-stage renal failure (22). Early identification of potential AKI is crucial to improving patient outcome as evidence shows that even small increases in serum creatinine are associated with a decline in overall mortality.

The etiology of post liver transplant can be related to numerous causes, including sepsis or bacteremia, hemodynamic instability, or hypovolemia. Immunosuppressive agents, such as calcineurin inhibitors (tacrolimus, cyclosporine), are known to cause a drug-induced kidney injury. Unfortunately, many OLT patients will end up back on the transplant list for a kidney transplant due to CNI induced renal failure.

Tacrolimus is the immunosuppressive drug of choice in solid organ transplant, and it is never completely held due to renal dysfunction. If a transplant patient is exhibiting progressively increasing creatinine, the tacrolimus dose may be decreased and the goal trough lowered in order to protect renal function. Patients are instructed to increase their oral rehydration and have repeat lab work in 2-3 days to assess changes in their creatinine.

Case Study – The Post-Operative Period

Ms. Mino receives an orthotopic liver transplant from a local deceased donor less than 24 hours after transfer to your ICU. You are returning for your 3rd shift in a row, just in time for her to be returning to your care from the operating room.

You get sign out from the transplant surgery fellow. “Yeah, the case went great. EBL 8.5L, we gave 5 units PRBC, 3 units platelets, 3 units FFP, 6L crystalloid and 2L albumin. She has 3 JP drains to bulb suction. I wouldn’t start anticoagulation yet. Case was pretty oozy since her INR was >3 at the start of the case. Pressures are a little soft, but we took her off vasopressors before we transferred her back here. Okay, thanks. Oh yeah…she’s still intubated, but can be extubated at your discretion.”

You assess your patient and find that she has a traditional Mercedes incision with 2 JP drains on the right side, and 1 JP drain on the left all with a moderate amount of serosanginuous drainage. Her abdomen is full, but soft. She is still sedated from the procedure, but you ask the nurse to titrate the sedation down in hopes of doing a spontaneous breathing trial and extubating in a few hours. Her blood pressures are 110/65 via arterial line. She is making adequate amounts of clear yellow urine, which will be monitored closely for signs of intravascular depletion or ongoing AKI.

If her SBP drops below 95, you will plan to give a bolus of albumin and watch for response. Due to the high EBL of the case, she could need a blood transfusion at some point. Her routine labs are cycled at every 6 hours for the first 24 hours. Her first set of post-operative labs show an H/H of 8.5/24, WBC 17 and her liver enzymes are now all under 1,000.

You review her post-operative orders and see that the transplant team entered most of them. Mrs. Mino received induction immunosuppression in the operating room, and will begin Tacrolimus, Mycophenolate mofetil, and a Methylprednisolone taper today. Tacrolimus levels will be drawn every morning, and the transplant surgery team will manage the medication dosage. You see that she is on a perioperative antibiotic for five days, as well as prophylactic doses of Bactrim to protect against toxoplasmosis, IV Gangciclovir for CMV prophylaxis and IV Fluconazole for fungal prophylaxis.

Knowing that her WBC will be elevated due to the surgical stress and high doses of steroids, you will have to remain diligent to assess for additional signs of infection.

Ultimately, Mrs. Mino does well and is extubated 8 hours post surgery. She is comfortable on 2L nasal cannula. Her pain is well controlled with IV Dilaudid, which will be transitioned to oral medications once she has return of bowel function. She is stepped down from the ICU on post op day 3, and discharged from the hospital on post op day 7 with close outpatient follow up.

Post Transplant Management: Immunosuppression, Infection Prevention, and Long Term Outcomes

Management of the post liver transplant patient requires diligent and comprehensive care.

Liver enzymes, bilirubin, protein synthesis markers, and coagulation factors are monitored frequently to detect early graft dysfunction and the need for aggressive intervention. Enzyme levels are expected to be markedly elevated in the immediate post-operative phase but begin to decrease over the course of several days (23). Persistent elevation in a patient’s liver enzymes may be indicative of ongoing hepatocellular necrosis (23).

Diligent immunosuppressive therapy is required to prevent rejection, and while immunosuppression pharmacology is always improving, the basic regimens are worth mentioning. In the early postoperative phase, immunosuppressive therapy is complex and must be patient specific. The most common immunosuppression regimens include calcineurin inhibitors, such as Tacrolimus. Tacrolimus is typically started on post-op day one at a dose of 4mg BID, and titrated based on the patient’s goal trough. In the immediate post-transplant phase, a goal trough is typically 10-12 ng/mL.

After approximately 4 weeks of initial treatment, the Tacrolimus trough goal will stabilize to a maintenance lifelong goal of 5-8. ng/mL. Corticosteroids play a major role in solid organ transplant immunosuppression and are critical in treating acute organ rejection (23). Typically, patients will begin with high doses of methylprednisolone intraoperatively, and transitioned to prednisone to complete their taper over the course of 3-6 months.

An additional agent, Mycophenolate mofetil, is used to treat acute rejection but is often used as an adjunct to immunosuppressive therapy (23). Mycophenolate is the first immunosuppressive drug to be held when there is a concern of infection, due to its adjuvant nature. Many of these drugs have harsh side effects making long-term compliance difficult and frustrating.

Most commonly, patients on immunosuppressive medications will suffer from diarrhea, headaches, tremors from the neurotoxicity risk of tacrolimus, and insomnia. In cases of neurotoxicity, the tacrolimus trough goal will be lowered as able, and other side effects are managed with supportive medications (Imodium, Lomotil, Melatonin). Immunosuppression regimen education is a focus of the post-transplant recovery process and should begin as early as possible.

Long term, patients require close follow up, including weekly clinic appointments the first several months post-transplant. As they recover from the surgery, clinic appointments become less frequent, but they still require frequent lab work to assess immunosuppressive drug levels.

Summary

Liver transplantation has come a long way since the first successful surgery 50 years ago, but patient’s today are facing new challenges that have yet to become medical triumphs.

The number of transplant organs continues to grow each year. In 2016, a total of 7,841 liver transplants were completed, a 10% increase from 2015 (24).  As transplant medicine continues to grow, long -term outcomes improve as well. In 2016, the incidence of graft failure at one year decreased to 9.8% for recipients of deceased donor organs, a 10% reduction from 2015 (24).  The three and five-year mortality rates continue to improve, especially in those who received living donor liver transplants (24).

As of June 30, 2016, there were 79,188 liver transplant patients living with a functioning graft (24), making the knowledge and care of a post- transplant patient crucial to both acute care and primary care practicing providers.

Quiz Questions

Self Quiz

Ask yourself...

  1. Knowing the potential complications of liver transplants- what physical exam, history, and clinical data will you examine to monitor for these?
  2. What education would you give a family prior to transplant regarding the potential risks?

Effective Communication In Nursing


Introduction

Communication in nursing is key, and the ability to communicate effectively can be our lifeline. We depend on ourselves and others to be fluent and effective in the art of communication in order to perform our role as nurses successfully. When any link in our communication chain fails, we immediately see poor outcomes, wastage of resources, reductions in patient and staff satisfaction as well as a decline in the quality of patient care (1). 

Types of Communication 

In order to master effective communication in nursing, it is important to understand the various types of communication, their definitions, and the impact they can make.  

Non-Verbal 

This form of communication relies solely on the utilization of body language, including body and facial mannerisms, and completely lacks spoken words or sounds (2). We perform and identify non-verbal communication in nursing daily without giving it a second thought. We may see a newborn sucking on their hands, providing us a non-verbal cue that they are hungry. When assessing a patient holding their abdomen, we would look to initially target that area because they have communicated (non-verbally) that this is where they are experiencing discomfort. Smiling when the next shift nurse is walking in the door communicates to them that you are happy to see them, and that it’s about time for you to go home!  

Since we perform non-verbal communication so often, it can become an incredibly powerful tool or an extremely negative one. This form of communication in nursing can be used positively to show our patients and co-workers that we have compassion, and we are engaged. Negative forms can make patients uncomfortable with sharing their medical history and result in a lower quality of patient care. Additionally, it can lead to dysfunctional teamwork among staff. 

Verbal 

Verbal communication occurs when we use words or sounds to discuss concepts with others (2). This form of communication in nursing has the conception to be a very easy notion, but it can create unfavorable consequences when used ineffectively. In order to produce clear verbal messages, we should always speak concisely and with confidence. As health care professionals, we have our own language, and understanding when to incorporate our medical jargon into conversations versus when to not is crucial in providing care. When communicating among co-workers, our medical knowledge can display professionalism and it is evident that they can follow along. However, when speaking with patients and their families, this may not always be the case and we must be able to effectively gauge our audience and ensure that they have a clear understanding of what we are teaching or explaining; this is an extremely valuable tool 

Written 

This form of communication can be either a formal or informal transcription of words that are intended to serve as a direct communication form (2). Written communication in nursing is used daily and incorporates one of our most important duties, documentation. Throughout our nursing practice, we have learned the importance and necessity of our documentation; it can be useful for legal protection or provide critical data to other health care professionals. Written communication can also be accessed through the policies and procedures we employ to perform various tasks. Having sound, written communication, and interpretation skills is vital to the overall success of our nursing career.  

Quiz Questions

Self Quiz

Ask yourself...

  1. What type of communication is being interpreted while watching a patient walk to the bathroom? 
  2. Upon admission of a female patient for a fall, you are performing normal intake questions and a physical assessment. The patient is quiet and uses minimal verbal communication and looks down at the floor while you are in the room. What communication types are you interpreting? 

Receiving Communication 

The most common communication perception is usually directed to producing communication through non-verbal, verbal, or written forms. While the production of communication is important, the reception of it potentially holds even greater value. In nursing, ensuring our communication is received correctly affects every clinical, orientation, or job experience we have encountered thus far. Think about it…  

  • Taking notes in class or during a shift. 
  • When a preceptor or instructor educates you on a brand-new skill or piece of equipment. 
  • Teaching your patient, family, or student about a new diagnosis.  
  • Watching your patient breathe for rate, depth, and effort. 

We must provide and receive communication in nursing through verbal, non-verbal, or written forms successfully. If communication fails, we will experience extremely negative effects throughout our entire nursing system. 

Hearing & Listening 

Hearing describes the process or act of perceiving sounds or spoken words (2). We hear sounds upon auscultation, varying frequencies of alarms, and patient concerns when they are voiced. Hearing all these sounds are heavily dependent on how they are used. To achieve successful implementation of these sounds, we must also listen to these sounds and words. To listen, we must hear and then interpret these sounds carefully (2). We interpret these sounds and words by asking additional questions, performing additional assessments, or paraphrasing the information presented.  

Quiz Questions

Self Quiz

Ask yourself...

  1. What is the best way to ensure a patient was actively listening while performing patient education?
  2. Which type of scenario requires active listening skills?
      a. Putting blood tubing into a pump.
      b. Watching an EKG monitor. 
      c. Performing a pain assessment. 
  3. What techniques show others you are actively listening? 
      a. Reading a document while being talked to. 
      b. Making eye contact. 
      c. Making noises while someone is talking. 

Communication Transmission Threads 

Communication in nursing occurs multiple times a day between a wide range of communication threads. The type of communication through non-verbal, verbal, and written communication produced and received, must be effectively performed. Success and implementation are heavily dependent on the communication between the nurse and the communication thread 

Nurse-Nurse 

Communication among nurses is continuous throughout a shift while working within a team environment. Whether it is us passing our documentation on to another nurse for review or vice versa, there is consistent communicative flow of all variants (non-verbal, verbal, and written) between the team in order to provide care for patients. 

Nurse-Ancillary Staff 

Your team members will vary depending on your nursing career setting, but some items will remain consistently important despite wherever you are. We must provide clear verbal communication when delegating or reporting critical information from the nurse to ancillary staff participating in patient, client, or resident care 

Charge Nurse-Team 

When stepping into a charge nurse role, there will always be unexpected tasks, staff conflicts, or emergent situations. In this position, you will be taking all the communication skills you have acquired and putting them into practice at an all-time high. As the charge nurse, you will be viewed as a leader, meaning that you are a role model for your fellow team members. Now, in addition to producing and receiving communication effectively, you will now be identifying poor communication and assisting with its correction 

Nurse-Patient 

The nurse-to-patient communication thread is one of the ultimate and most important exchanges in the nursing profession. Patients need us, so we must be able to keep consistent and effective communication flow with them because any assessment, report, and administration of medication is contingent upon it. 

Nurse-Family 

The thread between the nurse and the patient’s family can be the foundation for your nurse-to-patient communication and its effectiveness. The family could be the responsible party or guardian for your patient and could potentially serve as your sole historian for patient information if the patient is unable to communicate at the time of data collection. Ensuring that the family is aware of and understands discharge instructions can further help them to recognize any potential signs or symptoms that could result in calling a physician or visiting the emergency room in the future. 

Quiz Questions

Self Quiz

Ask yourself...

  1. Which of the following is a beneficial way to ensure effective communication throughout multiple threads? 
      a.
    One to one conversations. 
      b.
    Reviewing a policy. 
      c. Bedside report. 

Barriers & Improvements to Communication 

Barriers of communication in nursing happen frequently and are sometimes out of our control. These barriers include:  

Language barriers 

Utilizing available resources for language barriers through interpreter staff members or interpretation devices can ensure effective communication pathways between two individuals. 

Cultural differences 

Identification of cultural differences during admission and cultural awareness will allow for effective communication management throughout each culture you are presented with. 

Patient acuity, staffing levels, time constraints 

Patient acuity, staffing levels, and time constraints can be improved by utilizing staff huddles and working together with administration in order to overcome conflicts.  

Emergent situations 

Emergent situations that arise during your shift can be relieved through adequate knowledge of the policies and procedures and by performing debriefs after the situation resolves. Debriefings hold valuable insight into reflections of the emergent situations we face as nurses, especially on communication performance. 

In each thread and form of communication in nursing, we must remember the following items to receive information. While producing communication, we must always be clear, concise, and accurate with the correct corresponding tone when expressed to others. When we are receiving the information, we must ensure we are understanding, investigating, and acting according to the communication presented to us. Utilizing various communication platforms, including emails, boards, and group messaging apps, can help to assist in ensuring education is received. 

Benefits of Effective Communication in Nursing 

When we achieve effective and therapeutic communication between both our team and patients, it will create opportunities for enhancements throughout our practice. Fostering a unity of teamwork with co-workers will increase satisfaction and reduce burnout rates. Reduced health care costs through reduced readmissions or emergency room visits will be established by successful patient education and understanding. Our quality of patient care will be heavily influenced by the nursing communication threads created through their care.  

Alzheimer’s Nursing Care

Introduction 

Alzheimers disease is a destructive, progressive, and irreversible brain disorder that slowly destroys memory and thinking. Alzheimers is the most common cause of dementia in older adults (1). For most people who have Alzheimers disease, symptoms first appear in their mid 60s (1). Studies suggest more than 5.5 million Americans, most 65 or older, may have dementia caused by Alzheimers (1). It is currently listed as the sixth leading cause of death in the United States. It is important to understand the signs and symptoms of Alzheimer’s dementia and how to manage the care of a patient, family member, or friend suffering from the disease. 

Dementia is the loss of cognitive functioning-thinking, remembering, and reasoning- and behavioral abilities to such extent that it interferes with activities of daily living (1). The severity of dementia ranges from mild to severe. In its mildest stage, it begins with forgetfulness, with its most severe stage consists of complete dependence on others for general activities of daily living (1).  

History of Alzheimers 

Alzheimers disease is named after Dr. Alois Alzheimer. In the early 1900’s, Dr. Alzheimer noticed changes in the brain tissue of a patient who had died of an unknown mental illness. The patient’s symptoms included memory loss, language problems, and unpredictable behavior. After her death, her brain was examined, and was noted to have abnormal clumps known as amyloid plaques and tangled bundled fibers, known as neurofibrillary or tau tangles (1). These plaques and tangles within the brain are considered some of the main features of Alzheimers disease. Another feature includes connections of neurons in the brain. Neurons are responsible for the transmissions of messages between different parts of the brain and from the brain to other parts of the body (1).  

Scientists are continuing to study the complex brain changes involved with the disease of Alzheimers. It seems that the changes in the brain could begin ten years or more before cognitive problems start to surface. During this stage of the disease, the people affected seem to be symptomfree; however, toxin changes occur within the brain (1). Initial damage in the brain occurs within the hippocampus and entorhinal cortex, which are the parts of the brain that are necessary in memory formation. As the disease progresses, additional aspects of the brain become affected, and overall brain tissue shrinks significantly (1).  

Signs and Symptoms & Diagnosis of Alzheimers Disease  

Memory problems are typically among the first signs of cognitive impairment related to Alzheimers disease. Some people with memory problems have a condition called Mild Cognitive Impairment (MCI) (4). In this condition, people have more memory problems than usual for their age; however, their symptoms do not interfere with their daily lives. Older people with MCI are at increased risk of developing Alzheimers disease. The first symptoms of Alzheimer’s may vary from person to person. Many people display a decline in non-memory related aspects of cognition such as word-finding, visual issues, impaired judgment, or reasoning (4) 

Providers use several methods and tools to determine the diagnosis of Alzheimers Dementia. To diagnose, they may conduct tests of memory, problemsolving, attention, counting, and language. They may perform brain scans, including CVT. MRI or PET to rule out other causes for symptoms. Various tests may be repeated to give doctors information about how memory and cognitive functions change over time. They can help diagnose other causes of memory problems such as stroke, tumor, Parkinsons disease, and vascular dementia. Alzheimers disease can be diagnosed only after death by linking clinical measures with an examination of brain tissue in an autopsy (4).  

Quiz Questions

Self Quiz

Ask yourself...

  1. Have you experienced a patient in your practice with dementia or Alzheimer’s disease? What did their symptoms look like? 
  2. What are some common diagnostic tools that healthcare providers use in the diagnosis of this disease? 
  3. What is the definitive diagnosis of Alzheimer’s disease? 

Stages of Disease  

Mild Alzheimers  

As the disease progresses, people experience significant memory loss along with other cognitive problems. Most people are diagnosed in this stage (1). 

  • Wandering/getting lost  
  • Trouble handling money or paying bills  
  • Repeating questions  
  • Taking longer to complete basic daily tasks 
  • Personality/behavioral changes (1) 
Moderate Alzheimers  

In this stage, damage occurs in the area of the brain that controls language, reasoning, sensor processing, and conscious thought (1).  

  • Memory and confusion worsen  
  • Problems recognizing family and friends  
  • Unable to learn new things  
  • Trouble with multi-step tasks such as getting dressed  
  • Trouble coping with situations 
  • Hallucinations/delusions/paranoia (1) 
Severe Alzheimers 
  • Plaques and tangles spread throughout the brain and brain tissue shrinks by a significant amount 
  • Cannot communicate  
  • Completely dependent on others for care  
  • Bedridden most often as the body shuts down  
Quiz Questions

Self Quiz

Ask yourself...

  1. What are some of the signs and symptoms that differentiate each stage of Alzheimer’s disease? 
  2. A person is in what stage of Alzheimer’s disease when they struggle recognizing family members and friends? 

Prevention  

As a person ages, many worry about developing Alzheimers disease and dementia. Especially if they have had a family member who suffered from the disease, they may worry about genetic risk. Although there have been many studies on the prevention of the disease, and many are still ongoing, nothing has been proven to prevent or delay dementia caused by Alzheimers disease (2).  

A review led by experts from the National Academies of Sciences, Engineering, and Medicine, found encouraging yet inconclusive evidence for three types of interventions related to ways to prevent or delay Alzheimers Dementia or age-related cognitive decline (2) 

  • Increased physical activity  
  • Blood pressure control  
  • Cognitive training

Treatment of the Disease  

Alzheimers disease is complex and is continuously being studied. Current treatment approaches focus on helping people maintain their mental function, manage behavioral symptoms, and low the symptoms of the disease. The FDA has approved several prescription drugs to treat those diagnosed with Alzheimers (3). Treating symptoms of Alzheimers can provide patients diagnosed with comfort, dignity, and independence for a greater amount of time, simultaneously assisting their caregivers. The approved medications are most beneficial in the early or middle stages of the disease (3). 

Cholinesterase inhibitors are prescribed for mild to moderate Alzheimers disease; they may help to reduce symptoms. Medications include Rzadyne®, Exelon ®, and Aricept ® (3). Scientists do not fully understand how cholinesterase inhibitors work to treat the disease; however, research indicates that they prevent acetylcholine breakdown. Acetylcholine is a brain chemical believed to help memory and thinking (3). 

For those suffering from moderate to severe Alzheimers disease, a medication known as Namenda®, which is an N-methyl D-asparate (NMDA) antagonist, is prescribed. This drug helps to decrease symptoms, allowing some people to maintain certain essential daily functions slightly longer than they would without medication (3). For example, this medication could help a person in the later stage of the disease maintain their ability to use the bathroom independently for several more months, benefiting the patient and the caregiver (3). This drug works by regulating glutamate, which is an important chemical in the brain. When it is produced in large amounts, glutamate may lead to brain cell death. Because NMDA antagonists work differently from cholinesterase inhibitors, these rugs can be prescribed in combination (3).  

Quiz Questions

Self Quiz

Ask yourself...

  1. Is there a cure for this disease? 
  2. What are some of the treatment forms that have been used for the management of Alzheimer’s disease? 
  3. Can medications be used in conjunction with one another for the treatment of the disease? 

Medications to be Used with Caution in those Diagnosed with Alzheimers  

Some medications such as sleep aids, anxiety medications, anticonvulsants, and antipsychotics should only be taken by a patient diagnosed with Alzheimers after the prescriber has explained the risk and side-effects of the medications (3) 

Sleep aids: They are used to help people get to sleep and stay asleep. People with Alzheimers should not take these drugs regularly because they could make the person more confused and at a higher risk for falls 

Anti-anxiety: These are used to treat agitation and can cause sleepiness, dizziness, falls, and confusion (3) 

Antipsychotics: they are used to treat paranoia, hallucinations, agitation, and aggression. Side effects can include the risk of death in older people with dementia. They would only be given when the provider agrees the symptoms are severe enough to justify the risk (3) 

Caregiving  

Coping with Agitation and Aggression  

People with Alzheimers disease may become agitated or aggressive as the disease progresses. Agitation causes restlessness and causes someone to be unable to settle down. It may also cause pacing, sleeplessness, or aggression (5). As a caregiver, it is important to remember that agitation and aggression are usually happening for reasons such as pain, depression, stress, lack of sleep, constipation, soiled underwear, a sudden change in routine, loneliness, and the interaction of medications (5). Look for the signs of aggression and agitation. It is helpful to be able to prevent the problems before they happen.  

Ways to cope with agitation and aggression (5) 

  • Reassure the person. Speak calmly. Listen to concerns and frustrations.  
  • Allow the person to keep as much control as possible.  
  • Build in quiet times along with activities. 
  • Keep a routine. 
  • Try gently touching, soothing music, reading, or walks. 
  • Reduce noise and clutter.  
  • Distract with snacks, objects, or activities. 

Common Medical Problems  

In addition to the symptoms of Alzheimers disease, a person with Alzheimers may have other medical problems over time. These problems can cause confusion and behavior changes. The person may be unable to communicate with you as to what is wrong. As a caregiver, it is important to watch for various signs of illness and know when to seek medical attention for the person being cared for.  

Fever

Fever could be a sign of potential infection, dehydration, heatstroke, or constipation (4) 

Flu and Pneumonia

These are easily transmissible. Patients 65 years or older should get the flu and Pneumonia shot each year. Flu and Pneumonia may cause fever, chills, aches, vomiting, coughing, or trouble breathing (4) 

Falls

As the disease progresses, the person may have trouble with balance and ambulation. They may also have changes in depth perception. To reduce the chance of falls, clean up clutter, remove throw rugs use armchairs, and use good lighting inside (4). 

Dehydration

It is important to remember to ensure the person gets enough fluid. Signs of dehydration include dry mouth, dizziness, hallucinations, and rapid heart rate (4).  

Wandering  

Many people with Alzheimers disease wander away from their homes or caregiver. As the caregiver, it is important to know how to limit wandering and prevent the person from becoming lost (5) 

Steps to follow before a person wanders (5) 

  • Make sure the person carries a form of ID or wears a medical bracelet.  
  • Consider enrolling the person in the Medic Alert® + Alzheimers Association Safe Return Program® 
  • Alert neighbors and local police that the person tends to wander and ask them to alert you immediately if they are seen alone.  
  • Place labels on garments to aid in identification. 

Tips to Prevent Wandering (5) 

  • Keep doors locked. Consider a key or deadbolt. 
  • Use loosely fitting doorknob covers or safety devices.  
  • Place STOP, DO NOT ENTER< or CLOSED signs on doors.  
  • Divert the attention of the person away from using the door.  
  • Install a door chime that will alert when the door is opened.  
  • Keep shoes, keys, suitcases, coats, and hats out of sight.  
  • Do not leave a person who has a history of wandering unattended.  
Quiz Questions

Self Quiz

Ask yourself...

  1. What are basic implementations you can make as a caregiver to make handling confusion and aggression easier in a patient with Alzheimer’s? 
  2. What are some of the types of medical problems that people with Alzheimer’s may face and how can they be monitored for prevention? 

Conclusion  

Alzheimers is a sad, debilitating, progressive disease that robs patients of their life and dignity. As research continues on the causes, treatment, and prevention of the disease, it is important for healthcare workers and caregivers to know the signs and symptoms of a patient with Alzheimers disease and potential coping mechanisms and management strategies of the disease. More information on the disease is available through several various resources, including:  

Family Caregiver Alliance  

800-445-8106 

NIA Alzheimer’s and Related Dementias Education and Referral Center  

800-438-4380 

References + Disclaimer

Nursing Documentation 101
  1. 29-1141 Registered Nurses. (2018, March 30). Retrieved March 1, 2019, from https://www.bls.gov/oes/2017/may/oes291141.htm
  2. Hendrich, A., Chow, M. P., Skierczynski, B. A., & Lu, Z. (2008). A 36-hospital time and motion study: how do medical-surgical nurses spend their time?. The Permanente journal, 12(3), 25-34.
  3. Health IT Quick Stats. (2019, February 6). Retrieved March 1, 2019, from https://dashboard.healthit.gov/quickstats/quickstats.php
  4. Medical Practice Efficiencies & Cost Savings. (2018, August 13). Retrieved March 1, 2019, from https://www.healthit.gov/topic/health-it-and-health-information-exchange-basics/medical-practice-efficiencies-cost-savings
  5. Meaningful Use. (2017, January 18). Retrieved March 1, 2019, from https://www.cdc.gov/ehrmeaningfuluse/introduction.html
  6. Miller, L., Stimely, M., Matheny, P., Pope, M., McAtee, R. & Miller, K. Novice Nurse Preparedness to Effectively Use Electronic Health Records in Acute Care Settings: Critical Informatics Knowledge and Skill Gaps. (2014). Online Journal of Nursing Informatics,18(2). Retrieved March 1, 2019, from https://www.himss.org/novice-nurse-preparedness-effectively-use-electronic-health-records-acute-care-settings-critical
  7. HHS Office of the Secretary,Health Information Privacy Division. (2016, February 25). Individuals’ Right under HIPAA to Access their Health Information. Retrieved March 1, 2019, from https://www.hhs.gov/hipaa/for-professionals/privacy/guidance/access/index.html
  8. Office for Civil Rights (OCR). (2015, December 18). 2000-Why is the HIPAA Security Rule needed and what is the purpose of the security standards. Retrieved March 1, 2019, from https://www.hhs.gov/hipaa/for-professionals/faq/2000/why-is-hipaa-needed-and-what-is-the-purpose-of-security-standards/index.html
  9. AHIMA Work Group (2013). Integrity of the Healthcare Record: Best Practices for EHR Documentation (2013 update). Journal of AHIMA,84(8), 58-62. Retrieved March 1, 2019, from http://library.ahima.org/doc?oid=300257#.XHuU6YhKiUl
  10. What is Malpractice? (n.d.). Retrieved from https://www.abpla.org/what-is-malpractice#medical
  11. Cady, R. F., Esq. (2009). Criminal Prosecution for Nursing Errors. JONA’s Healthcare Law, Ethics, and Regulation,11(1), 10-16. Retrieved March 1, 2019, from https://www.nursingcenter.com/cearticle?an=00128488-200901000-00003&Journal_ID=260876&Issue_ID=848807
  12. Kann, B. R., Beck, D. E., Margolin, D. A., Vargas, D., & Whitlow, C. B. (Eds.). (2018). Improving Outcomes in Colon & Rectal Surgery. Retrieved March 1, 2019, from https://books.google.com/books?id=O61vDwAAQBAJ&dq=Improving Outcomes in Colon & Rectal Surgery edited by Brian R. Kann, David E. Beck, David A. Margolin, H. David Vargas, Charles B. Whitlow&source=gbs_navlinks_s
  13. Peters, P. G. (2008). Twenty Years of Evidence on the Outcomes of Malpractice Claims. Clinical Orthopaedics and Related Research, 467(2), 352-357. doi:10.1007/s11999-008-0631-7
  14. Singh, H. (2018). National Practitioner Data Bank Generated Data Analysis Tool. Retrieved March 1, 2019, from https://www.npdb.hrsa.gov/analysistool/
  15. Top 5 Malpractice Claims Made Against Nursing Professionals. (n.d.). Retrieved March 1, 2019, from https://www.proliability.com/portals/0/docs/nursemalpracticewhitepaper.pdf
  16. American Nurses Association. (2010). ANA’s Principles for Nursing Documentation. Retrieved February 28, 2019, from https://www.nursingworld.org/~4af4f2/globalassets/docs/ana/ethics/principles-of-nursing-documentation.pdf
  17. Lippincott Nursing Education. (2018, February 22). Lippincott Nursing Education Blog. Retrieved March 1, 2019, from http://nursingeducation.lww.com/blog.entry.html/2018/02/22/nursing_documentatio-S5hF.htmlOther references include:
  18. Reising, D. L., & Allen, P. N. (february 2007). Protecting yourself from malpractice claims. American Nurse Today,2(2). Retrieved March 1, 2019, from https://www.americannursetoday.com/protecting-yourself-from-malpractice-claims/.
  19. Reising, D. L. (2012). Make your nursing care malpractice-proof. American Nurse Today,7(1). Retrieved March 1, 2019, from https://www.americannursetoday.com/make-your-nursing-care-malpractice-proof/
Flu Treatment, Symptoms, and Red Flags
  1. Centers for Disease Control and Prevention. (2012). Respiratory hygiene/cough etiquette in healthcare settings. Retrieved from:
  2. https://www.cdc.gov/flu/professionals/infectioncontrol/resphygiene.htm
  3. Centers for Disease Control and Prevention. (2017). How the flu virus can change: “drift and shift”. Retrieved from: https://www.cdc.gov/flu/about/viruses/change.htm
  4. Centers for Disease Control and Prevention. (2021). Flu vaccination coverage, United States, 2020-21, influenza season. Retrieved from: https://www.cdc.gov/flu/fluvaxview/coverage-2021estimates.htm  
  5. Centers for Disease Control and Prevention (2018). Estimates of flu vaccination coverage among children- US 2017-2018 flu season. Retrieved from: https://www.cdc.gov/flu/fluvaxview/coverage-1718estimates-children.htm
  6. Centers for Disease Control and Prevention. (2018a). Influenza antiviral medications: summary for clinicians. Retrieved from: https://www.cdc.gov/flu/professionals/antivirals/summary-clinicians.htm#
  7. Centers for Disease Control and Prevention. (2018b). Influenza vaccination: a summary for clinicians. Retrieved from: https://www.cdc.gov/flu/professionals/vaccination/vax-summary.htm
  8. Centers for Disease Control and Prevention. (2018c). Overview of influenza testing methods. Retrieved from: https://www.cdc.gov/flu/professionals/diagnosis/overview-testing-methods.htm
  9. Centers for Disease Control and Prevention. (2018d). Prevention strategies for seasonal influenza in healthcare settings. Retrieved from: https://www.cdc.gov/flu/professionals/infectioncontrol/healthcaresettings.htm
  10. Centers for Disease Control and Prevention. (2018e). Preventing the flu: good health habits can help stop germs. Retrieved from: ​https://www.cdc.gov/flu/protect/habits/index.htm
  11. Centers for Disease Control and Prevention. (2018f). Prevention and control of seasonal influenza with vaccines: recommendations of the advisory committee on immunization
  12. Centers for Disease Control and Prevention. (2021). Flu vaccination coverage, United States, 2020-21, influenza season. Retrieved from: https://www.cdc.gov/flu/fluvaxview/coverage-2021estimates.htm  
Measles
  1. ABC News. (2018, August 29). Texas nurse fired after posting about patient’s measles on anti-vaccination page. Retrieved from https://abcnews.go.com/beta-story-container/US/texas-nurse-investigation-posting-patients-measles-anti-vaccination/story?id=57443736&fbclid=IwAR3Y7iXlC3-z2IP29aQ8fGQp8EJIxgUE4Tkf4OWgGelZTKGsRNEPP8mhMls
  2. AP News. (2019, February 25). National Vaccination Information Center: Public hearings on measles outbreaks and vaccine laws provide opportunities for Americans to voice concerns. Retrieved from https://apnews.com/Business%20Wire/1375c31e40d94327a2c873570c1f65ef
  3. Centers for Disease Control and Prevention. (2019a). Making the vaccinedecision. Retrieved from https://www.cdc.gov/vaccines/parents/vaccine-decision/index.html
  4. Centers for Disease Control and Prevention. (2019b). Measles (Rubeola). Retrieved from https://www.cdc.gov/measles/hcp/index.html
  5. Centers for Disease Control and Prevention. (2018). Measles, mumps, and rubella VIS. Retrived from https://www.cdc.gov/vaccines/hcp/vis/vis-statements/mmr.html
  6. Fischer, P. B. (2018). Measles from coast to coast: Risks, costs, and potential interventions. Infectious Disease Alert, 37(12).
  7. Funk, S. (2013). Critical immunity thresholds for measles elimination. Retrieved from https://www.who.int/immunization/sage/meetings/2017/october /2._target_immunity_levels_FUNK.pdf
  8.  Vanderbilt University Medical Center. (n.d.). Type of Isolation Needed. Retrieved from https://ww2.mc.vanderbilt.edu/infectioncontrol/12177
  9. Bichon, Amandine MDa; Aubry, Camille MDa; Benarous, Lucas MDb; Drouet, Hortense MDa; Zandotti, Christine MDa; Parola, Philippe MD, PhDa; Lagier, Jean-Christophe MD, PhDa,* Case report, Medicine: December 2017 – Volume 96 – Issue 50 – p e9154 doi: 10.1097/MD.0000000000009154  
Childhood Asthma Treatment and Prevention
  1. American Academy of Pediatrics. (2016). Asthma action plan and school medication authorization. Retrieved from https://portal.ct.gov/-/media/Departments-and-Agencies/DPH/dph/hems/asthma.pdf/sampleasthmaactionplanaapmarch2017pdf.pdf?la=en
  2. Asthma and Allergy Foundation of America. (2015). Preventing asthma episodes and controlling your asthma. Retrieved from https://www.aafa.org/asthma-prevention/
  3. CDC. (2015). Asthma: Asthma-related missed school days among children aged 5-17 years. Retrieved from  https://www.cdc.gov/asthma/asthma_stats/missing_days.htm
  4. CDC. (2018). Asthma: Know how to use your asthma inhaler. Retrieved from https://www.cdc.gov/asthma/inhaler_video/default.htm
  5. CDC. (2015). Asthma: Asthma Data Visualizations. Retrieved from https://www.cdc.gov/asthma/data-visualizations/default.htm 
  6. CDC. (2019). Asthma: Most Recent National Asthma Data severity among children with current asthma. Retrieved from https://www.cdc.gov/asthma/most_recent_national_asthma_data.htm
  7. CDC. (2018). Home characteristics and asthma triggers: Checklist for home visitors. Retrieved from https://www.cdc.gov/asthma/pdfs/home_assess_checklist_P.pdf
  8. Hsu J, Sircar K, Herman E, Garbe P. (2018). EXHALE: A technical package to control asthma. Atlanta, GA: National Center for Environmental Health Centers for Disease Control and Prevention.
  9. National Asthma Education and Prevention Program. Expert Panel Report 3: Guidelines for the Diagnosis and Management of Asthma. (2007). NIH Publication 07-4051. Bethesda, MD: National Heart, Lung, and Blood Institute. Retrieved from http://www.nhlbi.nih.gov/guidelines/asthma/
  10. Schuers, M., Chapron, A., Guihard, H., Bouchez, T., & Darmon, D. (2019). Impact of non-drug therapies on asthma control: A systematic review of the literature. European Journal of General Practice. doi: 10.1080/13814788.2019.1574742
  11. United States Environmental Protection Agency. (2016). Asthma facts. Retrieved from https://www.epa.gov/sites/production/files/2016-05/documents/asthma_fact_sheet_english_05_2016.pdf
  12. Zahran, H., Bailey, C., Damon, S., Garbe, P. & Breysse, P. (2018). Vital signs: Asthma in children — United States, 2001–2016. DOI: http://dx.doi.org/10.15585/mmwr.mm6705e1
Nursing Interventions for Sepsis: Fluid Management
  1. Malbrain, M. L., Regenmortel, N. V., Saugel, B., Tavernier, B. D., Gaal, P. V., Joannes-Boyau, O., . . . Monnet, X. (2018). Principles of fluid management and stewardship in septic shock: It is time to consider the four D’s and the four phases of fluid therapy. Annals of Intensive Care,8(1), 1-16. doi:10.1186/s13613-018-0402-x
  2. Marini, J. J., & Dries, D. J. (2019). Shock and support of the failing circulation. In Critical Care Medicine: The essentials and more(5th ed., pp. 47-67). Philadelphia, PA: Lippincott Williams & Wilkins.
  3. 3- Hour Bundle. (n.d.). Retrieved March 21, 2019, from http://www.survivingsepsis.org/SiteCollectionDocuments/Bundle-3-Hour-Step4-Fluids.pdf
  4. Lewis, S. R., Pritchard, M. W., Evans, D. W., Butler, A. R., Alderson, P., Smith, A. F., & Roberts, I. (2018, August 3). Colloids or crystalloids for fluid replacement in critically people. Retrieved March 21, 2019, from https://www.cochrane.org/CD000567/INJ_colloids-or-crystalloids-fluid-replacement-critically-people
  5. Semler, M. W., & Rice, T. W. (2016). Sepsis Resuscitation: Fluid Choice and Dose. Clinics in chest medicine37(2), 241-50.
  6. Avila, A. A., Kinberg, E. C., Sherwin, N. K., & Taylor, R. D. (2016). The Use of Fluids in Sepsis. Cureus. doi:10.7759/cureus.528
  7. Self, W. H., Semler, M. W., Wanderer, J. P., Ehrenfeld, J. M., Byrne, D. W., Wang, L., Atchison, L., Felbinger, M., Jones, I. D., Russ, S., Shaw, A. D., Bernard, G. R., … Rice, T. W. (2017). Saline versus balanced crystalloids for intravenous fluid therapy in the emergency department: study protocol for a cluster-randomized, multiple-crossover trial. Trials18(1), 178. doi:10.1186/s13063-017-1923-6
  8. Farkas, J. (2018, February 27). PulmCrit- Get SMART: Nine reasons to quit using normal saline for resuscitation. Retrieved March 21, 2019, from https://emcrit.org/pulmcrit/smart/
  9. Levy, M. M., Evans, L. E., & Rhodes, A. (2018). The Surviving Sepsis Campaign Bundle. Critical Care Medicine,46(6), 997-1000. doi:10.1097/ccm.0000000000003119
  10. Mcdermid, R. C. (2014). Controversies in fluid therapy: Type, dose and toxicity. World Journal of Critical Care Medicine,3(1), 24-33. doi:10.5492/wjccm.v3.i1.24
  11. Greenwood, J. C., & Orloski, C. J. (2017). End Points of Sepsis Resuscitation. Emergency Medicine Clinics of North America,35(1), 93-107. doi:10.1016/j.emc.2016.09.001
  12. Boyd, J. H., Sirounis, D., Maizel, J., & Slama, M. (2016). Echocardiography as a guide for fluid management. Critical Care,20(1), 1-7. doi:10.1186/s13054-016-1407-1
  13. Byrne, L., & Van Haren, F. (2017). Fluid resuscitation in human sepsis: Time to rewrite history?. Annals of intensive care7(1), 4.
  14. De Backer, D., & Vincent, J. L. (2018). Should we measure the central venous pressure to guide fluid management? Ten answers to 10 questions. Critical care (London, England)22(1), 43. doi:10.1186/s13054-018-1959-3
  15. Xavier M., Marik, P., Jean-Louis T. (2016) Prediction of fluid responsiveness: an update. Annals of intensive care. doi: 1186/s13613-016-0216-7
One Hour Sepsis Bundle
  1. McCulloh, R. J., & Opal, S. M. (2017). Sepsis, Septic Shock, and Multiple Organ Failure. In Lange Critical Care. Retrieved March 8, 2019, from https://accessmedicine.mhmedical.com/book.aspx?bookid=1944
  2. Marini, J. J., & Dries, D. J. (2019). Sepsis and Septic Shock. In Critical Care Medicine: The essentials and more(pp. 576-594). Philadelphia, PA: Lippincott Williams & Wilkins. Retrieved March 8, 2019, from http://ovidsp.dc1.ovid.com/
  3. Levy, M. M., Evans, L. E., & Rhodes, A. (2018). The Surviving Sepsis Campaign Bundle: 2018 update. Intensive Care Medicine,44(6), 925-928. doi:10.1007/s00134-018-5085-0
  4. Milano, P., Desai, S., Eiting, E., Hofmann, E., Lam, C., & Menchine, M. (2018). Sepsis Bundle Adherence Is Associated with Improved Survival in Severe Sepsis or Septic Shock. Western Journal of Emergency Medicine,19(5), 774-781. doi:10.5811/westjem.2018.7.37651
  5. Hour-1 Bundle. (n.d.). Retrieved March 11, 2019, from http://www.survivingsepsis.org/Bundles/Pages/default.aspx
  6. García-López, L., Grau-Cerrato, S., Frutos-Soto, A. D., Lamo, F. B., Cítores-Gónzalez, R., Diez-Gutierrez, F., . . . Andaluz-Ojeda, D. (2017). Impact of the implementation of a Sepsis Code hospital protocol in antibiotic prescription and clinical outcomes in an intensive care unit. Medicina Intensiva (English Edition),41(1), 12-20. doi:10.1016/j.medine.2017.02.001
Chest Tubes Nursing Care
  1. Kwiatt, M., Tarbox, A., Seamon, M., Swaroop, M., Cipolla, J., Allen, C., … Stawicki, S. P. 
  2. (2014). Thoracostomy tubes: A comprehensive review of complications and related topics. International Journal of Critical Illness & Injury Science, 4(2), 143-155. doi: 10.4103/2229-5151.134182 
  3. Hogg, J. R., Caccavale, M., Gillen, B., McKenzie, G., Vlaminck, J., Fleming, C. J., … 
  4. Friese, J. L. (2011). Tube thoracostomy: A review for the interventional radiologist. Seminars in Interventional Radiology, 28(1), 39-47. doi:10.1055/s-0031-1273939 
  5. Porcel, J. M. (2018). Chest tube drainage of the pleural space: A concise review for pulmonologists. Tuberculosis and Respiratory Diseases, 81(2), 106-115. doi: 10.4046/trd.2017.0107 
  6.  Hallifax, R. J., Psallidas, I., & Rahman, N. M. (2017). Chest drain size: The debate continues. Current Pulmonology Reports, 6(1), 26-29. doi:10.1007/s13665-017-0162-3 
  7. Avery, S. (2000). Insertion and management of chest drains. Nursing Times, 96(37), 3. Retrieved from https://www.nursingtimes.net 
  8. Choi, W. (2014). Pneumothorax. Tuberculosis and Respiratory Diseases (Seoul), 76(3), 99-104. doi: 10.4046/trd.2014.76.3.99 
  9. Patrini, D., Panagiotopoulos, N., Pararajasingham, J., Gvinianideze, L., Iqbal, Y., & 
  10. Lawrence, D. R. (2015). Etiology and management of spontaneous haemothorax. Journal of Thoracic Disease, 7(3), 520-526. doi: 10.3978/j.issn.2072-1439.2014.12.50 
  11. Yu, H. (2011). Management of pleural effusion, empyema, and lung abscess. Seminars in 
  12. Sakata, Kenneth K. et al. (2018). Persistent air leak – review. Respiratory Medicine, Volume 137, 213 – 218. 
  13. Doyle, G. R., McCutcheon, J. A. (2015). Clinical procedures for safer patient care. BCcampus. https://opentextbc.ca/clinic 
  14. Muzzy, A. C., & Butler, A. K. (2015). Managing chest tubes: air leaks and unplanned tube removal. American Nurse Today, 10(5). Retrieved from https://www.americannursetoday.com 
  15. Lemone, P., & Burke, K. (2008). Medical Surgical Nursing: Critical Thinking in Client Care (4th ed). Upper Saddle River, New Jersey: Pearson Prentice Hall. 
  16. Jalota R, Sayad E. Tension Pneumothorax. [Updated 2021 Aug 11]. In: StatPearls [Internet]. Treasure Island (FL): StatPearls Publishing; 2022 Jan-. Available from: https://www.ncbi.nlm.nih.gov/books/NBK559090/ 
  17. (Image) Joseph Pangrace (2016). “Draining of a pleural effusion in the left hemithorax. The indwelling pleural catheter is tunneled under the soft tissue and enters the thoracic cavity between the ribs.” Cleveland Clinic Journal of Medicine. https://www.ccjm.org/content/ccjom/83/12/891.full.pdf 
Drains: Everything You Need to Know
  1. Makama, J. G., & Ameh, E. A. (2008). Surgical drains: What the residents need to know. Nigerian Journal of Medicine: Journal of the National Association of Resident Doctors of Nigeria, 17(3), 244-50. doi: 10.4314/njm.v17i3.37389
  2. Knowlton, M. C. (2015). Nurse’s guide to surgical drain removal. Nursing 2015, 45(9), 59-61. doi: 10.1097/01.NURSE.0000470418.02063.ca
  3. Lemone, P., & Burke, K. (2008). Medical-surgical nursing(4th ed.). Upper Saddle, New Jersey: Pearson.
  4. Percutaneous. (2019). In Merriam-Webster Dictionary Online. Retrieved from https://www.merriam-webster.com/dictionary/percutaneous#medicalDictionary
  5. Wallace, M. J., Chin, K. W., Fletcher, T. B., Bakal, C. W., Cardella, J. F., Grassi, C. J., … Kundu, S. (2010). Quality improvement guidelines for percutaneous drainage/aspiration of abscess and fluid collections. Journal of Vascular and Interventional Radiology, 21(4), 431-435. doi: https://doi.org/10.1016/j.jvir.2009.12.398
  6. Hearns, W. C. (2012). Abscess drainage. Seminars in Interventional Radiology, 29(4), 325-336. doi 10.1055/s-0032-1330068
  7. Rivera-Sanfeliz, G. (2008). Percutaneous abdominal abscess drainage: A historical perspective. American Journal of Roentgenology, 191(3), 642-643. doi: 10.2214/AJR.07.3903
  8. Cinat, M. E., & Wilson, S. E. (2002). Determinants for successful percutaneous image-guided drainage of intra-abdominal abscess. Arch Surg., 137(7), 845-849. doi:10.1001/archsurg.137.7.845
  9. Lorenz, J. & Thomas, J. L. (2006). Complications of percutaneous fluid collection. Seminars in Interventional Radiology, 23(2), 194-204. doi: 10.1055/s-2006-941450
  10. National Institutes of Health. (n.d.) Patient education: How to care for the Jackson-Pratt drain. Retrieved from https://www.cc.nih.gov/ccc/patient_education/pepubs/jp.pdf
  11. St. Jude Children’s Research Hospital. (2019). Caring for a pigtail drain. Retrieved from https://www.stjude.org/treatment/patient-resources/caregiver-resources/patient-family-education-sheets/home-care-guidelines/caring-for-a-pigtail-drain.html
  12. (Image) Doyle, G. R., & McCutcheon, J. A. (2015). Clinical Procedures for Safer Patient Care. Victoria, BC: BCcampus. Retrieved from https://opentextbc.ca/introductiontosociology2ndedition/. 
  13. Patel IJ, Davidson JC, Nikolic B, Salazar GM, Schwartzberg MS, Walker TG, Saad WA; Standards of Practice Committee, with Cardiovascular and Interventional Radiological Society of Europe (CIRSE) Endorsement. Consensus guidelines for periprocedural management of coagulation status and hemostasis risk in percutaneous image-guided interventions. J Vasc Interv Radiol. 2012 Jun;23(6):727-36. do: 10.1016/j.jvir.2012.02.012. Epub 2012 Apr 17. PMID: 22513394. 
  14. Mamuyac, E. M., Pappa, A. K., Thorp, B. D., Ebert, C. S., Jr, Senior, B. A., Zanation, A. M., Lin, F. C., & Kimple, A. J. (2019). How Much Blood Could a JP Suck If a JP Could Suck Blood? The Laryngoscope, 129(8), 1806–1809. https://doi.org/10.1002/lary.27710 
Transortic Valve Replacement (TAVR) Nursing Care
  1. Africa, S., Curtin, R. J., & Griffin, B. P. (2006). Valvular Heart Disease. Cardiovascular Medicine, (June). https://doi.org/10.1007/978-1-59745-411-7
  2. Ahmad, M., Patel, J., Mungee, S., & Barzallo, M. A. (2018). TCT-759 Valve Size as a Predictor of Permanent Pacemaker Implantation in Edwards Sapien 3 TAVR Valves: A Single Center Experience. Journal of the American College of Cardiology, 72(13), B303–B304. https://doi.org/10.1016/j.jacc.2018.08.1986
  3. Ambikkumar, A., Luk, K., Chen, H. Y., Yasui, N., Lathrop, M., Thanassoulis, G., … Dufresne, L. (2017). Association of LPA Variants With Aortic Stenosis. JAMA Cardiology, 3(1), 18. https://doi.org/10.1001/jamacardio.2017.4266
  4. Barbanti, M., Gulino, S., Capranzano, P., Immè, S., Sgroi, C., Tamburino, C., … Tamburino, C. (2015). Acute Kidney Injury With the RenalGuard System in Patients Undergoing Transcatheter Aortic Valve Replacement: The PROTECT-TAVI Trial (PROphylactic effecT of furosEmide-induCed diuresis with matched isotonic intravenous hydraTion in Transcatheter Aortic Valve Replacement. JACC: Cardiovascular Interventions, 8(12), 1595–1604. https://doi.org/10.1016/j.jcin.2015.07.012
  5. Borger, M. A., Fedak, P. W. M., Stephens, E. H., Gleason, T. G., Girdauskas, E., Ikonomidis, J. S., … Elefteriades, J. A. (2018). The American Association for Thoracic Surgery consensus guidelines on bicuspid aortic valve–related aortopathy: Full online-only version. Journal of Thoracic and Cardiovascular Surgery, 156(2), e41–e74. https://doi.org/10.1016/j.jtcvs.2018.02.115
  6. Dehédin, B., Guinot, P.-G., Ibrahim, H., Allou, N., Provenchère, S., Dilly, M.-P., … Depoix, J.-P. (2011). Anesthesia and perioperative management of patients who undergo transfemoral transcatheter aortic valve implantation: an observational study of general versus local/regional anesthesia in 125 consecutive patients. Journal of Cardiothoracic and Vascular Anesthesia, 25(6), 1036–1043. https://doi.org/10.1053/j.jvca.2011.05.008
  7. DeYoung, R. (2012). Banking in the United States. The Oxford Handbook of Banking, 70(2). https://doi.org/10.1093/oxfordhb/9780199640935.013.0031
  8. Dweck, M. R., Boon, N. A., & Newby, D. E. (2012). Calcific aortic stenosis: A disease of the valve and the myocardium. Journal of the American College of Cardiology, 60(19), 1854–1863. https://doi.org/10.1016/j.jacc.2012.02.093
  9. Elhmidi, Y., Bleiziffer, S., Deutsch, M. A., Krane, M., Mazzitelli, D., Lange, R., & Piazza, N. (2014). Acute kidney injury after transcatheter aortic valve implantation: Incidence, predictors and impact on mortality. Archives of Cardiovascular Diseases, 107(2), 133–139. https://doi.org/10.1016/j.acvd.2014.01.002
  10. Hahn, R. T., Malaisrie, S. C., Smith, C. R., Greason, K. L., Dewey, T. M., Thourani, V. H., … Wang, D. (2013). Two-Year Outcomes After Transcatheter or Surgical Aortic Valve Replacement. Survey of Anesthesiology, 57(4), 166–167. https://doi.org/10.1097/01.sa.0000431219.37059.d1
  11. Hall, J.E. Guyton, A. C. (2011). Guyton and Hall Textbook of Medical Physilogy.Philadelphia, PA: Elsevier Inc.
  12. Halpern, L. W. (2017). Early ambulation is crucial for improving patient health. American Journal of Nursing, 117(6), 15. https://doi.org/10.1097/01.NAJ.0000520240.29643.e2
  13. Ho, S. Y. (2009). Structure and anatomy of the aortic root. European Journal of Echocardiography, 10(1), 3–10. https://doi.org/10.1093/ejechocard/jen243
  14. Kanwar, A., Thaden, J. J., & Nkomo, V. T. (2018). Management of Patients With Aortic Valve Stenosis. Mayo Clinic Proceedings, 93(4), 488–508. https://doi.org/10.1016/j.mayocp.2018.01.020
  15. Kapadia, S., Agarwal, S., Miller, D. C., Webb, J. G., MacK, M., Ellis, S., … Leon, M. B. (2016). Insights into Timing, Risk Factors, and Outcomes of Stroke and Transient Ischemic Attack after Transcatheter Aortic Valve Replacement in the PARTNER Trial (Placement of Aortic Transcatheter Valves). Circulation: Cardiovascular Interventions, 9(9), 1–10. https://doi.org/10.1161/CIRCINTERVENTIONS.115.002981
  16. Kar, B., Zhao, Y., Smalling, R., Balan, P., Hadidi, O., Ocazionez, D., … Ekeruo, I. A. (2017). Predicting Risk Factors for Permanent Pacemaker Placement Following Transcatheter Aortic Valve Replacement: a Uthealth Experience. Journal of the American College of Cardiology, 69(11), 1246. https://doi.org/10.1016/s0735-1097(17)34635-1
  17. Kibler, M., Marchandot, B., Messas, N., Labreuche, J., Vincent, F., Grunebaum, L., … Morel, O. (2018). Primary Hemostatic Disorders and Late Major Bleeding After Transcatheter Aortic Valve Replacement. Journal of the American College of Cardiology, 72(18), 2139–2148. https://doi.org/10.1016/j.jacc.2018.08.2143
  18. Kovacs, R. J., Halperin, J. L., Stevenson, W. G., Otto, C. M., Brindis, R. G., Bozkurt, B., … Ohman, E. M. (2014). 2014 AHA/ACC guideline for the management of patients with valvular heart disease. The Journal of Thoracic and Cardiovascular Surgery, 148(1), e1–e132. https://doi.org/10.1016/j.jtcvs.2014.05.014
  19. Le Tourneau, T., Jude, B., Vincentelli, A., Bauters, A., Juthier, F., Decoene, C., … Six, I. (2003). Acquired von Willebrand Syndrome in Aortic Stenosis. New England Journal of Medicine, 349(4), 343–349. https://doi.org/10.1056/nejmoa022831
  20. Mixon, T. A., & Dehmer, G. J. (2019). 45 – Aortic Valve Disease. Netter’s Cardiology (Third Edit). Elsevier Inc. https://doi.org/10.1016/B978-0-323-54726-0.00045-5
  21. Nicoara, A., Martin, R., Kapadia, S., Hahn, R. T., & Svensson, L. (2017). Echocardiographic Imaging for Transcatheter Aortic Valve Replacement. Journal of the American Society of Echocardiography, 31(4), 405–433. https://doi.org/10.1016/j.echo.2017.10.022
  22. Nitya Nand Kumar, M. P. N. (2015). Valvular Aortic Stenosis: An Update. Journal of Vascular Medicine and Surgery, 03(02), 2–5. https://doi.org/10.4172/2329-6925.1000195
  23. Osnabrugge, R. L. J., Mylotte, D., Head, S. J., Van Mieghem, N. M., Nkomo, V. T., Lereun, C. M., … Kappetein, A. P. (2013). Aortic stenosis in the elderly: Disease prevalence and number of candidates for transcatheter aortic valve replacement: A meta-analysis and modeling study. Journal of the American College of Cardiology, 62(11), 1002–1012. https://doi.org/10.1016/j.jacc.2013.05.015
  24. OpenStax, Anatomy and Physiology. OpenStax CNX. Feb 12, 2019 http://cnx.org/contents/[email protected]
  25. Perriello, B. (2019). Boston Scientific confirms Lotus valve off the market until 2019.
  26. Perrin, N., Ellenberger, C., Licker, M., Hachulla, A. L., Cikirikcioglu, M., Frei, A., … Noble, S. (2015). Management of vascular complications following transcatheter aortic valve implantation. Archives of Cardiovascular Diseases, 108(10), 491–501. https://doi.org/10.1016/j.acvd.2015.03.007
  27. Pichard, A. D., Brown, D. L., Fearon, W. F., Kapadia, S., Hodson, R. W., Miller, D. C., … Mack, M. J. (2016). Transcatheter or Surgical Aortic-Valve Replacement in Intermediate-Risk Patients. New England Journal of Medicine, 374(17), 1609–1620. https://doi.org/10.1056/nejmoa1514616
  28. Rader, F., Sachdev, E., Arsanjani, R., & Siegel, R. J. (2015). Left ventricular hypertrophy in valvular aortic stenosis: Mechanisms and clinical implications. American Journal of Medicine, 128(4), 344–352. https://doi.org/10.1016/j.amjmed.2014.10.054
  29. Reardon, M. J., Van Mieghem, N. M., Popma, J. J., Kleiman, N. S., Søndergaard, L., Mumtaz, M., … Kappetein, A. P. (2017). Surgical or Transcatheter Aortic-Valve Replacement in Intermediate-Risk Patients. New England Journal of Medicine, 376(14), 1321–1331. https://doi.org/10.1056/NEJMoa1700456
  30. Ruiz, C. E., Alexander, K. P., Desai, M. Y., Kumbhani, D. J., Lee, J. C., Kaul, S., … Vassileva, C. M. (2017). 2017 ACC Expert Consensus Decision Pathway for Transcatheter Aortic Valve Replacement in the Management of Adults With Aortic Stenosis. Journal of the American College of Cardiology, 69(10), 1313–1346. https://doi.org/10.1016/j.jacc.2016.12.006
  31. Sinning, J. M., Ghanem, A., Steinhuser, H., Adenauer, V., Hammerstingl, C., Nickenig, G., & Werner, N. (2010). Renal function as predictor of mortality in patients after percutaneous transcatheter aortic valve implantation. JACC: Cardiovascular Interventions, 3(11), 1141–1149. https://doi.org/10.1016/j.jcin.2010.09.009
  32. Steinberg, B. A., Harrison, J. K., Frazier-Mills, C., Hughes, G. C., & Piccini, J. P. (2012). Cardiac conduction system disease after transcatheter aortic valve replacement. American Heart Journal, 164(5), 664–671. https://doi.org/10.1016/j.ahj.2012.07.028
  33. Stortecky, S., Wenaweser, P., Diehm, N., Pilgrim, T., Huber, C., Rosskopf, A. B., … Windecker, S. (2012). Percutaneous management of vascular complications in patients undergoing transcatheter aortic valve implantation. JACC: Cardiovascular Interventions, 5(5), 515–524. https://doi.org/10.1016/j.jcin.2012.01.021
  34. Takahashi, M., Mouillet, G., Deballon, R., Sudre, A., Lellouche, N., Lim, P., … Teiger, E. (2017). Impact of QRS Duration on Decision of Early Removal of Pacing Catheter After Transcatheter Aortic Valve Replacement With CoreValve Device. American Journal of Cardiology, 120(5), 838–843. https://doi.org/10.1016/j.amjcard.2017.05.050
  35. Townsend, T. (2015). Aortic stenosis. Nursing Critical Care, 10(1), 15–17. https://doi.org/http://dx.doi.org/10.1097/01.CCN.0000457314.79995.1c
  36. Wang, N., & Phan, K. (2018). Cerebral protection devices in transcatheter aortic valve replacement: A clinical meta-analysis of randomized controlled trials. Journal of Thoracic Disease, 10(3), 1927–1935. https://doi.org/10.21037/jtd.2018.01.151
Liver Transplant Nursing Care
  1. Farkas, S., Hackl, C., & Jurgen Schlitt, H. (2014). Overview of the indications and contraindications for liver transplantation [Journal]. Cold Spring Harbor Perspectives in Medicine, 4, 1-12. http://dx.doi.org/10.1101/cshperspect.a015602
  2. The Stages of Liver Disease. (n.d.). Retrieved February 12, 2019, from https://liverfoundation.org/for-patients/about-the-liver/the-progression-of-liver-disease/#1503432933768-040e8645-d918
  3. Watson, S. (2017, December 19). Understanding hepatitis C from diagnosis to stage 4. Retrieved February 12, 2019, from https://www.healthline.com/health/stage-4-hepatitis-c#acute-hepatitis-c
  4. Cunha, J. P. (n.d.). What Is Cirrhosis of the Liver? Symptoms, Treatment & Stages. Retrieved February 12, 2019, from https://www.medicinenet.com/cirrhosis/article.htm
  5. Martin, P., DeMartini, A., Feng, S., Brown Jr, R., & Fallon, M. (2014). Evaluation for liver transplantation in adults: 2013 practice guideline by the American Association for the Study of Liver Diseases and the American Society of Transplantation [Practice Guideline]. Clinical Journal of the American Association for the Study of Liver Diseases, 59(3). http://dx.doi.org/10.1002/hep.26972
  6. Martin, P., DiMartini, A., Feng, S., Brown, R., Jr., & Fallon, M. (2013). Evaluation for liver transplantation in adults: 2013 practice guidelines by the AASLD and the American Society of Transplantation. AASLD Practice Guideline,1-98. Retrieved February 9, 2019, from https://www.aasld.org/sites/default/files/guideline_documents/141020_Guideline_Evaluation_Adult_LT_4UFb_2015.pdf
  7. Berg, C. L. (2016). Liver transplantation in 2016: An update [Invited Commentary]. NC Medical Journal, 77(3), 194-197. Retrieved from http://www.ncmedicaljournal.com/
  8. The Four Classes of Hep C Treatment DAAs. (2017, September 21). Retrieved February 13, 2019, from http://www.hepctip.ca/daas/
  9. Andrews, M. (2017, October 04). FDA’s Approval Of A Cheaper Drug For Hepatitis C Will Likely Expand Treatment. Retrieved February 13, 2019, from https://www.npr.org/sections/health-shots/2017/10/04/555156577/fdas-approval-of-a-cheaper-drug-for-hepatitis-c-will-likely-expand-treatment
  10. Harvoni (ledipasvir and sofosbuvir) | Hepatitis C TIP | PHCN. (n.d.). Retrieved February 13, 2019, from http://www.hepctip.ca/harvoni-ledipasvir-and-sofosbuvir/
  11. Liver transplants. (2016). Retrieved from http://emedicine.medscape.com/article/776313-overview
  12. Bambha, K., & Kamath, P. S. (2016). Model for end-stage liver disease (MELD). Retrieved from https://www.uptodate.com/contents/model-for-end-stage-liver-disease-meld#H16431598
  13. Questions and answers for transplant candidates about liver allocation. (2017). Retrieved from http://www.unos.org/wp-content/uploads/unos/Liver_patient.pdf
  14. Martin, P., DeMartini, A., Feng, S., Brown Jr, R., & Fallon, M. (2014). Evaluation for liver transplantation in adults: 2013 practice guideline by the American Association for the Study of Liver Diseases and the American Society of Transplantation [Practice Guideline]. Clinical Journal of the American Association for the Study of Liver Diseases, 59(3). http://dx.doi.org/10.1002/hep.26972
  15. Arvelakis, A., & Shapiro, R. (2013). Living donor hepatectomy. Retrieved from http://emedicine.medscape.com/article/1830182-overview#a4
  16. Berg, C. L., Gillespie, B., Merion, R. M., Brown, R. S., Abecassis, M. M., Trotter, J. F., … Everhart, J. E. (2007). Improvement in survival associated with adult-to-adult living donor liver transplantation [Entire issue]. Gastroenterology.
  17. Glass, M., Smola, S., Pfuhl, T., Pokorny, J., Bohle, R. M., Bücker, A., . . . Volk, T. (2012, September 16). Fatal Multiorgan Failure Associated with Disseminated Herpes Simplex Virus-1 Infection: A Case Report. Retrieved February 13, 2019, from https://www.hindawi.com/journals/cricc/2012/359360/
  18. Cotler, S. J. (2017). Living donor liver transplantation. Retrieved from https://www.uptodate.com/contents/living-donor-liver-transplantation
  19. Sun, Z., Yu, Z., Yu, S., Chen, J., Wang, J., Yang, C., … Zhang, M. (2015). Post-operative complications in living liver donors: A single-center experience in China. PLoS One, 10(8). http://dx.doi.org/10.1371/journal.pone.0135557
  20. Tebas, P. (2015). Solid organ transplantation in HIV-infected individuals. Retrieved from https://www.uptodate.com/contents/solid-organ-transplantation-in-hiv-infected-individuals#H1
  21. Dove, L., & Brown, R. S. (2015). Liver transplantation in adults: Patient selection and pretransplantation evaluation. Retrieved from https://www.uptodate.com/contents/liver-transplantation-in-adults-patient-selection-and-pretransplantation-evaluation?source=see_link&sectionName=CONTRAINDICATIONS&anchor=H5#H5
  22. Razonable, R. R., Findlay, J. Y., O’Riordan, A., Burroughs, S. G., Ghobrial, R. M., Agarwal, B., … Gropper, M. (2011). Critical care issues in patients after liver transplantation [Review]. Liver Transplantation, 17, 511-527. http://dx.doi.org/10.1002/lt
  23. Feltracco, P., Barbieri, S., Galligioni, H., Michieletto, E., Carollo, C., & Ori, C. (2011). Intensive care management of liver transplanted patients. World Journal of Hepatology, 3, 61-71. http://dx.doi.org/10.4254/wjh.v3.i3.61
  24. Kim, W. R., Lake, J. R., Smith, J. M., Skeans, M. A., Schladt, D. P., Edwards, E. B., . . . Kasiske, B. L. (2018). OPTN/SRTR 2013 Annual Data Report: Liver. American Journal of Transplantation,15(S2), 1-28. doi:10.1111/ajt.13197
Effective Communication In Nursing
  1. Dictionary by Merriam-Webster: America’s most-trusted online dictionary. (n.d.). Retrieved February 22, 2021, from https://www.merriam-webster.com/ 
  2. Effects of poor communication in healthcare. (n.d.). Retrieved February 22, 2021, from https://www.hipaajournal.com/effects-of-poor-communication-in-healthcare/?amp 
Alzheimer’s Nursing Care
  1. Alzheimer’s disease fact sheet. (n.d.). Retrieved February 10, 2021, from https://www.nia.nih.gov/health/alzheimers-disease-fact-sheet 
  2. Preventing Alzheimer’s disease: What do we know? (n.d.). Retrieved February 10, 2021, from https://www.nia.nih.gov/health/preventing-alzheimers-disease-what-do-we-know 
  3. How is Alzheimer’s disease treated? (n.d.). Retrieved February 10, 2021, from https://www.nia.nih.gov/health/how-alzheimers-disease-treated 
  4. Behavior changes and communication in Alzheimer’s. (n.d.). Retrieved February 10, 2021, from https://www.nia.nih.gov/health/topics/behavior-changes-and-communication-alzheimers 
  5. How is Alzheimer’s disease diagnosed? (n.d.). Retrieved February 10, 2021, from https://www.nia.nih.gov/health/how-alzheimers-disease-diagnosed 
Disclaimer:

Use of Course Content. The courses provided by NCC are based on industry knowledge and input from professional nurses, experts, practitioners, and other individuals and institutions. The information presented in this course is intended solely for the use of healthcare professionals taking this course, for credit, from NCC. The information is designed to assist healthcare professionals, including nurses, in addressing issues associated with healthcare. The information provided in this course is general in nature and is not designed to address any specific situation. This publication in no way absolves facilities of their responsibility for the appropriate orientation of healthcare professionals. Hospitals or other organizations using this publication as a part of their own orientation processes should review the contents of this publication to ensure accuracy and compliance before using this publication. Knowledge, procedures or insight gained from the Student in the course of taking classes provided by NCC may be used at the Student’s discretion during their course of work or otherwise in a professional capacity. The Student understands and agrees that NCC shall not be held liable for any acts, errors, advice or omissions provided by the Student based on knowledge or advice acquired by NCC. The Student is solely responsible for his/her own actions, even if information and/or education was acquired from a NCC course pertaining to that action or actions. By clicking “complete” you are agreeing to these terms of use.

Complete Survey

Give us your thoughts and feedback

Click Complete

To receive your certificate


Want to earn credit for this course? Sign up (new users) or Log in (existing users) to complete this course for credit and receive your certificate instantly.